Table of Contents
Independent Axis ("AxisPlus")

The AxisPlus settings window allows the user to utilize an additional independent axis using a myCNC controller to our software. Such an additional axis can be controlled simultaneously with (and independently of) the main program - this includes manual movements, MPG control and positioning instructions from within PLC commands.
This functionality useful for applications such as grinding machines, laser cutting (to have a Z-axis with tracking and positioning simultaneous with regular program execution), oxy-fuel cutting (piercing operations with simultaneous XY movement), and others.
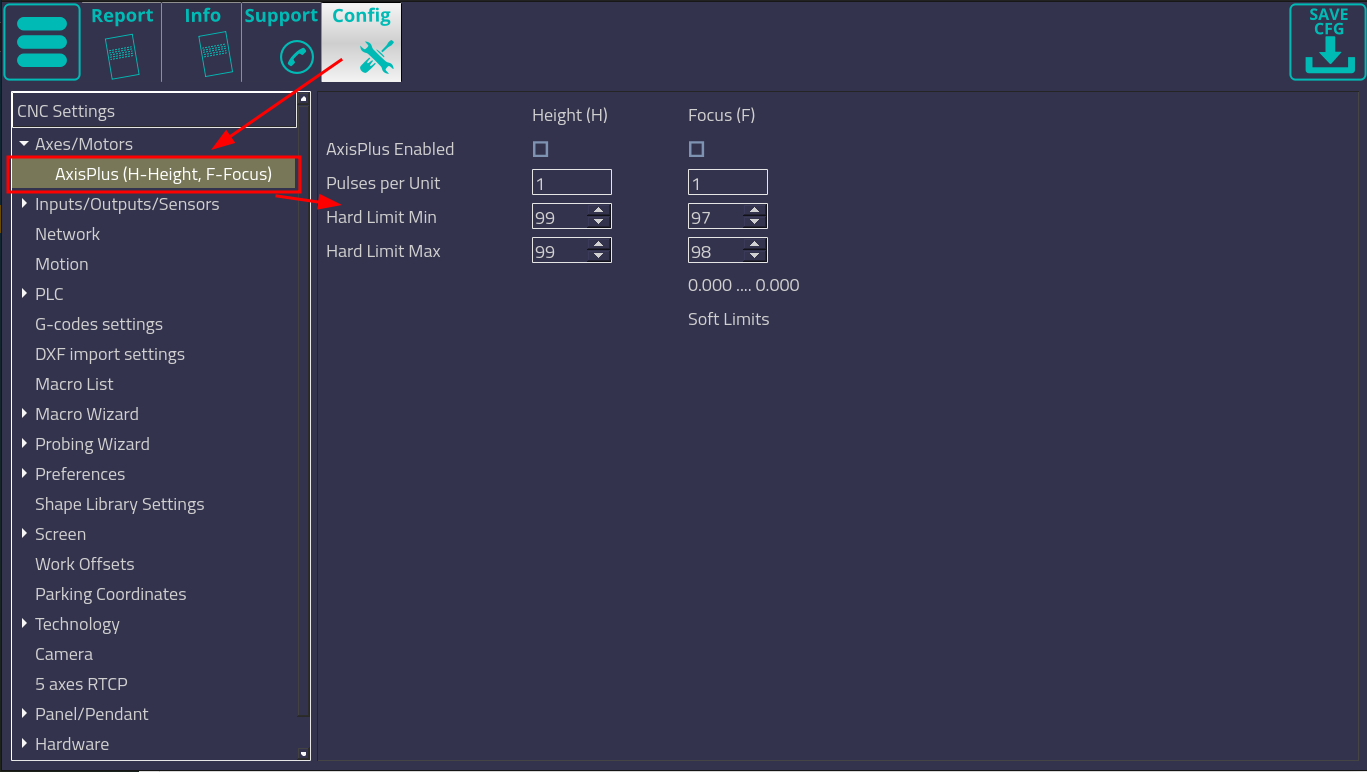
AxisPlus settings for the Height and Focus axes are available in Settings > Config > Axes/Motors > AxisPlus:
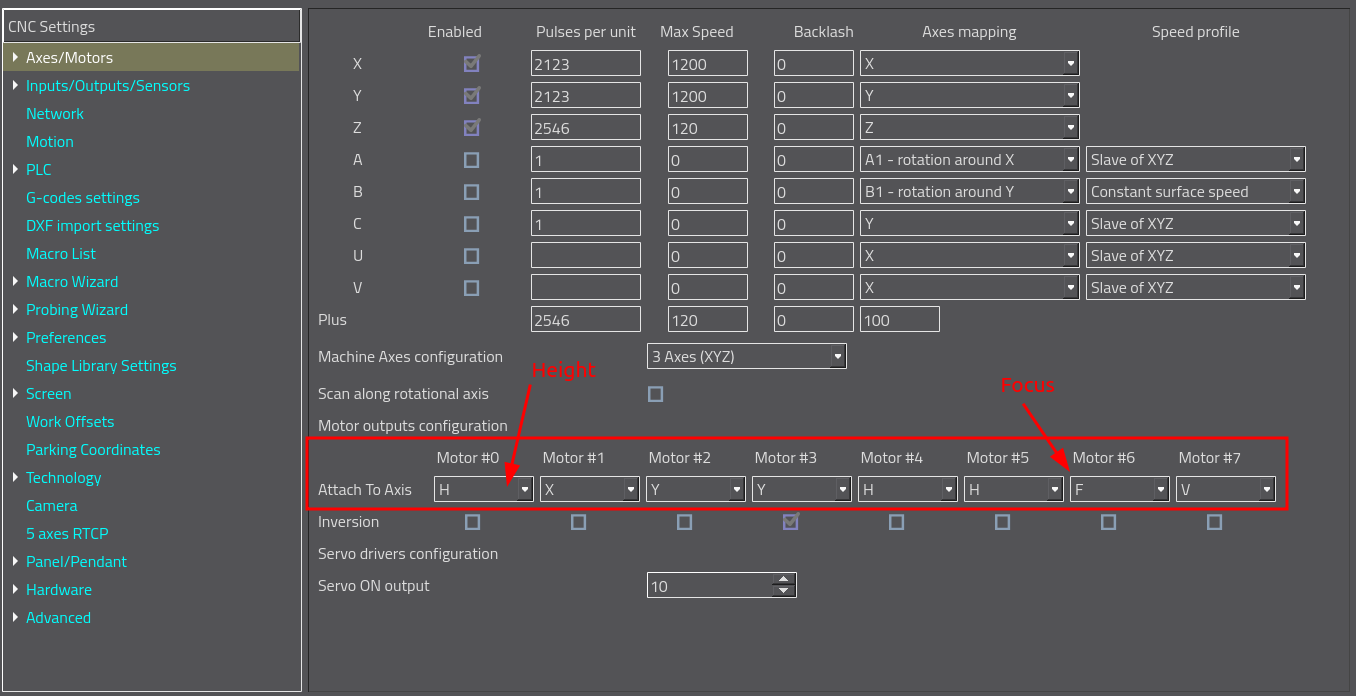
Motors for axis H (height) and F (focus) must be attached in Settings > Config > Axes/Motors:
These settings allow the operator to:
- Enable/disable the Height (H) and Focus (F) axes
- Set the pulses-per-unit values for either axis
- Set the input port number for the hardware limits (maximum and minimum)
(Note that the above configuration is an example only, real assignments for motors/axes will likely be different depending on the specific machine and setup).
Homing
Note that after a reset has been performed, the soft limits are activated to the be equal to the current position. This is done to prevent movement in any direction for safety reasons. The software limit lock can be released by utilizing register 8522 (described in the table below). The recommended way to release the software limit lock is by running the homing procedure.
The code below is for M133 Automatic Z-axis Homing procedure:
- M133.plc
#include pins.h

main()
{
  gvarset(5521,1); //Ignore Hard Limits
  gvarset(8522,999999); //Reset Soft Limits

  gvarset(5539,1);

  speed=gvarget(8044); //IHC_SPEED
  p=gvarget(8045);	//SLOW_SPEED
  slow_speed=speed*p/100;

  gvarset(8341,speed); //Set Jog Speed
  gvarset(8342,20);       //Set Jog Acceleration time 20ms = 0.02s

  gvarset(8340,1);	//Jog Z+
  do  {  sens=portget(INPUT_HOME_Z);  }while(sens==0); //move up till pressed

  speed=speed>>2;
  gvarset(8341,speed);  //Set Jog Speed
  gvarset(8342,20);        //Set Jog Acceleration time
  gvarset(8340,0-1);      //Jog Z-, Slow speed
  do {  sens=portget(INPUT_HOME_Z);  }while(sens!=0); //move down till released

  gvarset(8340,0); //stop
  timer=60;do{timer--;}while(timer>0);

  gvarset(8523,0); //AxisPlus Set MAX POS
  timer=2;do{timer--;}while(timer>0);
  gvarset(8522,0); //Set WORK ZERO(0)
  timer=2;do{timer--;}while(timer>0);
  gvarset(8524,0-5750); //AxisPlus Set MIN POS
  timer=2;do{timer--;}while(timer>0);

  exit(99);
};
The code below shows the M143 (Manual Z-axis Homing) procedure:
- M143.plc
main()
{
  if (eparam==0)
  {
    gvarset(5521,1); //Ignore Hard Limits
    gvarset(8523,0); //AxisPlus Set MAX POS
    timer=2;do{timer--;}while(timer>0);
    gvarset(8524,0-5750); //AxisPlus Set MIN POS

    exit(99);
  };


  gvarset(5521,1); //Ignore Hard Limits
  gvarset(8523,0); //AxisPlus Set MAX POS
  timer=2;do{timer--;}while(timer>0);
  gvarset(8524,0-5750); //AxisPlus Set MIN POS
  timer=2;do{timer--;}while(timer>0);
  gvarset(8522,999999); //Reset Soft Limits (RELEASE Z AXIS)

  exit(99);

};
Hardware Pendant settings window
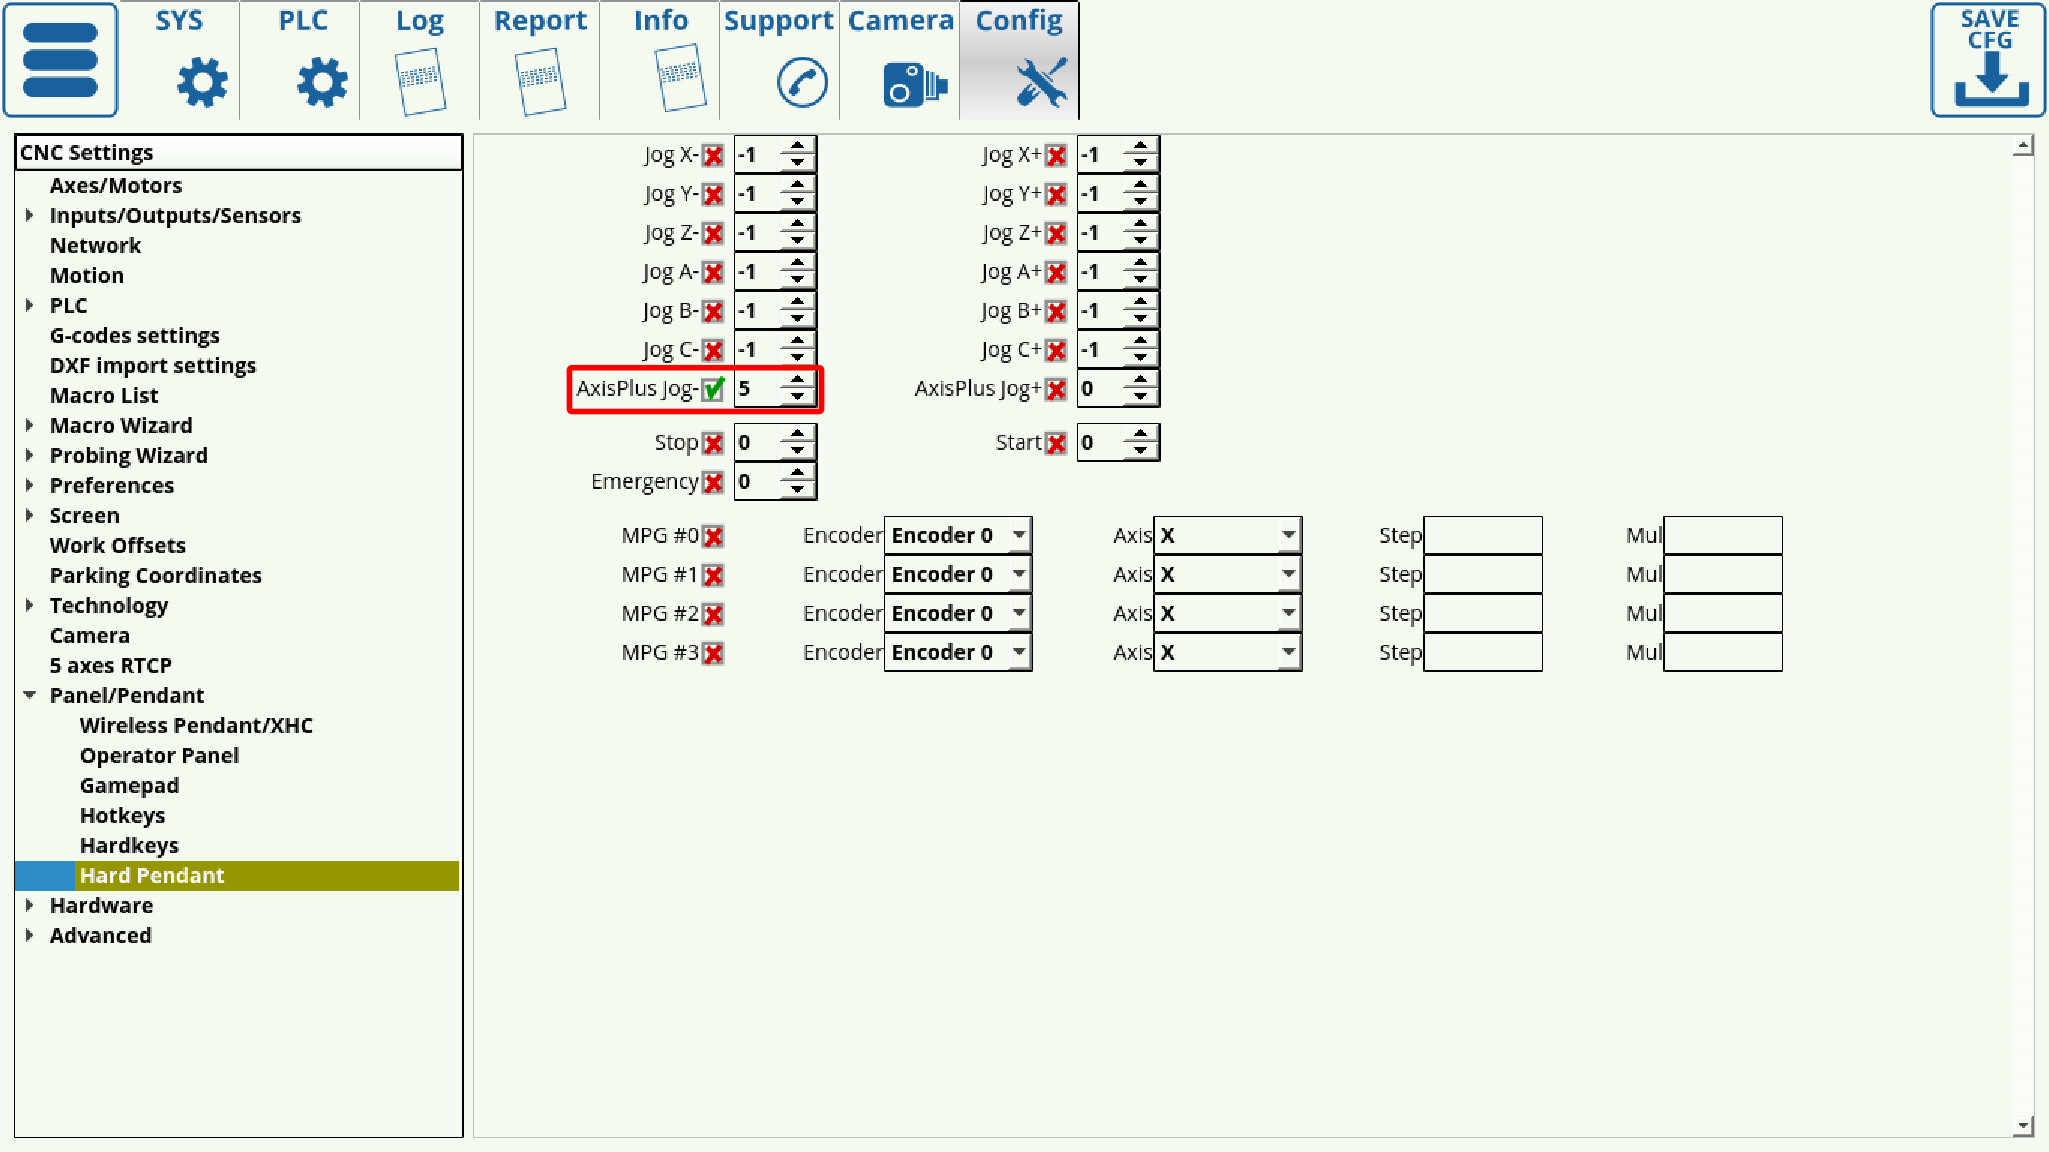
Independent axis control can be enabled via the Hard Pendant settings window (as of myCNC v.1.88.4494).

For this reason, it's not recommended to utilize the inputs specified in the Hard Pendant settings window for other additional purposes to avoid conflicts.
To enable:
- Set the check mark next to AxisPlus Jog to ON
- Select the input port number for the pendant button. Select
-1if no port is used.
To set the speed and acceleration for the independent axis, first head into Settings > Config > Axes/Motors > AxisPlus:
The units used are based on AxisPlus setting. Changing speed is done via writing to global variable 8341 (as shown in the code examples below). Instead of an acceleration value, an acceleration time is set in milliseconds:
gvarset(8342,100); //acceleration time 100ms = 0.1s
Jog control
| Register | Access | Description |
|---|---|---|
| 8341 | Write | Set Jog Speed, [pulses/s] |
| 8342 | Write | Set Jog Acceleration, [1000* pulses/s2] |
| 8340 | Write | Start/Stop Jog “ 1” - Jog in positive direction “-1” - Jog in negative direction “ 0” - Jog Stop |
| 8343 | Write | Set Soft Limit - (Minus) |
| 8344 | Write | Set Soft Limit + (Plus) |
Position command (PLC)
| Register | Access | Description |
|---|---|---|
| 8330 | Write | Set Positioning Speed, [pulses/s] |
| 8331 | Write | Set Positioning Acceleration Time, [msec] |
| 8332 | Read | Get AxisPlus State reading this register returns current state of the AxisPlus controller “0” - Idle state “1” - Positioning in action |
Set Coordinate (PLC)
| Register | Access | Description |
|---|---|---|
| 9717 | Write | Set Machine coordinate for AxisPlus, [pulses] |
Other Global Variables
| GVAR_CURRENT_AXPLUS_POSITION | 5036 | Current AxisPlus position coordinate |
| GVAR_CURRENT_FOCUS_POSITION | 5037 | Current Focus axis position coordinate |
| GVAR_FOCUS_STEP_PER_UNIT | 8491 | Step per unit value for the independent Focus axis |
| GVAR_FOCUS_G0_SPEED | 8492 | Focus axis - G0 speed |
| GVAR_FOCUS_G0_TIME | 8493 | |
| GVAR_FOCUS_MSPEED | 8494 | Jog (manual) speed |
| GVAR_FOCUS_MTIME | 8495 | Time to accelerate to jog (manual) speed, in ms |
| GVAR_FOCUS_SOFTMINUS | 8496 | |
| GVAR_FOCUS_SOFTPLUS | 8497 | |
| GVAR_FOCUS_JOG | 8498 | |
| GVAR_FOCUS_G0_STATE | 8499 | |
| GVAR_FOCUS_SET_ZERO | 8502 | |
| GVAR_FOCUS_SET_MAX_POS | 8503 | |
| GVAR_FOCUS_SET_MIN_POS | 8504 | |
| GVAR_FOCUS_HARDLIMITS | 8505 | |
| GVAR_AXPLUS_STEP_PER_UNIT | 8511 | |
| GVAR_AXPLUS_WPOSITION | 8514 | Get work position |
| GVAR_FOCUS_POSITION | 8515 | |
| GVAR_AXPLUS_LIFT | 8516 | |
| GVAR_FOCUS_LIFT | 8517 | |
| GVAR_AXPLUS_STOP | 8518 | |
| GVAR_FOCUS_STOP | 8519 | |
| GVAR_AXPLUS_SET_ZERO | 8522 | Writing 999999 to this register will reset the soft limits. Otherwise this allows to set a coordinate to a given value (in units of 1000 >1.000) |
| GVAR_AXPLUS_SET_MAX_POS | 8523 | If the value of this register is equal to zero, then current position is taken as the maximum position for the axis |
| GVAR_AXPLUS_SET_MIN_POS | 8524 | If the value of this register is equal to zero, then current position is taken as the minimum position for the axis |
| GVAR_AXPLUS_HARDLIMITS | 8525 | |
| GVAR_AXPLUS_MPOSITION | 8526 | Get machine position |
| GVAR_AXPLUS_JOGSPEED | 8060 | AxisPlus Jog Speed for the on-screen elements (as well as Page up/down button motion, pendant motion, etc) |
| GVAR_AXPLUS_DRO_SPEED | 8701 | AxisPlus speed display |
| GVAR_AXPLUS_DRO_DIR | 8702 | AxisPlus movement direction (1 for positive, -1 for negative, 0 for stationary). Can be used for LED indicators. |
| GVAR_FOCUS_DRO_SPEED | 8711 | Focus axis speed display |
| GVAR_FOCUS_DRO_DIR | 8712 | Focus axis movement direction (1 for positive, -1 for negative, 0 for stationary). Can be used for LED indicators. |
A procedure “g0moveA()” is used to run AxisPlus positioning. A mask “0x1000” is used for AxisPlus
Code Example
 gvarset(8330,40000);  //G0PLUS SPEED - 40kHz pulses
 gvarset(8331,500);    //G0Plus Time (Acceleration) - 0.5sec acceleration time

 g0moveA(0x0,0x1000,8000);           //Axis Plus - move 8000 pulses
 do{ a=gvarget(8332); }while(a!=0);  //Wait in a loop till motion is finished

 g0moveA(0x0,0x1000,0-8000);         //Axis Plus - move 8000 pulses in negative direction
 do{ a=gvarget(8332); }while(a!=0);  //Wait in a loop till motion is finished
Motion can be done via the global variable #8340, like in the following code:
jog_plus()
{
 gvarset(8342,100); //acceleration time 100ms = 0.1s
 gvarset(8341,3000); //jog speed

 gvarset(8340,1); //JOG + direction
 timer=2000;
 do {  timer--;
     if ((timer&0xff)==0)  {    gvarset(8340,1);   };
     //repeat jog command every 0.256 sec to reset WatchDog.
     //If no repeat command, jog will be stopped after about 0.8 sec
   }while(timer>0);

 gvarset(8340,0-1); //JOG - direction
 timer=2000;  do {  timer--;
 if ((timer&0xff)==0)  {    gvarset(8340,0-1);   };
 //repeat jog command every 0.256 sec to reset WatchDog.
 //If no repeat command, jog will be stopped after about 0.8 sec
   }while(timer>0);

 gvarset(8340,0);
The above code results in a 2 seconds long motion in the positive direction, which is then followed by a 2 seconds long motion in the negative direction. The axis motion is done at a speed of 3m/min with an acceleration set to be 0.1 seconds long.
Focus axis
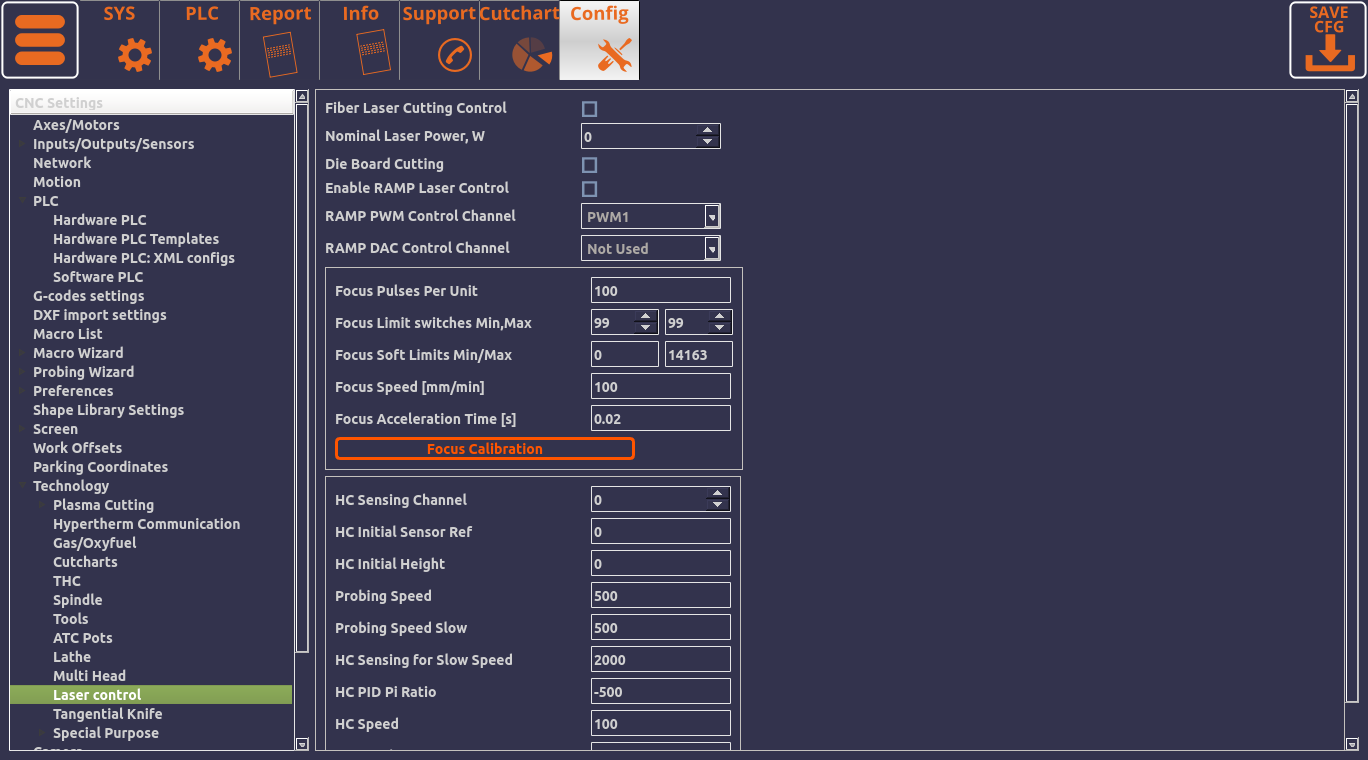
The Focus axis is similar to AxisPlus (for development purposes, the goal is to achieve parity between both of these independent axes). A number of Focus axis settings are available in the Technology → Laser Control tab:
Plasma cutting
The following settings are available for plasma cutting control in certain myCNC profiles (such as U1366P as of August 2022):
THC Control
THC control through the independent axis allows for two simultaneous THC systems to function for two different axes on the same machine. The following variables are used for THC control with the independent axis:
| 9795 | Independent axis - THC low speed percentage | |
| 9796 | Independent axis - THC OFF arc radius | |
| 9797 | Independent axis - THC max speed |
Arc control
The following variables are used for arc slow control with the independent axis:
| 9790 | Arcs slow control | |
| 7609 | Arcs slow percentage (same gvariable as for typical Arc Control) | |
| 9791 | Arcs slow diameter |
Read more about arc slow control in general here: MyCNC Configuration Dialogs - Plasma Settings
PLC Examples
M71
The M71 PLC looks the following way:
It includes the func_ihc_plus.h that is specifically designed for AxisPlus applications. That, in turn includes the following code blocks:
and
M74
The M74 (end cutting) command contains the following code:
Here, it is the do_lift_after_cut section that contains the relevant AxisPlus components:
M133
M133 also features AxisPlus functionality with the global variables listed above:
Overall, the AxisPlus/Focus axes allow for the following advantages for laser/plasma cutting setups:
- allows to simultaneously change the cutting height along with XY movement, completely independently from each other
- allows the system to perform pierce operations while moving
- allows to lift the torch up after cutting while simultaneously repositioning the system (for instance, while moving to the next part - this functionality is sometimes labeled “Frog-Mode” by other systems)
Switching between AxisPlus and regular Z-axis
The following table lists the items that need to be switched within the myCNC software and the profile to change between the regular Z-axis control and AxisPlus (for instance, on a plasma setup):
| Settings | Regular | AxisPlus |
|---|---|---|
| Config → Axes/Motors | Axes/Motors in settings - set to Z | Axes/Motors in settings - set to H |
| Homing | Uses the standard macro (described here) | Homing done via a custom PLC, regular homing macro must be DISABLED. See “Homing” section above. |
| Current Z-axis coordinate display | display-machine-pos-axis-2 | display-cnc-gvariable-5036 |


