Table of Contents
Torch Height Control (THC)
THC checkup
This article goes through the steps the user may want to take in order to set the variety of THC settings available in myCNC software to suit their Torch Height Control needs.
Initial Setup - Check the ADC channel number
Arc Voltage measured value is displayed on the myCNC main screen. Arc voltage signal should be connected to the proper ADC input number. This number can be set up in the THC configuration dialog.


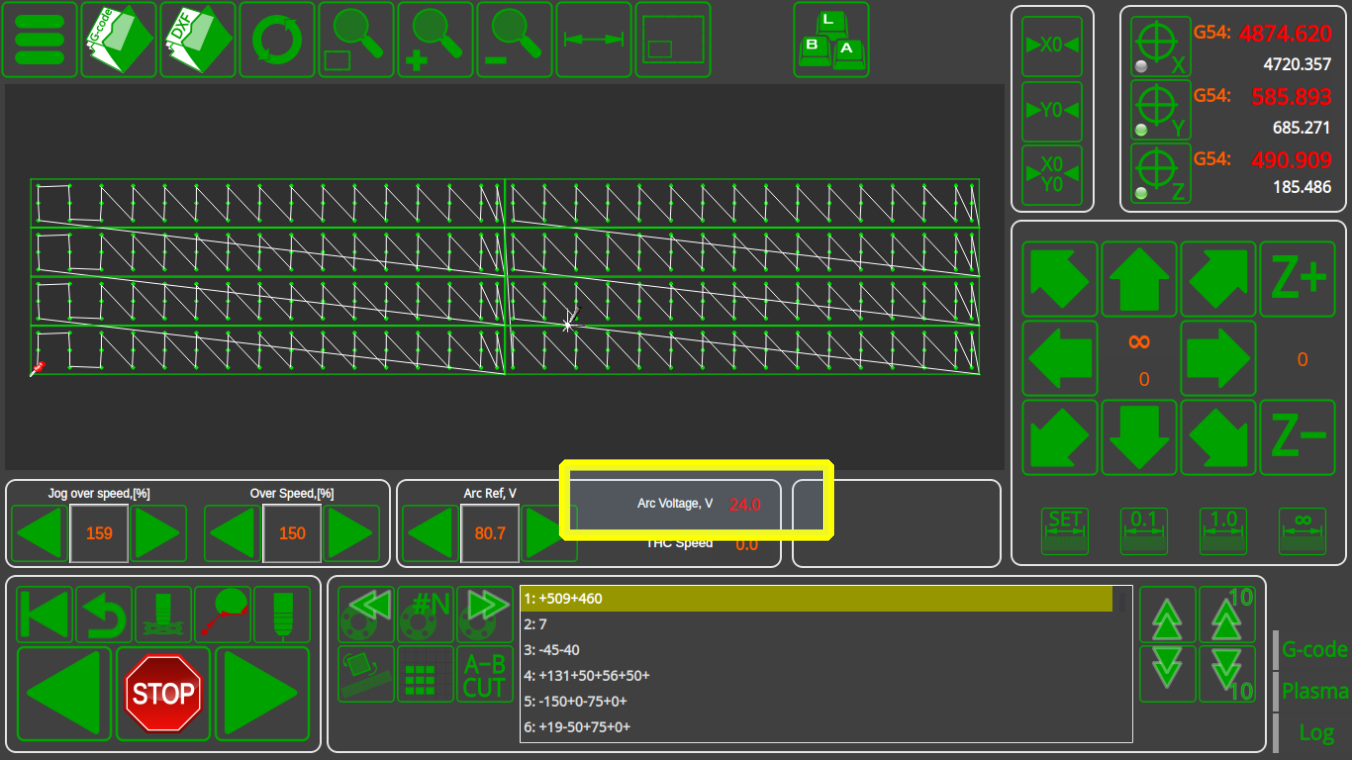
Connect the test signal (for example 24V from test power source) to the THC ADC input and check the voltage value displayed. Test signal should be connected through the Arc Voltage Divider you use (not directly to the board's ADC input).
If you don't see any voltage on the display, then:
- go to the “Diagnose” widget,
- find the ADC channel number your test signal connected to
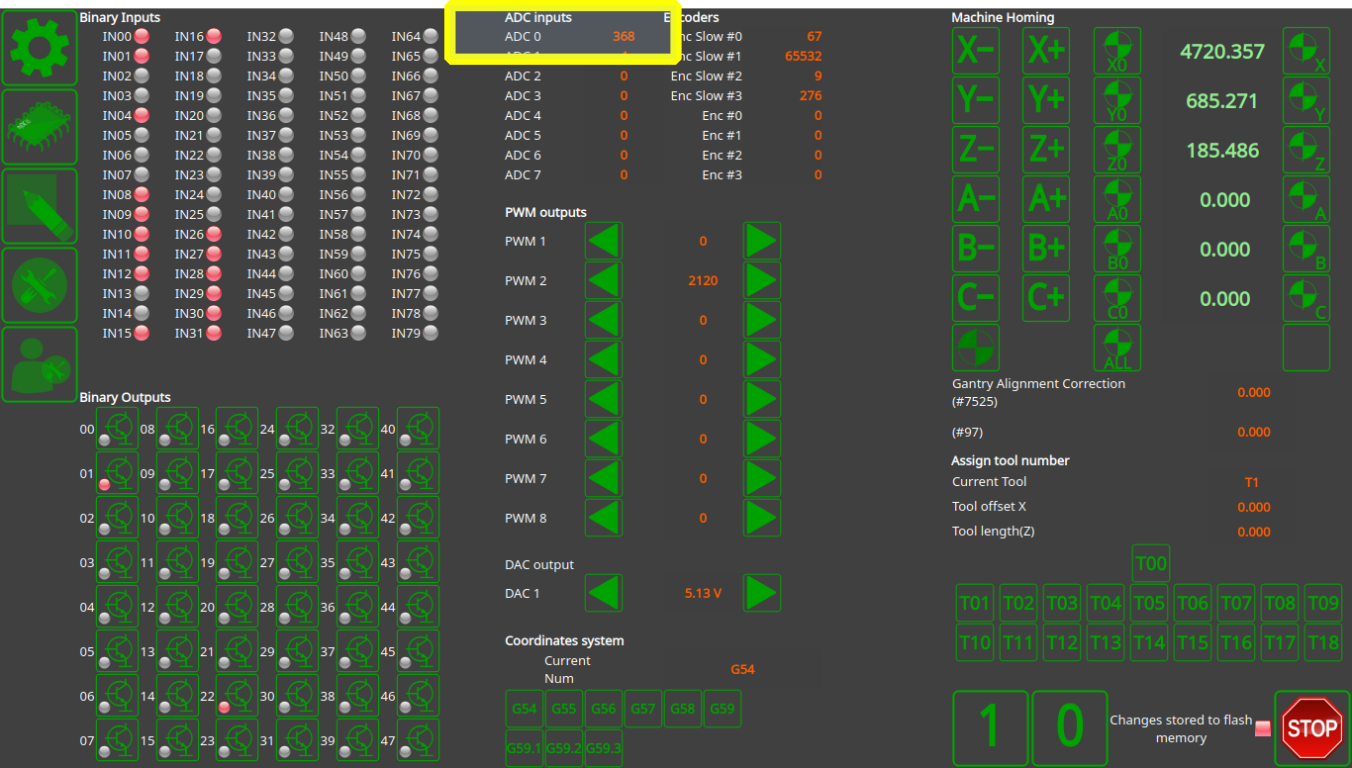
(ADC0 - channel#0 - in the example shown in the screenshot)
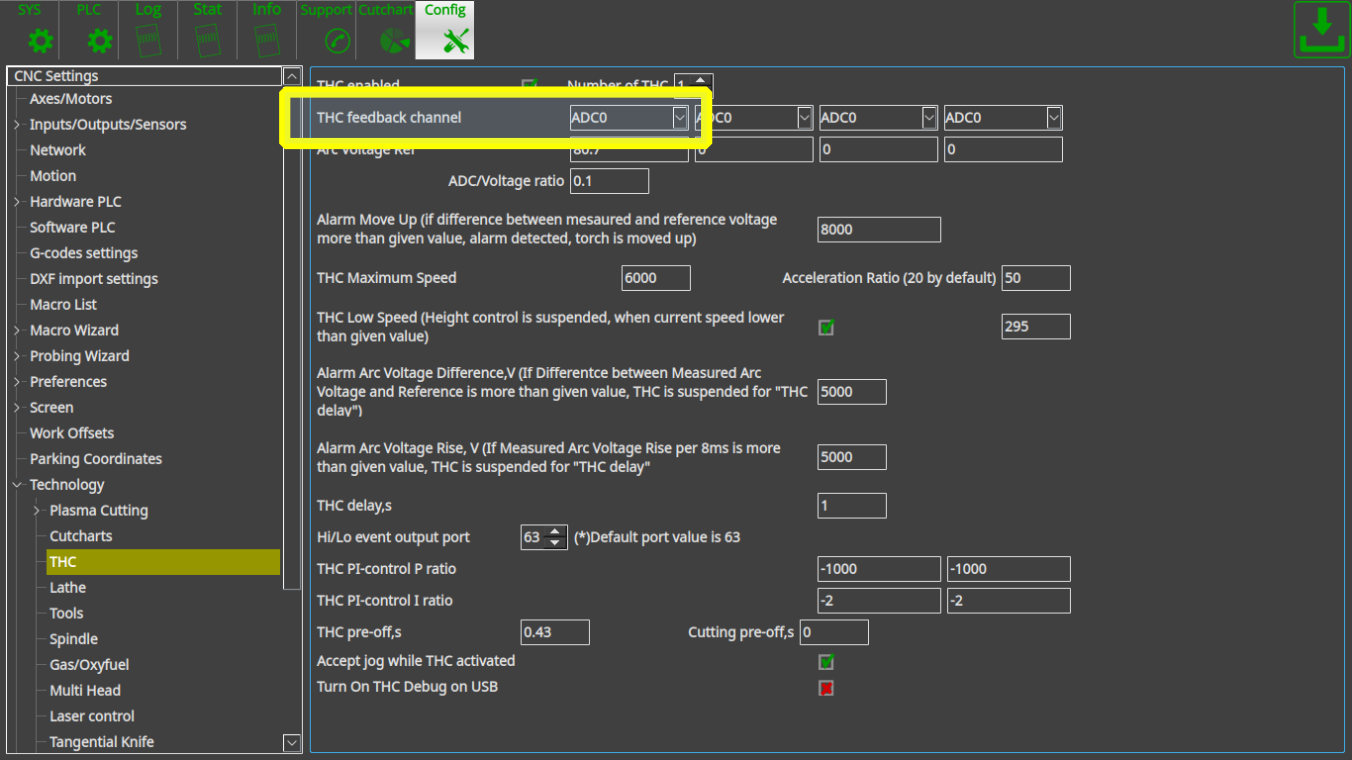
- set up this channel # as the THC feedback in the THC settings widget (THC feedback channel was changed to “ADC0”, Save button on the top-right of the screen clicked)
- go back to the main screen and check the Arc Voltage display.

Now it shows Arc Voltage. However, the value is not correct ( 36.8V instead of 24V) and the Voltage ratio should be adjusted. - go to the THC settings widget again and fix the “ADC/Voltage” ratio. The value should adjusted to
K1=24/36.8=0.6522
Current ratio is “0.1” (on the screen above), so total ratio would beK=0.1*24/36.8=0.06522
- Change the ratio to the new values, then press Save
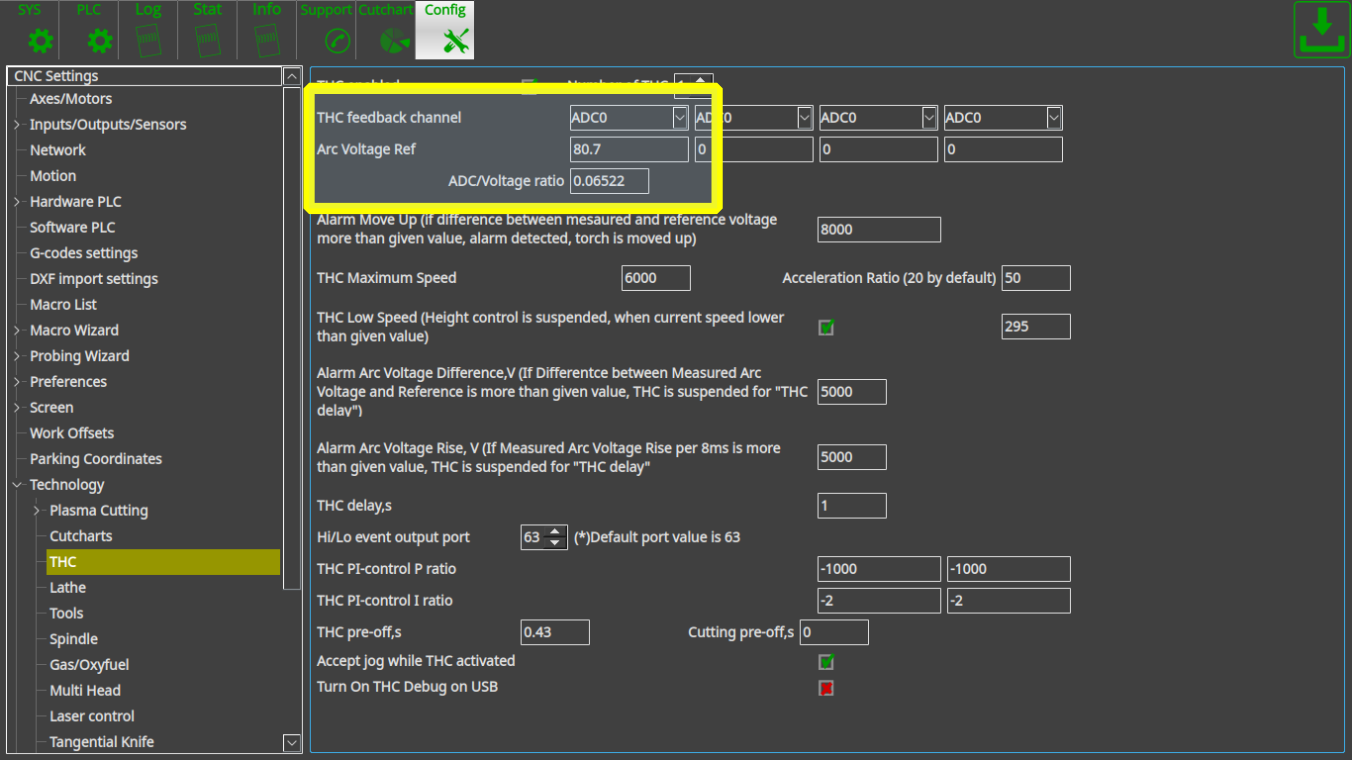
- This should result in the correct value being displayed on the main screen


Check Additional THC/PID settings
After the initial ADC setup has been completed, more granular THC settings can be adjusted. These are all located in Settings > Config > Technology > THC

The screenshot above illustrates the default values only. “Recommended” values depend on machine speed, sheet thickness, plasma power source and torch type, and thus will vary from user to user. In this manual, values that are suitable for one particular configuration will be shown.
In order to set up THC completely, follow the instructions below:
1. Select the green check mark in the THC Enabled field.

2. Select the number of THC you have in your setup (usually 1)

3. Select the feedback channel as described in the procedure above.
4. Select your reference voltage. This can be done in two ways:
- By using a value from literature (by going to the Tool Configuration window, or your manufacturer's manual tables)

OR
- By first disabling THC and bringing the plasma arc to a desirable position and then recording the reference voltage.
- Disable THC & IHC
- Set desired height from the sheet
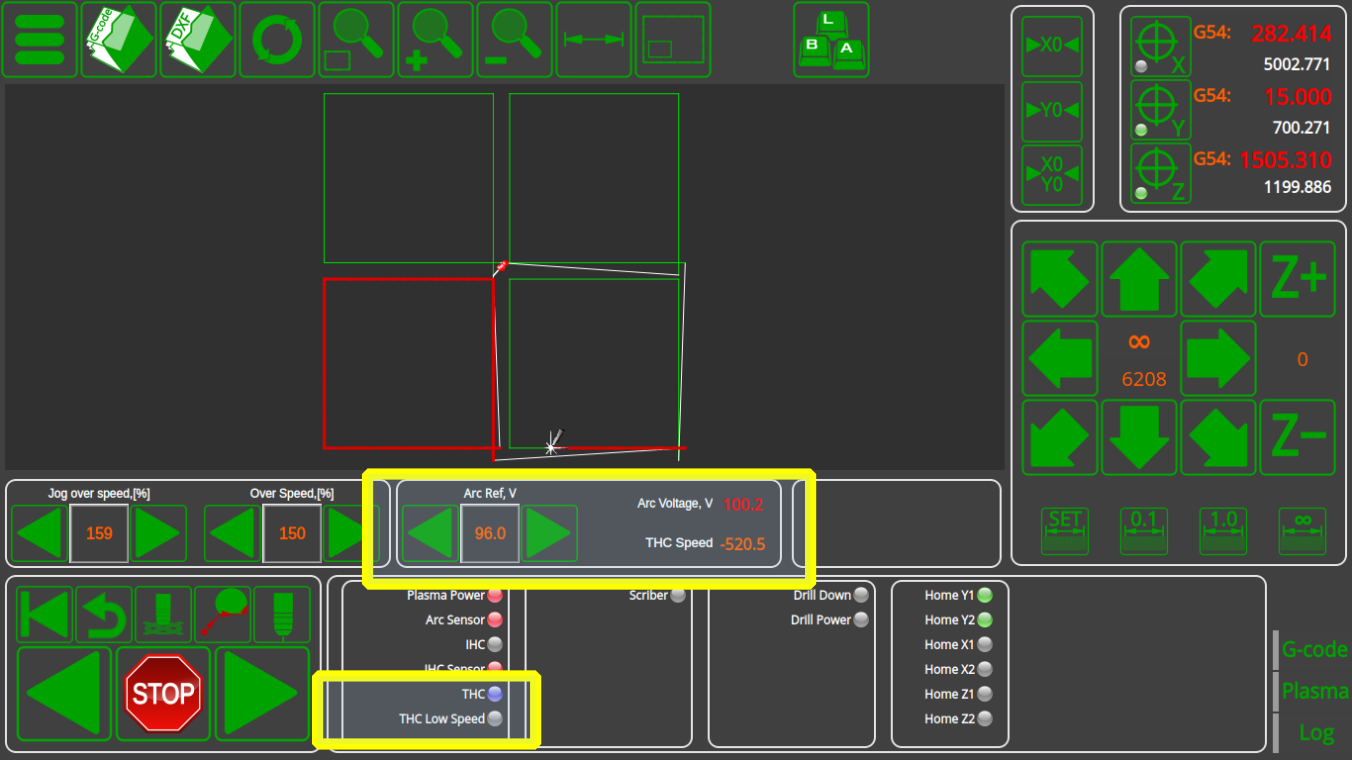
- Make a test straight cut and check Arc Voltage during the cut (it is “96V” for the setup below).
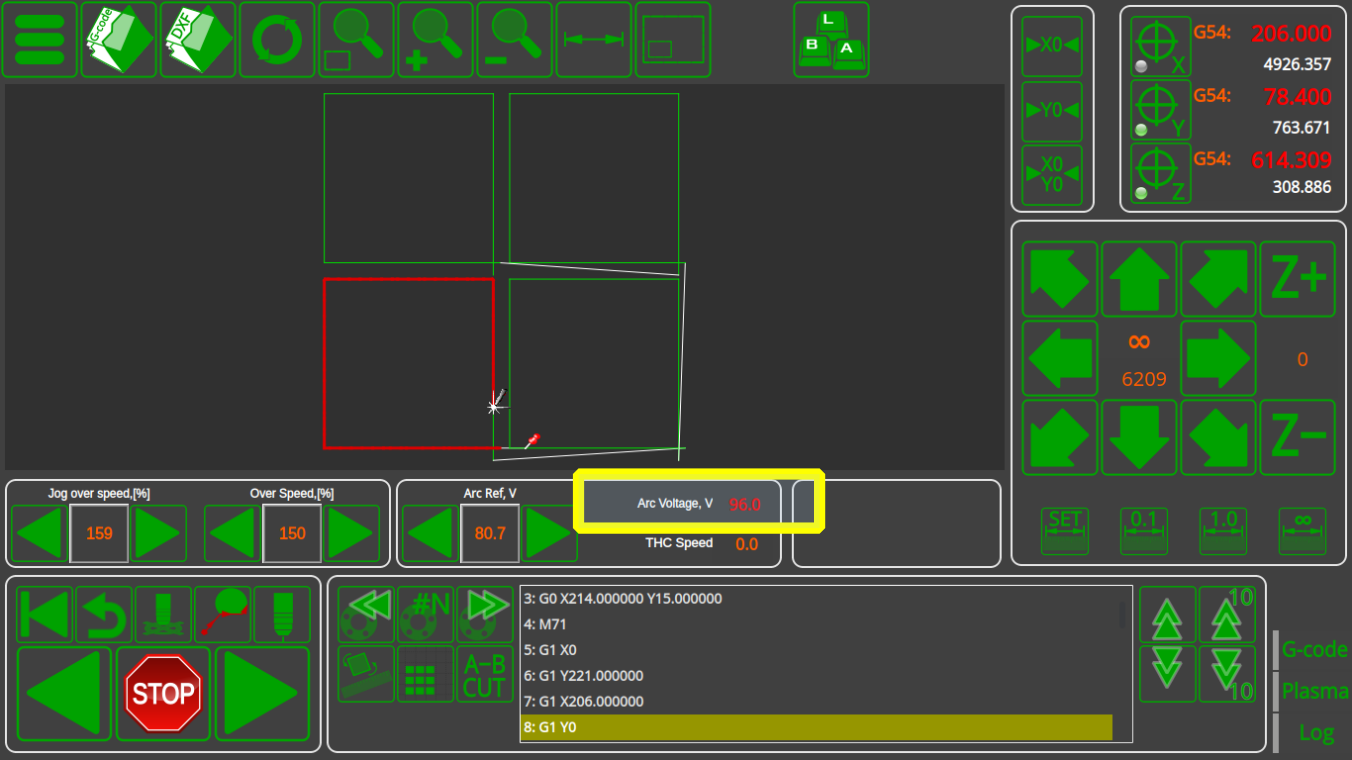

This second method is recommended for the more experienced users.
5. Select the proper ratio, as described in the Initial Setup part.

6. Set the THC Maximum Speed (usually set to be lower than the usual machine speed to make the movement slightly less erratic)

7. Set the Acceleration Ratio. It is set to be 20 by default, thus setting it to 50 as in the example below will make the acceleration ratio 2.5 larger than the default, from 100% to 250%.

8. Set the THC Low Speed, [%] of feedrate value. Whenever the speed of the machine will fall lower than this percentage of the feedrate, the possibility of the arc voltage fluctuating rises greatly. Thus, to prevent the torch from diving, the last height value before the speed goes below your THC Low Speed percentage value is taken and maintained until the speed rises back up again.
The below diagram illustrates the way THC Low Speed works. On corners (green), the speed falls below the typical Feedrate #1 (red), so it can be used to disable THC on sharp corners. Feedrate #2 (blue), which is typically different from Feedrate #1, is used for hole and arc cutting. This way, THC will still be ON at smooth corners:

Typically, a good starting point for setting up THC Low Speed value is around 80-95%. That is, when the speed decreases by anywhere from by 5-20%, the system will turn off Torch Height Control.
NOTE: It is not recommended to set this value to 100%, as the THC can then be turned off even on straight sections of the work path far away from corners (due to integer operations within the controller).
9. Select the Hi/Lo event output port (63 by default).
10. Select the THC Small Radius value. THC will be turned OFF when the value of the cut radius is lower than that specified in this field.
11. Select Alarm Arc Voltage difference. This setting helps prevent the torch from diving while moving through the cut, on low speed corners, etc. The Voltage Difference takes the absolute difference value between the real and the reference voltage. In case of a voltage spike, for example due to the metal part being cut off and the material falling to the ground, this stops the THC from trying to adjust for that by diving after a falling part. This value allows for granular control depending on the operator's needs, and should be set depending on the operator setup.
12. Select Alarm Arc Voltage Rise. This setting looks at the rate at which the voltage is changing - thus, if there has been a single rapid spike to a new voltage value, for example, such as after metal warping due to the heat, the machine will temporarily disable THC until the rise (the derivative of the voltage difference) is stable again. This is useful for when Torch Height Control needs to be turned off temporarily, but still function after a voltage spike.

NOTE: If the reference voltage is very different from the real measured voltage (more than these values), Height Control may not start at all. You may want to temporarily set these values to “1000” to disable this feature and test the THC.
13. Set the THC Start Delay. This sets a value, in seconds, after which THC will begin during the cutting process. During the beginning of the cut, there may be splatter/arc voltage fluctuations which would interfere with THC, so it is often necessary to wait a fraction of a second before turning the THC ON.
14. Set THC Restart Delay to select the value (in seconds) for which to delay the THC after starting it up again to avoid sudden dives.
15. Set the THC P- and I- control ratios. These will vary depending on sheet thickness and the type of plasma power source you are using. The higher the P-ratios absolute values, the higher the Height Control Speed.
According to our experience, I-ratios should be set around “-2…-6”, since higher I-ratio values may lead to oscillation during height control.
Both P- and I-ratios should be NEGATIVE for Arc Voltage Height Control (as we are trying to inversely compensate for voltage changes).

16. Set the THC pre-off value (in seconds). This allows to turn THC control OFF before the cutting completes (for example, if we know that THC is not required at the very end of the cutting operation). This value can be set to 0 if not required by the user (majority of user cases).
17. Set the Cutting pre-off value (in seconds). This allows to stop the cutting some fraction of a second before the machine stops moving at its working speed and may be useful to some users/operators depending on their cutting needs and machine configuration. This value can be set to 0 if not required by the user.
18. Select whether you want to accept jog while THC is activated. This allows for jog in the z-axis while THC is on in order to allow the user to lift/lower the torch manually through operator inputs in addition to the regular THC control. This field can be set to OFF if the user does not want to be able to accidentally move the torch during the cutting process while the THC is ON.

When this setting is turned ON, it is possible to set up a set of hard keys / buttons which will allow the operator to quickly adjust the THC position. To do this, head into Settings > Config > Panel/Pendant > Hardkeys and assign input numbers to which your controls are attached to the Jog: Z+ and Jog: Z- (as well as Jog: Stop Z) commands, as shown in the screenshot below:

When the keys are then pressed during the cutting process, the THC Position will reflect that by going up/down:

19. Select the THC Jog speed ratio. This is usually set to be an order of magnitude lower than the working speed, as to not move the torch erratically.
20. Enable DC Motor Control for DC motors only, with options for PWM channel and direction.
21. Enable AxisPlus 0/1 for Height Control if necessary. The first option can be enabled to utilize the THC settings for AxisPlus (instead of Z-axis only). Second option is reserved for Focus axis (currently in beta testing, usually left disabled).
22. Set the THC PID dead zone. This option will monitor the current arc voltage value. If that value differs from the reference by less than the selected value (in ADC units), then no control signal is generated. This is done to potentially reduce the response to noise in the voltage signal readings.
- NOTE: For high levels of noise in the arc voltage value readings, the dead zone setting is typically not sufficient to prevent excessive motion on its own. In such a case, it is recommended to either improve noise filtering for the electronics hardware, or to change the PID coefficients within the myCNC software.
Check that the THC is ON
The next step is to check if THC is ON in the User Settings.
It can be a button in User settings, or a toggle in the PLC settings (Settings > PLC). Both settings will turn THC on/off and both represent the same variables - the user can decide which one they want to use out of convenience. Typically, the User Settings window is used.


Check that the THC is working
Turn THC ON in User settings and make a test cut.
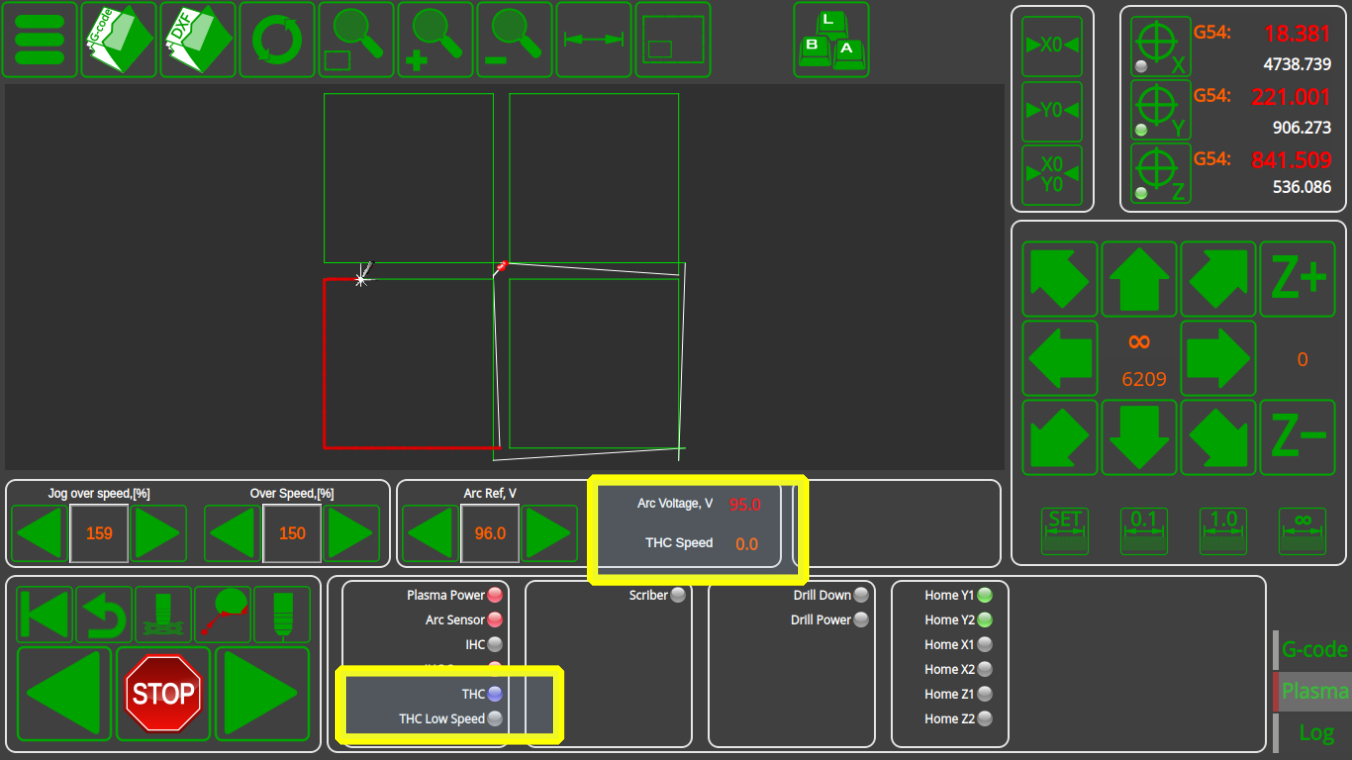
- Check that the “Arc Ref” voltage is about the same as the measured “Arc Voltage”
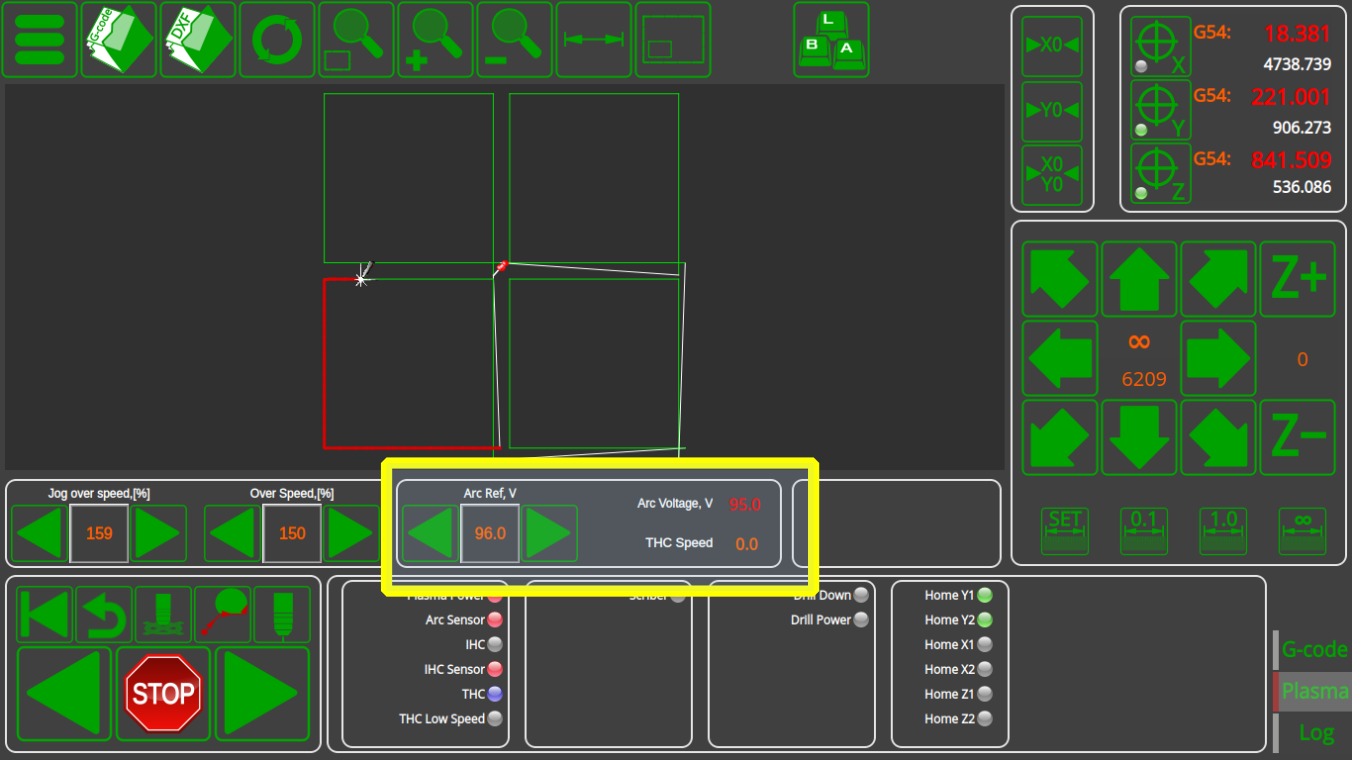
- Check that the “THC Low Speed” led is OFF

- “THC Speed” display should show the current Height Control Speed. The current implementation takes the display speed to be in internal machine units, so the absolute “THC Speed” value might not correspond to the actual physical speed of the machine. However, this is still useful since you can see the following:
- “THC Speed = 0” means THC is off
- “THC Speed” is positive - Height Control moves torch UP, usually because the Arc Voltage (and the current height) is lower than reference value
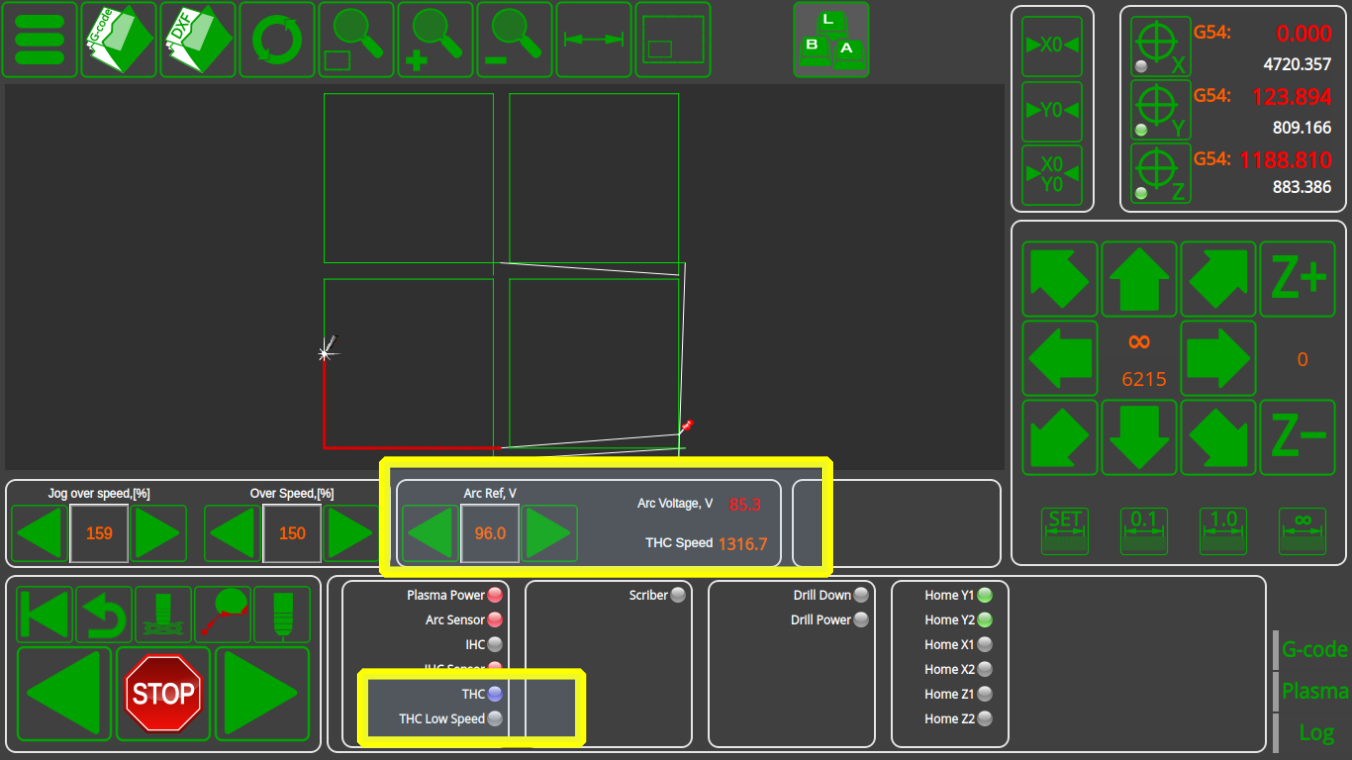
- “THC Speed” is negative - Height Control moves torch DOWN, usually because the Arc Voltage (and the current height) is higher than reference value


Check Additional Machine/User Settings
The Arc Voltage Control setting signifies the THC behaviour that the user prefers. The underscores signify whether or not the Torch Height Control will have a THC Start Delay (the entries with underscores do have the start delay, while the entries without the underscores will ignore the THC Start Delay).

- THC OFF - the automatic torch height control system is off
- Table - the reference arc voltage for the height control is taken from a predefined value (could be loaded in from the cutcharts, or provided by the manufacturer). THC Start Delay is IGNORED.
- Measure - Arc Voltage value right before THC Start will be recorded by the controller and then used as the reference voltage for the THC process. THC Start Delay is IGNORED.
- _Table - similar to regular Table, with a predefined value for the reference voltage, however the THC Start Delay WILL be used.
- _Measure - similar to regular Measure, the reference voltage value is recorded by the controller prior to the THC Start. THC Start Delay WILL be used.
- Measure 1V - the reference voltage is measured (similar to the Measure setting), but if the voltage has changed a lot relative to the previous reference voltage, then the new value will change no more than the specified value (for example 1V)
- For example, if the previous voltage was 125, and 130 was the new measured value, then the new reference voltage will be set to 126
- The maximum reference voltage change is set in the THC settings (Settings > Config > Technology > THC):

- _Measure 1V - similar to regular Measure 1V, with the THC Start Delay.
A skilled operator can also control the reference arc voltage, if necessary, to bring the torch up/down, however the system allows for a fully automatic Torch Height Control through these settings.
NOTE: It is usually recommended to have some amount of THC Start Delay in order to prevent THC from making the torch moving erratically during the initial cutting phase.
Creep Speed can be set up in order to signify the speed during the creep phase of the machine movement. The Creep speed is set on the CNC Speeds screen as a percentage of the Cut Speed. This setting can help improve the initial plasma arc stability, especially when cutting materials of a considerable thickness. Set the Creep Time (in seconds) to signify the amount of time for which the Creep Speed will be active, or set it to 0 to disable Creep Speed entirely.

THC diagram
The THC diagram in the User Settings allows the operator to tweak the THC settings in a simple visual way - arrows signify time, values signify height. The following settings are available:

- IHC Correction Height. The correction height is typically set once per machine, and signifies the correction between the IHC sensor and the actual height of the plasma torch. Read more about the IHC Correction height in the IHC manual.
- IHC Ignition Height. After contact, the torch rises to the Ignition Height and waits for the arc signal.
- IHC Pierce Height. After receiving the arc signal, the torch rises to the pierce height and begins the pierce procedure.
- IHC Pierce Time. The pierce time specifies the amount of time, in seconds, allocated to the pierce procedure.
- IHC Cutting Height. After the pierce time has elapsed, the machine moves the torch to the cutting height at which the cutting will begin.
- THC Start Delay signifies the time for which Torch Height Control is not turned on after the cutting has started (to prevent metal splashes/voltage variations that are often present at the beginning of the cut to impact the cutting procedure). This delay can be set to ON or OFF in the User Settings.
- THC Pre-off time. In order to prevent sudden movements due to rapid voltage changes as a cut (especially when cutting a hole) is finishing up, THC can be turned off some time before the end of the cut and the machine will be kept at a set height until the THC system will move to the next cut.
- Lift After Cut Height to move the torch up to after the cut has completed.
Registers to control THC
| Variable Name | Value | Comments |
|---|---|---|
| THC #0 | ||
| GVAR_THC0_ARC_VOLTAGE_REF | 7011 | Arc Voltage Reference value. This register is written while Load Cutcharts. It can be updated automatically if THC is activated in “Measure” mode. In this case, after THC activated and given “THC delay” controller measures real Arc Voltage, save this value as “Arc Reference” and keeps this value during the cut. Rotary encoder can be connected to this register to implement on-the-fly Arc Voltage adjustment |
| GVAR_THC0_ARC_VOLTAGE_ADJ | 7012 | Adjustment Value for Reference Arc. Either potentiometer or rotary encoder can be connected to this register to be able to adjust Arc Voltage reference on the fly VolategArc Voltage Reference value. |
| GVAR_THC0_ARC_VOLTAGE_REF2 | 7013 | Register contains sum of Arc Voltage Reference register (#7011) and Adjustment register (#7012). The software automatically updates register value if any of register 7011,7012 is changed. The register is available for reading to display adjusted Arc Voltage reference value |