quickstart:mycnc-quick-start
This is an old revision of the document!
Table of Contents
MyCNC Quick Start
Installing Ubuntu MATE 16.04 through LiveCD with preinstalled myCNC software
- Connect the power cable, the screen through the HDMI or VGA cable, keyboard, mouse and the LiveCD with Ubuntu Mate 16.04 to the computer
- When booting up the computer, hold the Delete key to enter the BIOS

- In the BIOS screen, navigate to the Boot tab

- Select the Hard Drive BBS Priorities
- For Boot Option #1, switch the SSD 32GB to KingstonDT 101 G2 PMAP

- Save & Exit by pressing F10. The boot-up will begin shortly
- In the popup window, select the Install Ubuntu MATE option

- Select Normal Installation, and check the Install third-party software check mark at the bottom of the next screen

- Select the Erase disk and install Ubuntu MATE option if you want to format the Windows partition, leaving only Ubuntu MATE on the computer

- Select your timezone
- In the Who are you? screen, use mycnc as the username to access the presets that are applied during the installation of the myCNC software. NOTE: These presets include the mycnc user in groups such as dialout (scanners), sudo (security privileges of superuser), and sambashare (SMB/CIFS networking protocol for Windows). These presets are strongly recommended for novice users.
- Select the Log in automatically option

The installation of Ubuntu MATE will begin momentarily.
Setting up the myCNC control board
- Connect 24V DC power supply to myCNC control board
- Here are power-up examples for ET6, ET7, ET10 control boards
- Connect myCNC Ethernet controller with Network cable directly to Host computer or to Network Router. If use Odroid-C2 (Raspberry-Pi3) computers as a Host, Network cable is a short 0.5ft cable between Odroid & Controller

- Setup Network addresses for Host computer and myCNC Ethernet controller. Addresses of Controller and Host should be in same local network. For Example -
Controller Address: 192.168.0.78
Host Address: 192.168.0.100
or
Controller Address: 192.168.5.10
Host Address: 192.168.5.11
Look here if need to change IP address of controller board
- Goto MyCNC software, Cfg Settings, Network Tab and
- Set actual Controller IP address to “Controller IP Address” to tell the software where it can find myCNC Controller,
- Set “Network Protocol” to “UDP”,
- press “Save” button on the top-right of myCNC screen.
- Changes should be applied on the fly and UDP message counter should start counting which means communication between Controller & Host works correct.

- Connect Pulse-Dir signals from servo or stepper driver to myCNC control board
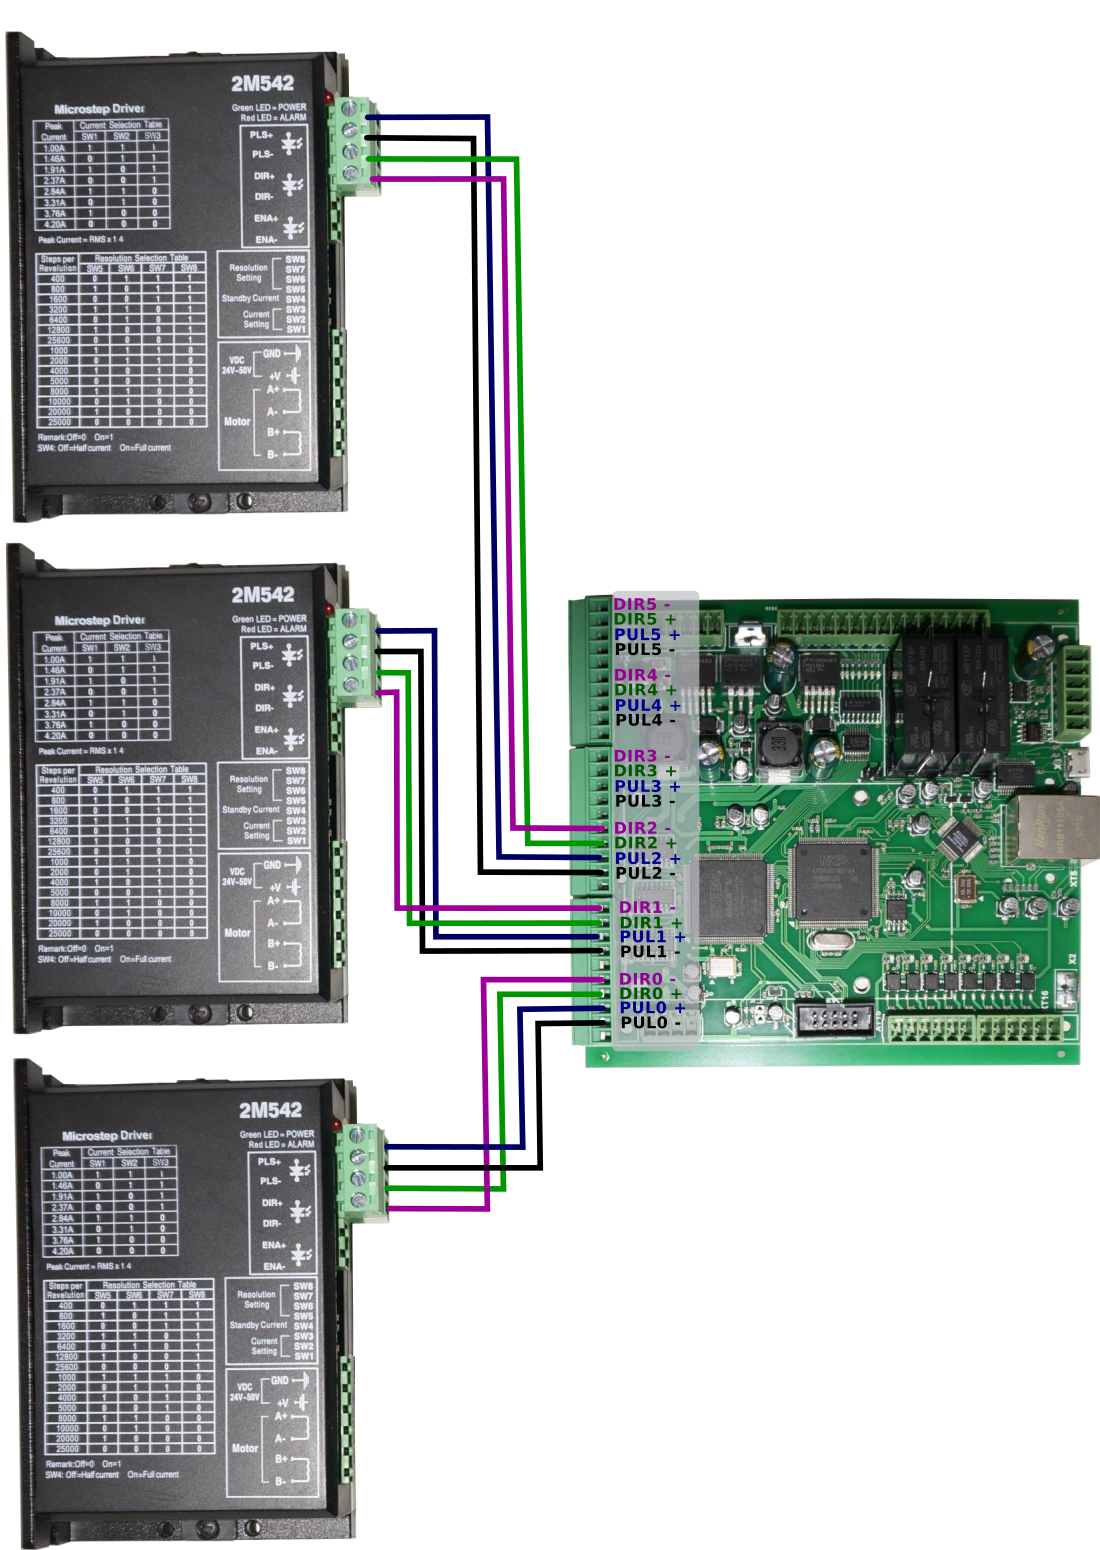
- Check what minimal pulse width your drivers accept and set pulse width of myCNC control board accordingly (equal or more) in MyCNC software → Cfg Settings → Hardware Tab → Common Hardware Settings
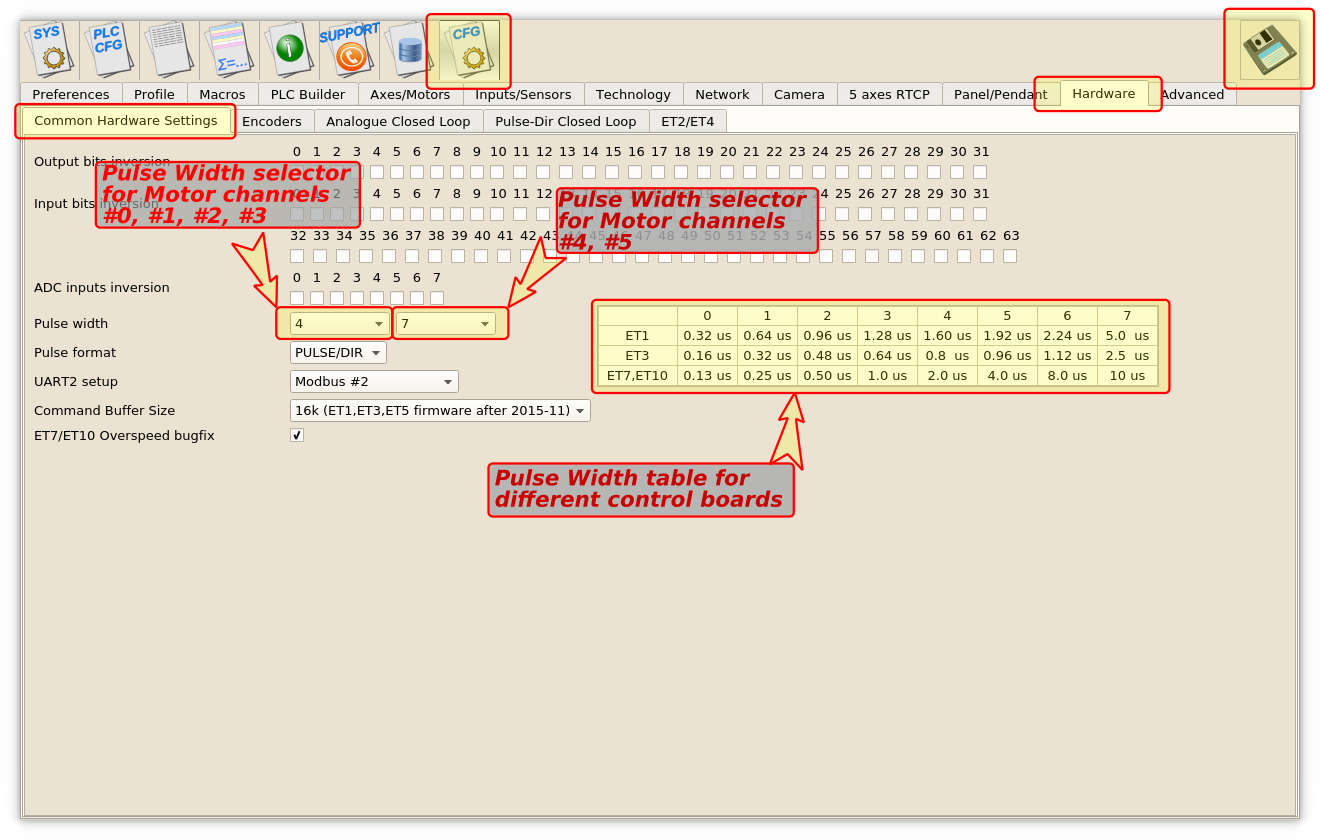 MyCNC-ET6, myCNC-ET7 controllers support separate pulse width settings for the first 4 channels (#0, #1, #2, #3) and the rest 2 (#4, #5). This option can be convenient if use high performance servo drivers with low psed stepper drivers (for example high speed servos for X, Y, Z axes and low speed stepper for rotational A axis). myCNC-ET10 controller use only the first pulse width selector for all motor outputs.


quickstart/mycnc-quick-start.1555431436.txt.gz · Last modified: 2019/04/16 12:17 by ivan