Table of Contents
1366 Series Screen Configuration Examples
NOTE: The myCNC team recommends utilizing the examples provided in this manual (as well as other manuals in this documentation) as a starting point for your machine setup. When possible (and applicable), it is recommended to keep changes to a mininum. In general, using these examples as the basis for your PLCs/macro commands allows for an easier setup process.
The following examples show some of the available settings that were discussed in the MyCNC Screen Configuration manual. As an extremely large variety of possible settings and combinations are available, not every parameter discussed in the main manual is presented in the examples listed below. If any additional information is required, do not hesitate to reach out on the myCNC Forum.
Example 1: Add a button to display the Centring Widget (probe wizard)
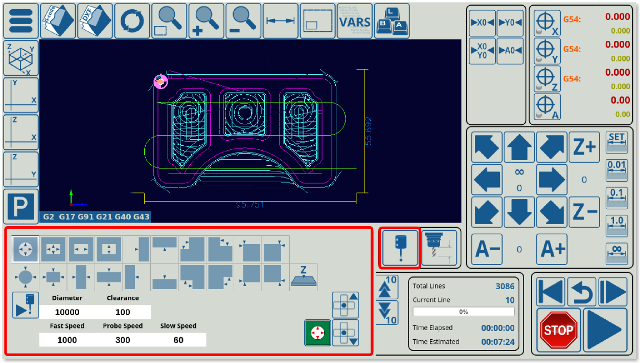
myCNC software has Centring widget to work with probing sensor and find internal and external centers, edges, corners on parts. In this example, we will be working with the 1366M4 profile to add a button which will open and close the centring widget when pressed.
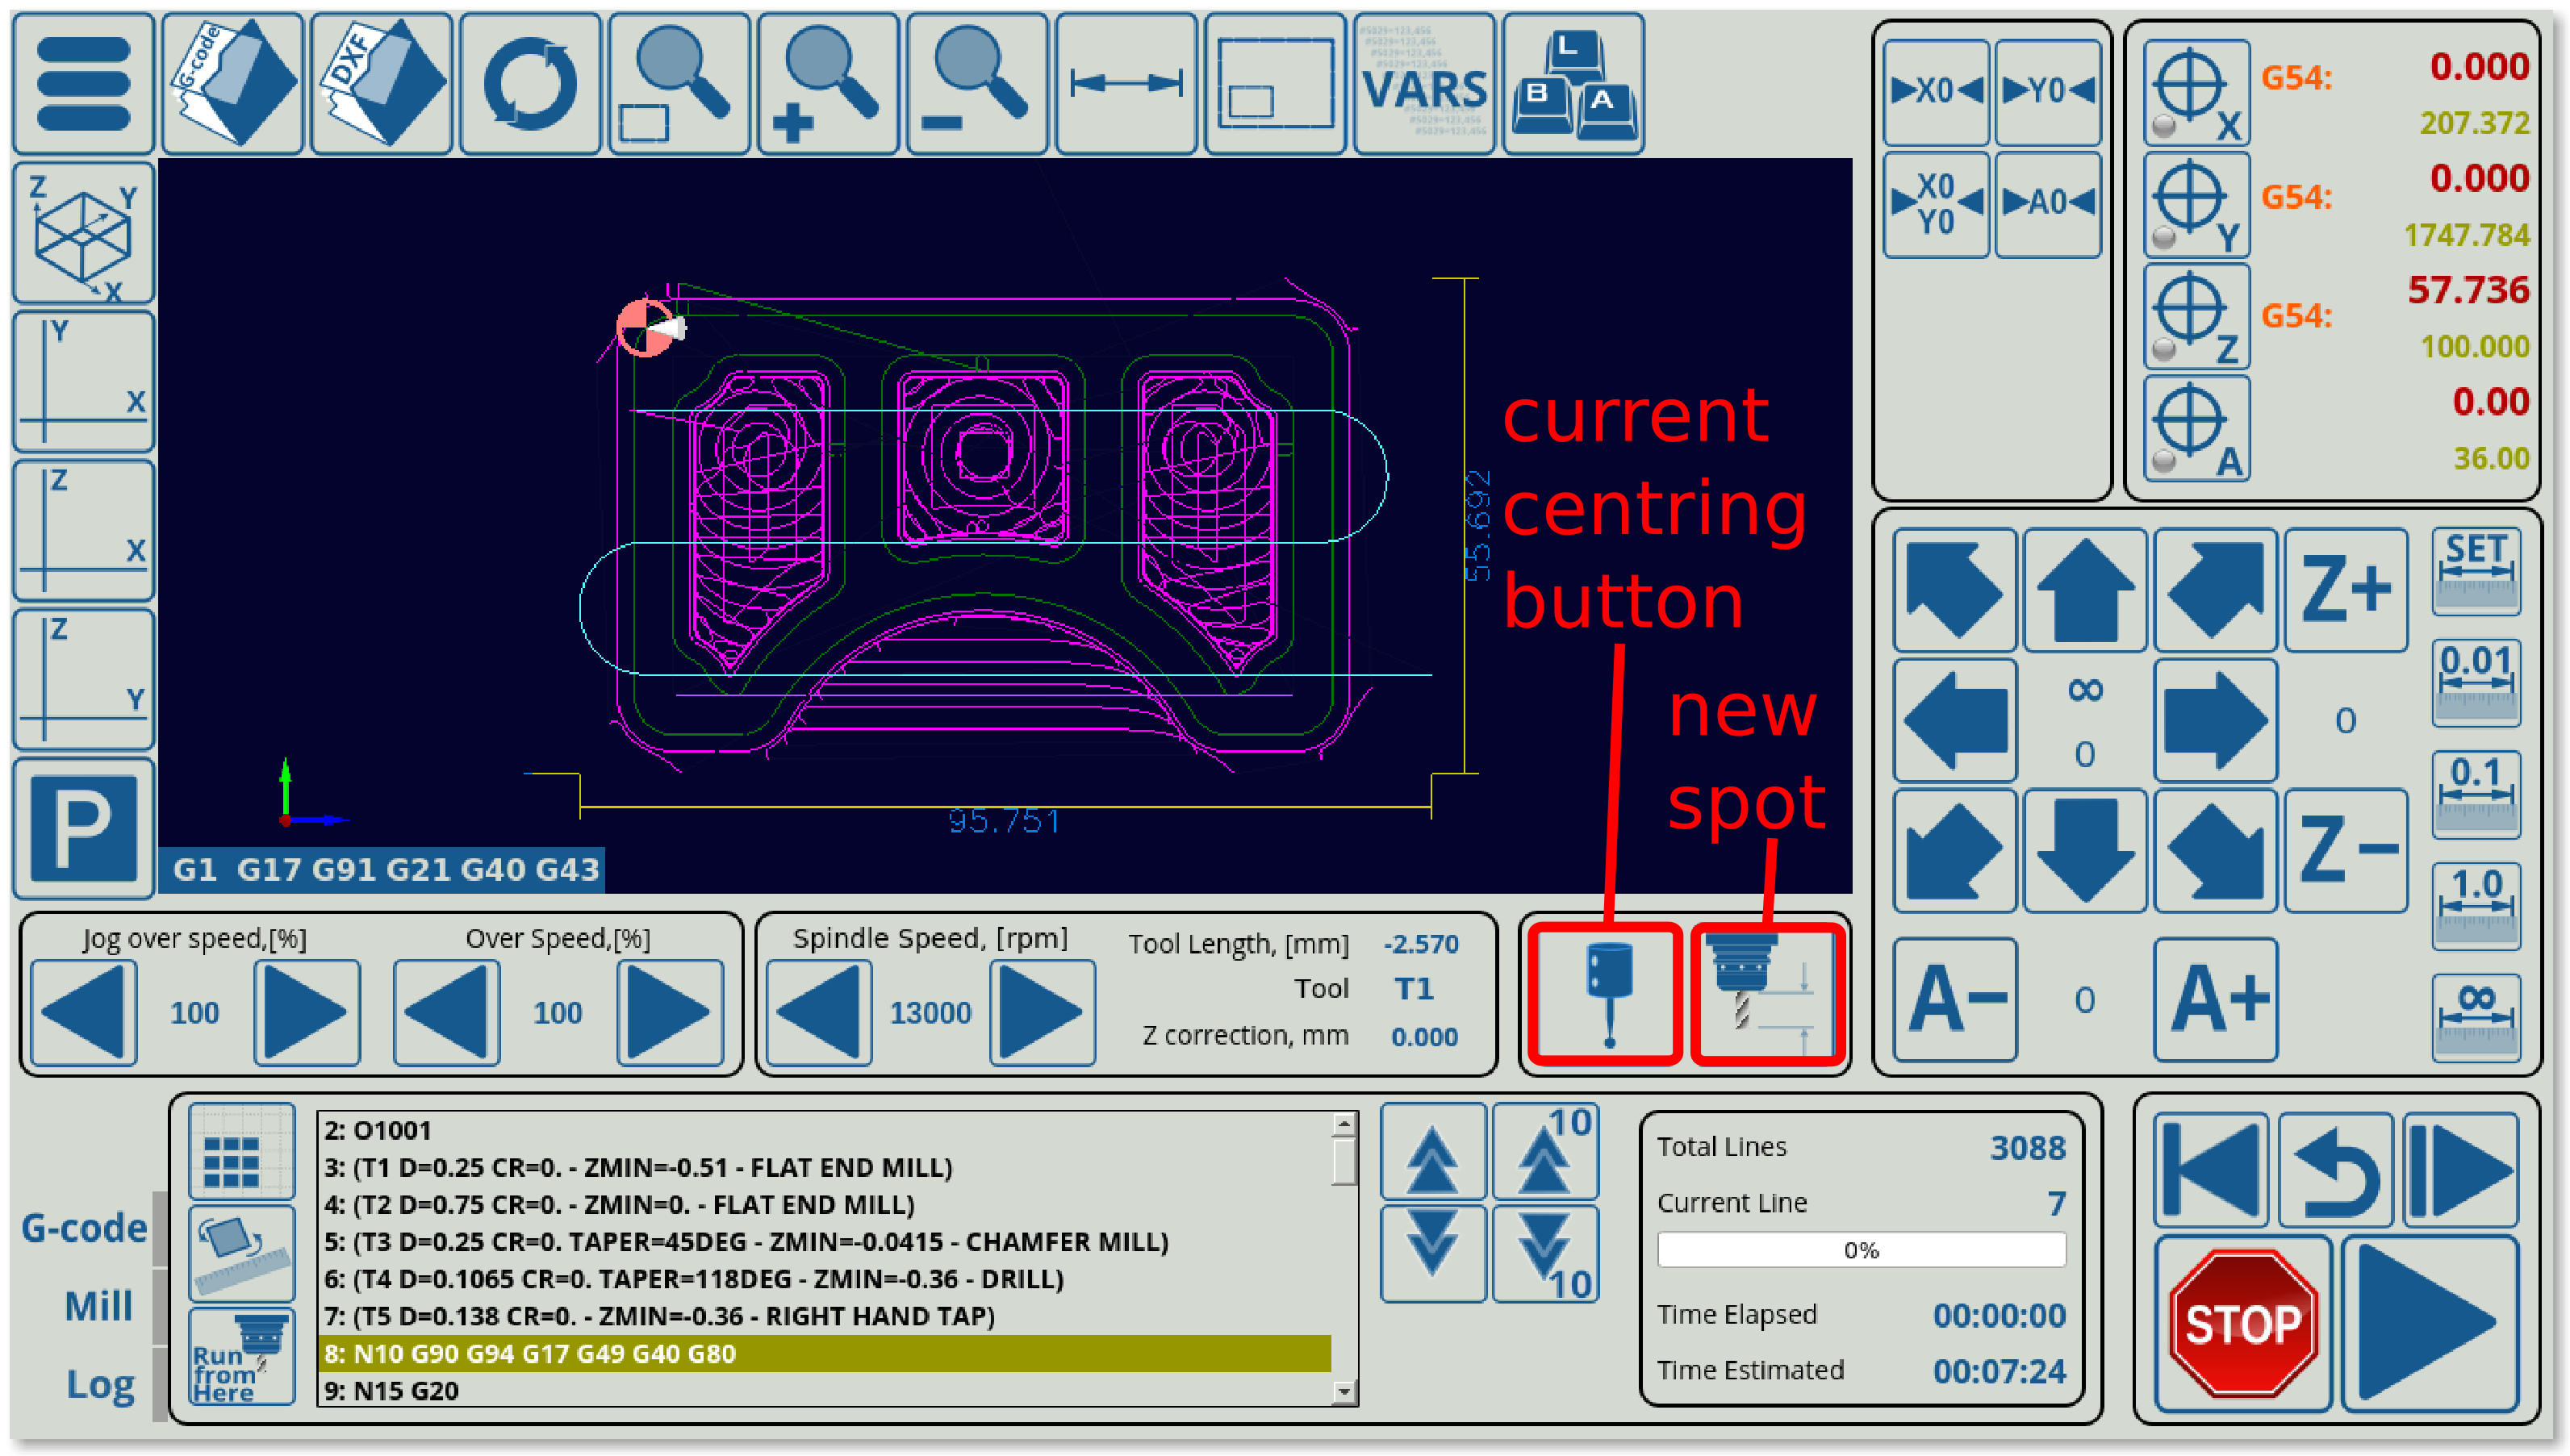
Note that the 1366M4 profile already has a centring widget with a dedicated button. For this example, the button next to the current probing wizard (centring widget) will be converted to also open up the centring window.
The following code describes the centring wizard button (this can be found in the x-speed-m.xml file, as this button is located in the x-speed-m section on the main software screen:
  <gitem where="x-reserv"
  position="8;5" width="80" height="80" image="probing/centring-unit"
  action="mywidget-toggle:x-centring" type="button"/>
The x-centring.xml file that can be found in the X1366M4 profile folder will describe everything that is inside the popup probing/centring window. However, to add a button that will bring up this popup, we simply have to add a button to another location and to assign to it the same action of toggling the x-centring window ON and OFF.
The easiest way to do this is to change another existing button (such as the Tool Measure button shown in the image above) as this will not require to shift any other buttons around to find some screen space into which the button will be inserted. The following code for the Tool Measure button is located in the same x-speed-m.xml file (as it is in the same section):
 <gitem where="x-reserv" position="92;5" width="80" height="80" image="button-tool-measure"
 action="mywidget-toggle:x-toolsview-main" type="button">
 </gitem>
Again, note how the where line is the same, as both the probe wizard and the tool measure buttons are in the same section.
In this code, we can switch the image line to read image=“probing/centring-unit”, and the action line to action=“mywidget-toggle:x-centring”, after which our code will look like this:
 <gitem where="x-reserv" position="92;5" width="80" height="80"
 image="probing/centring-unit"
 action="mywidget-toggle:x-centring" type="button">
 </gitem>
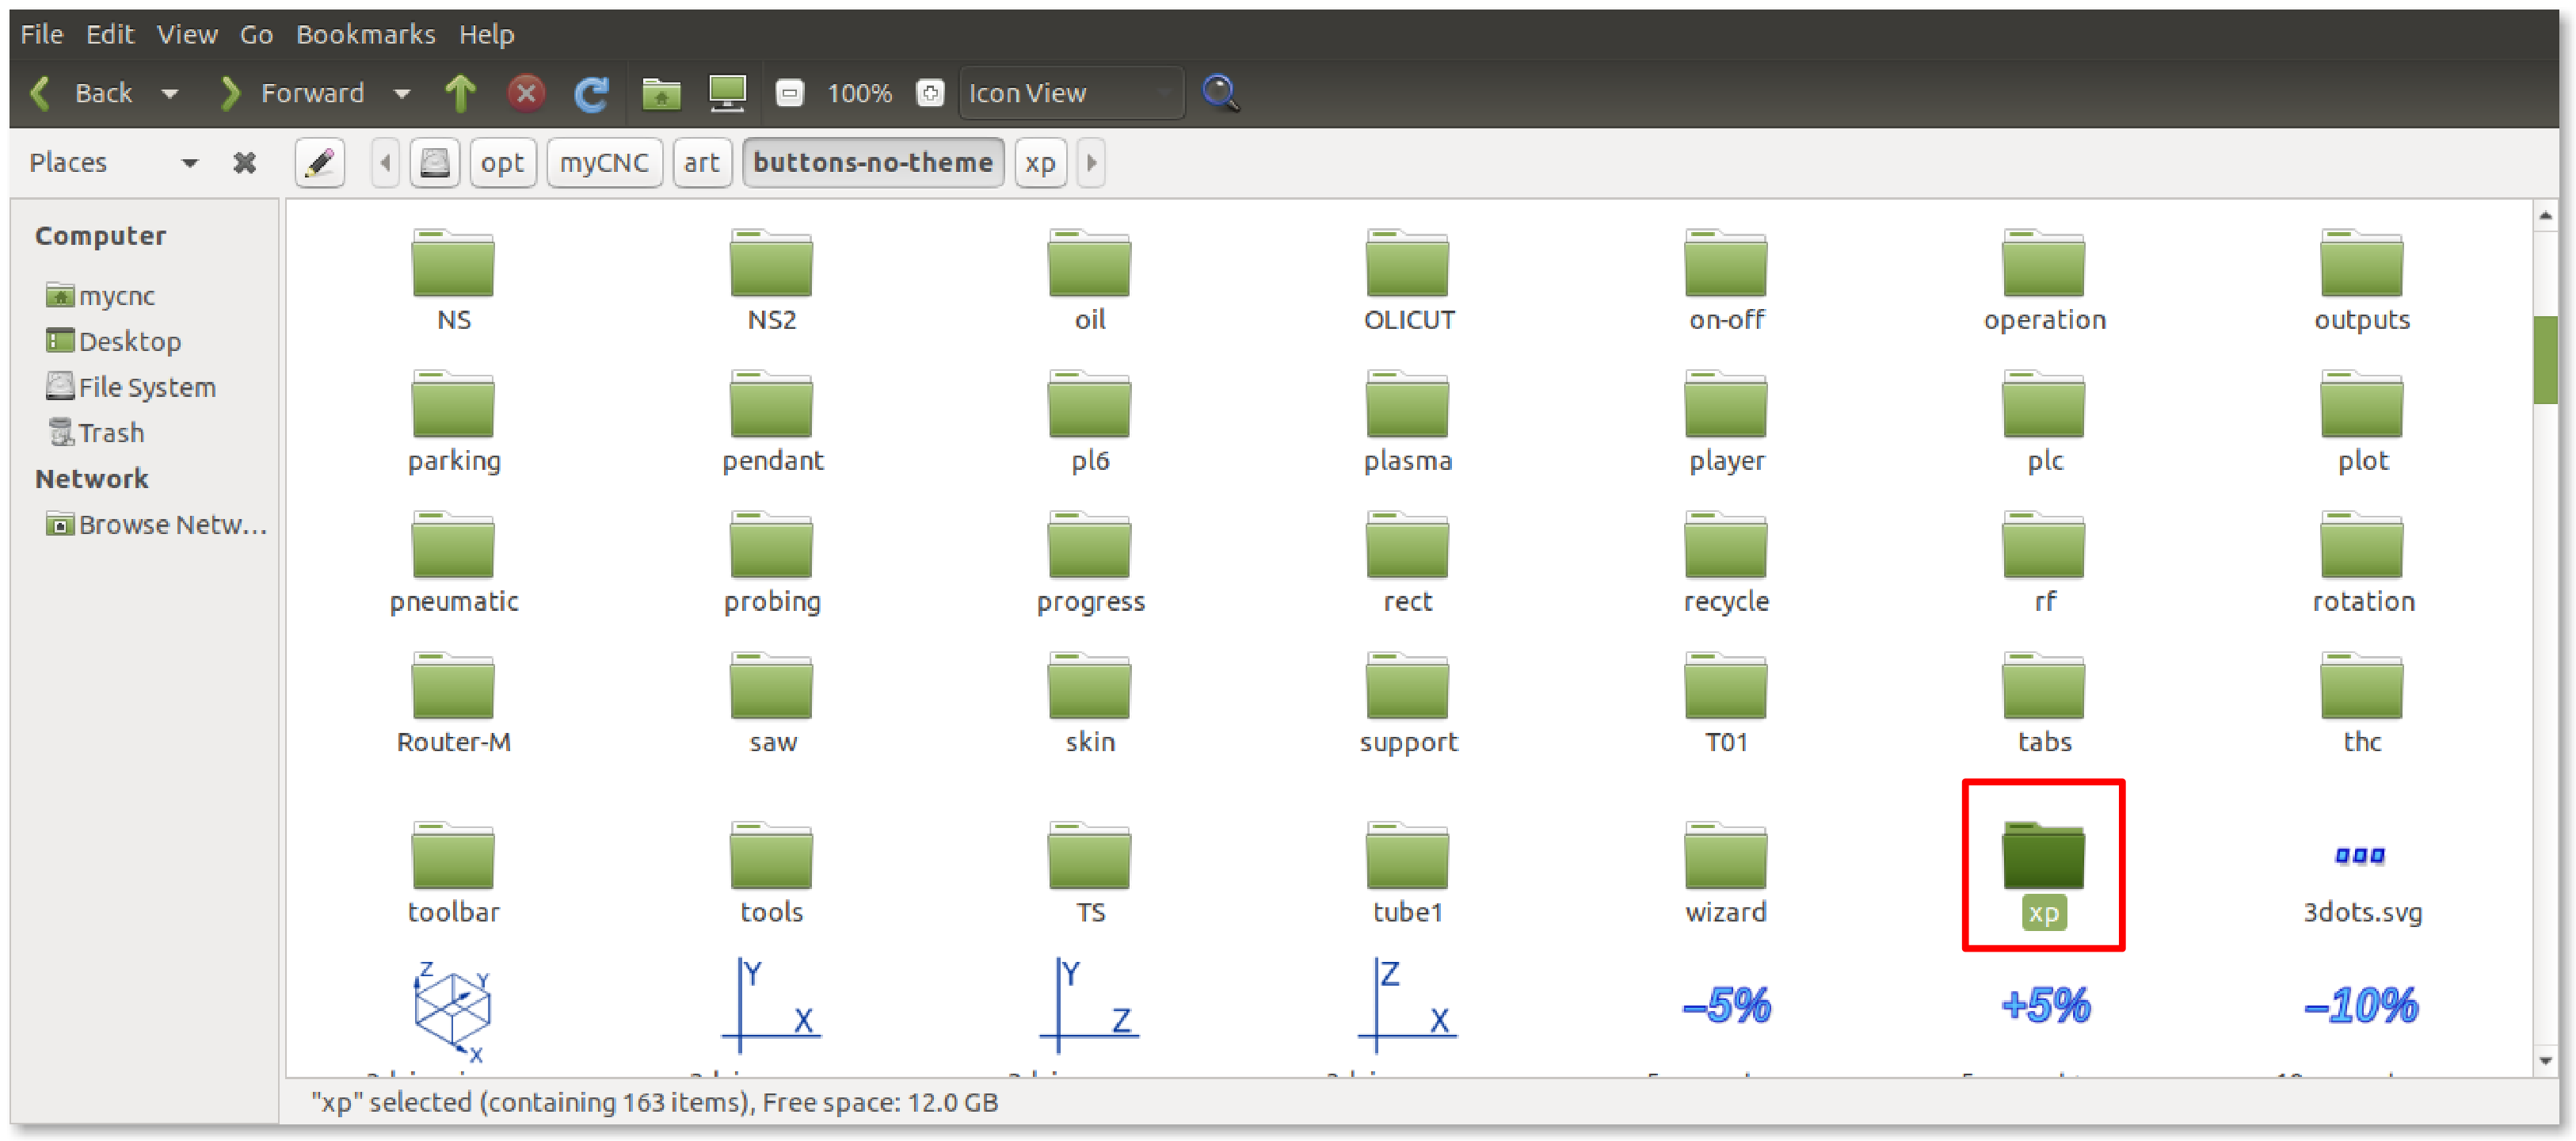
Note that the icons are located in your myCNC folder (typically opt/myCNC/art/buttons-no-theme/xp). If there is no xp folder (and the xp theme is specified), then the folder can be created. Read more about theme changes in the Theme and button skins manual.
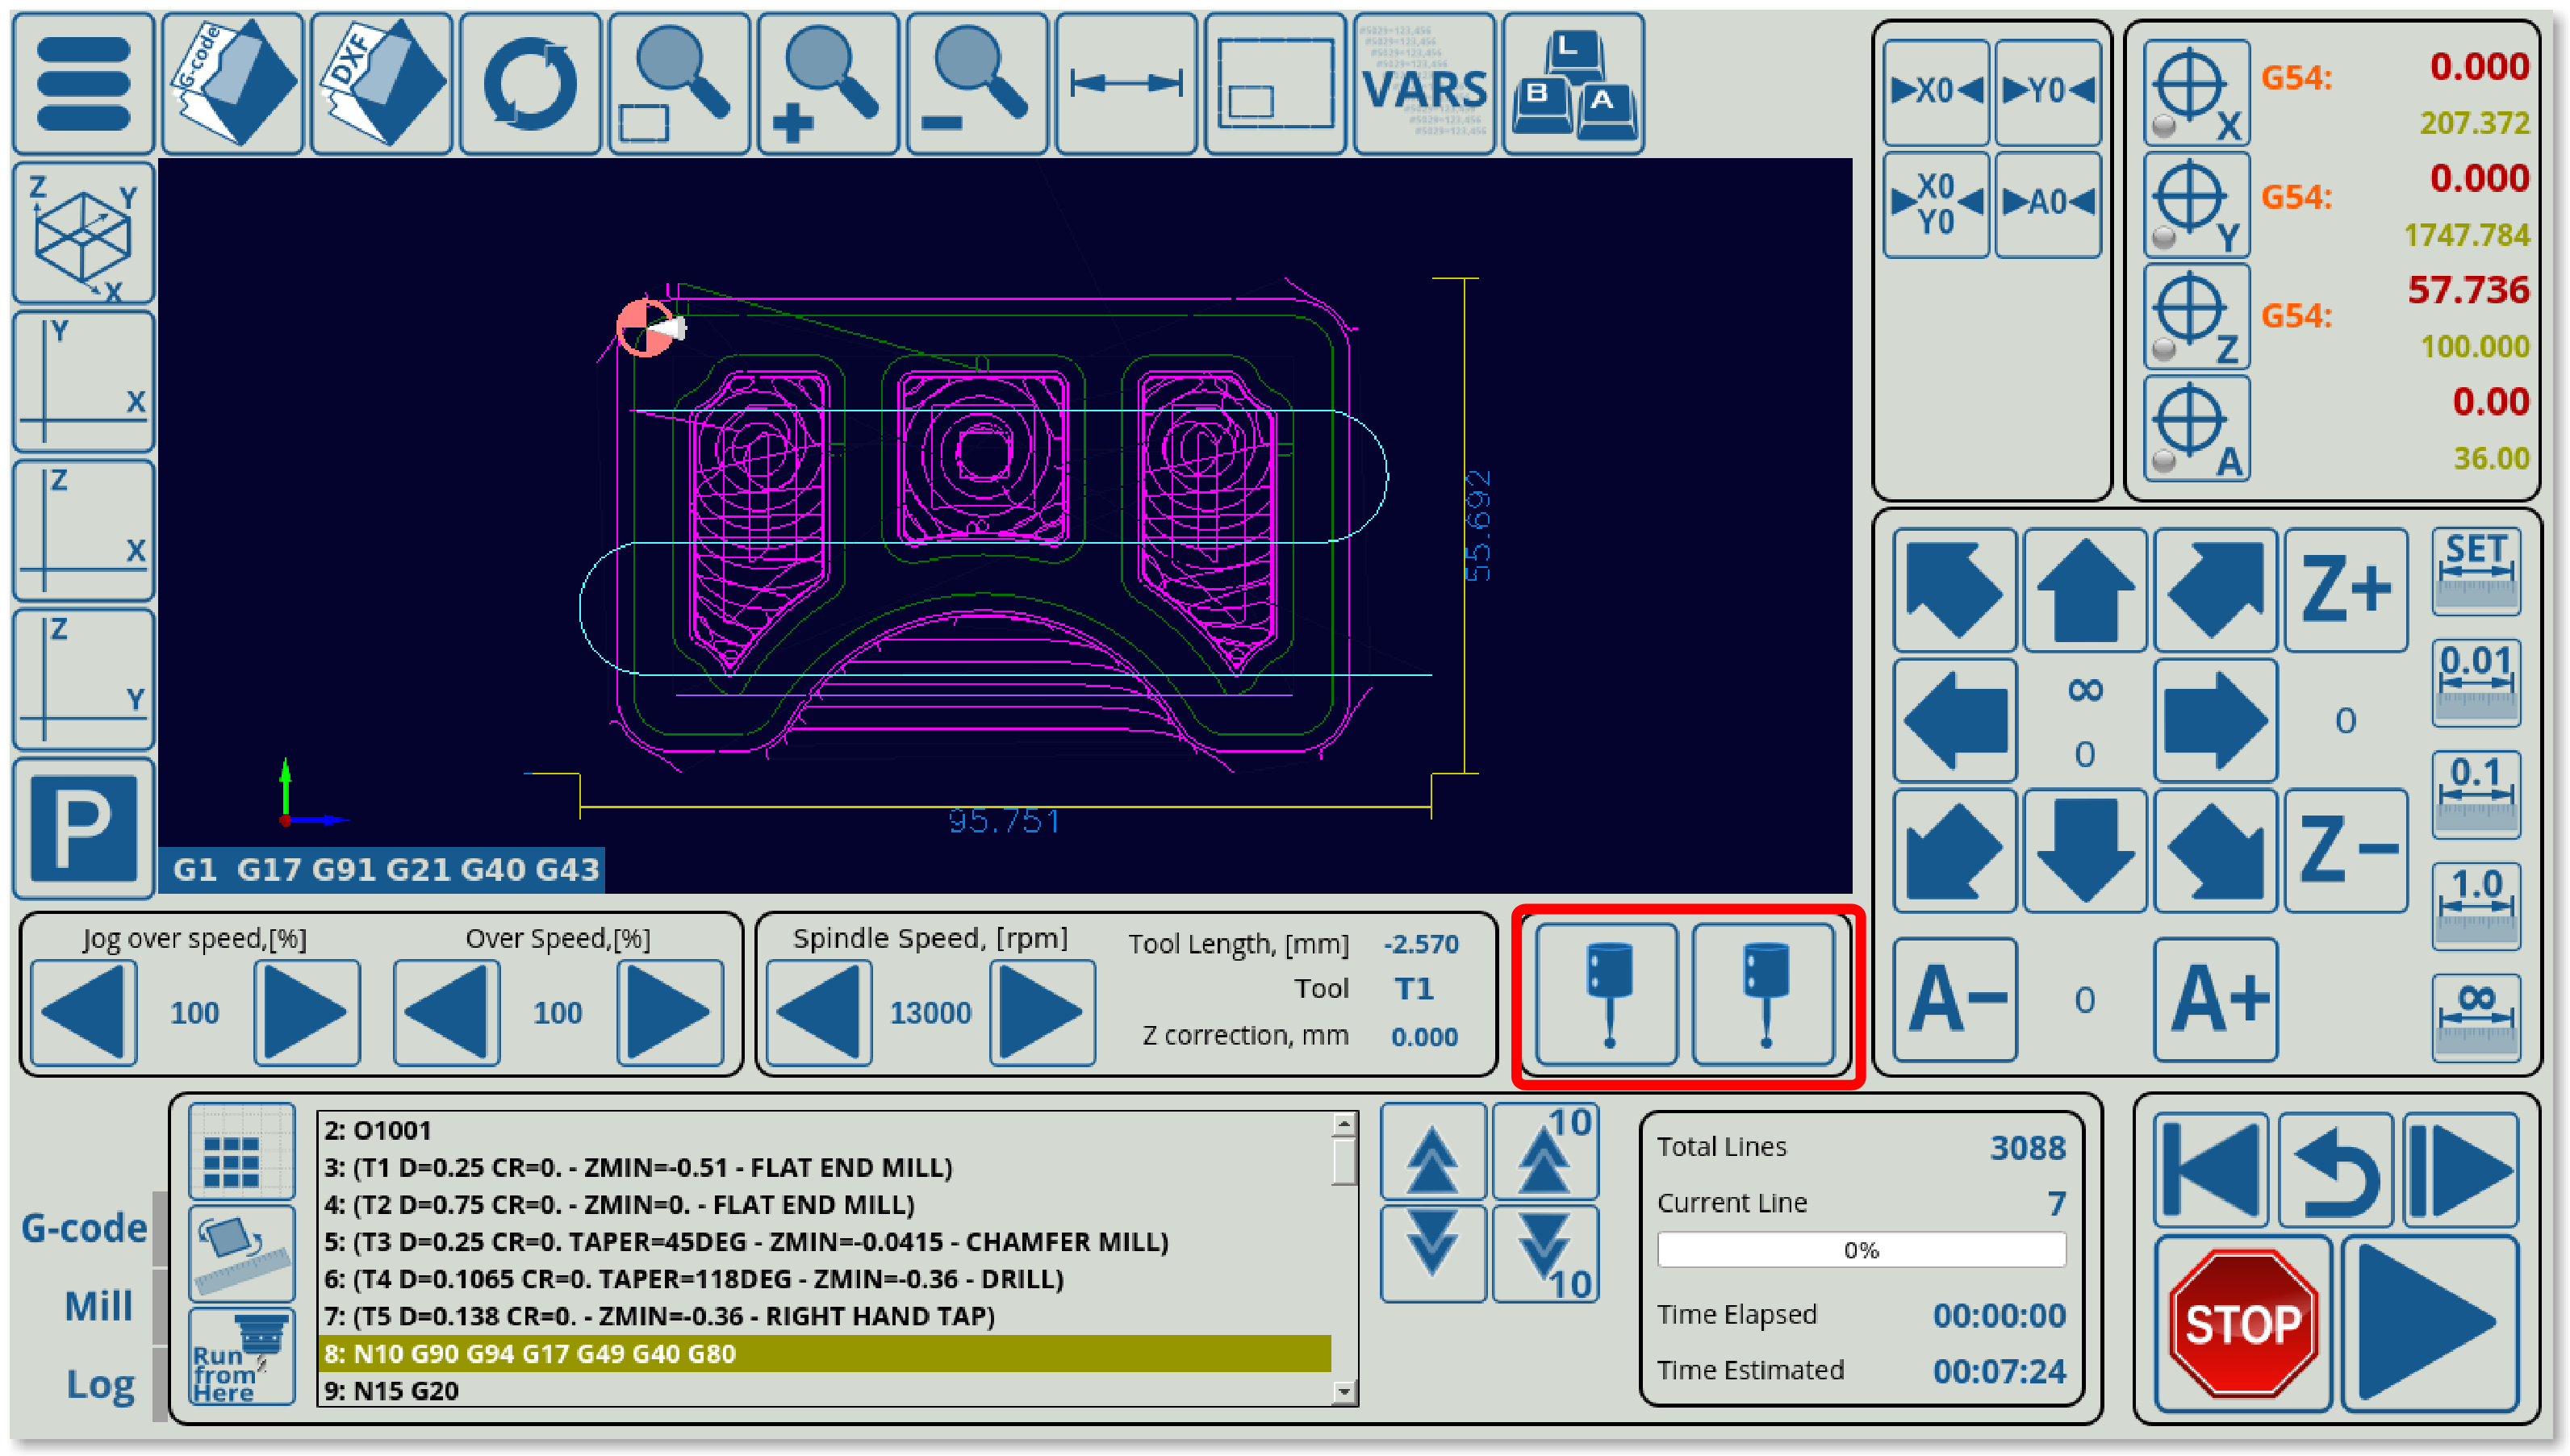
The resulting screen will now have two probe (centring widget) buttons which will both bring up the probe window:
It is also possible to delete the old centring button entirely, to edit it so as to use it as a tool measure button, or to assign a completely different display element in its place (as two probe buttons are unnecessary).
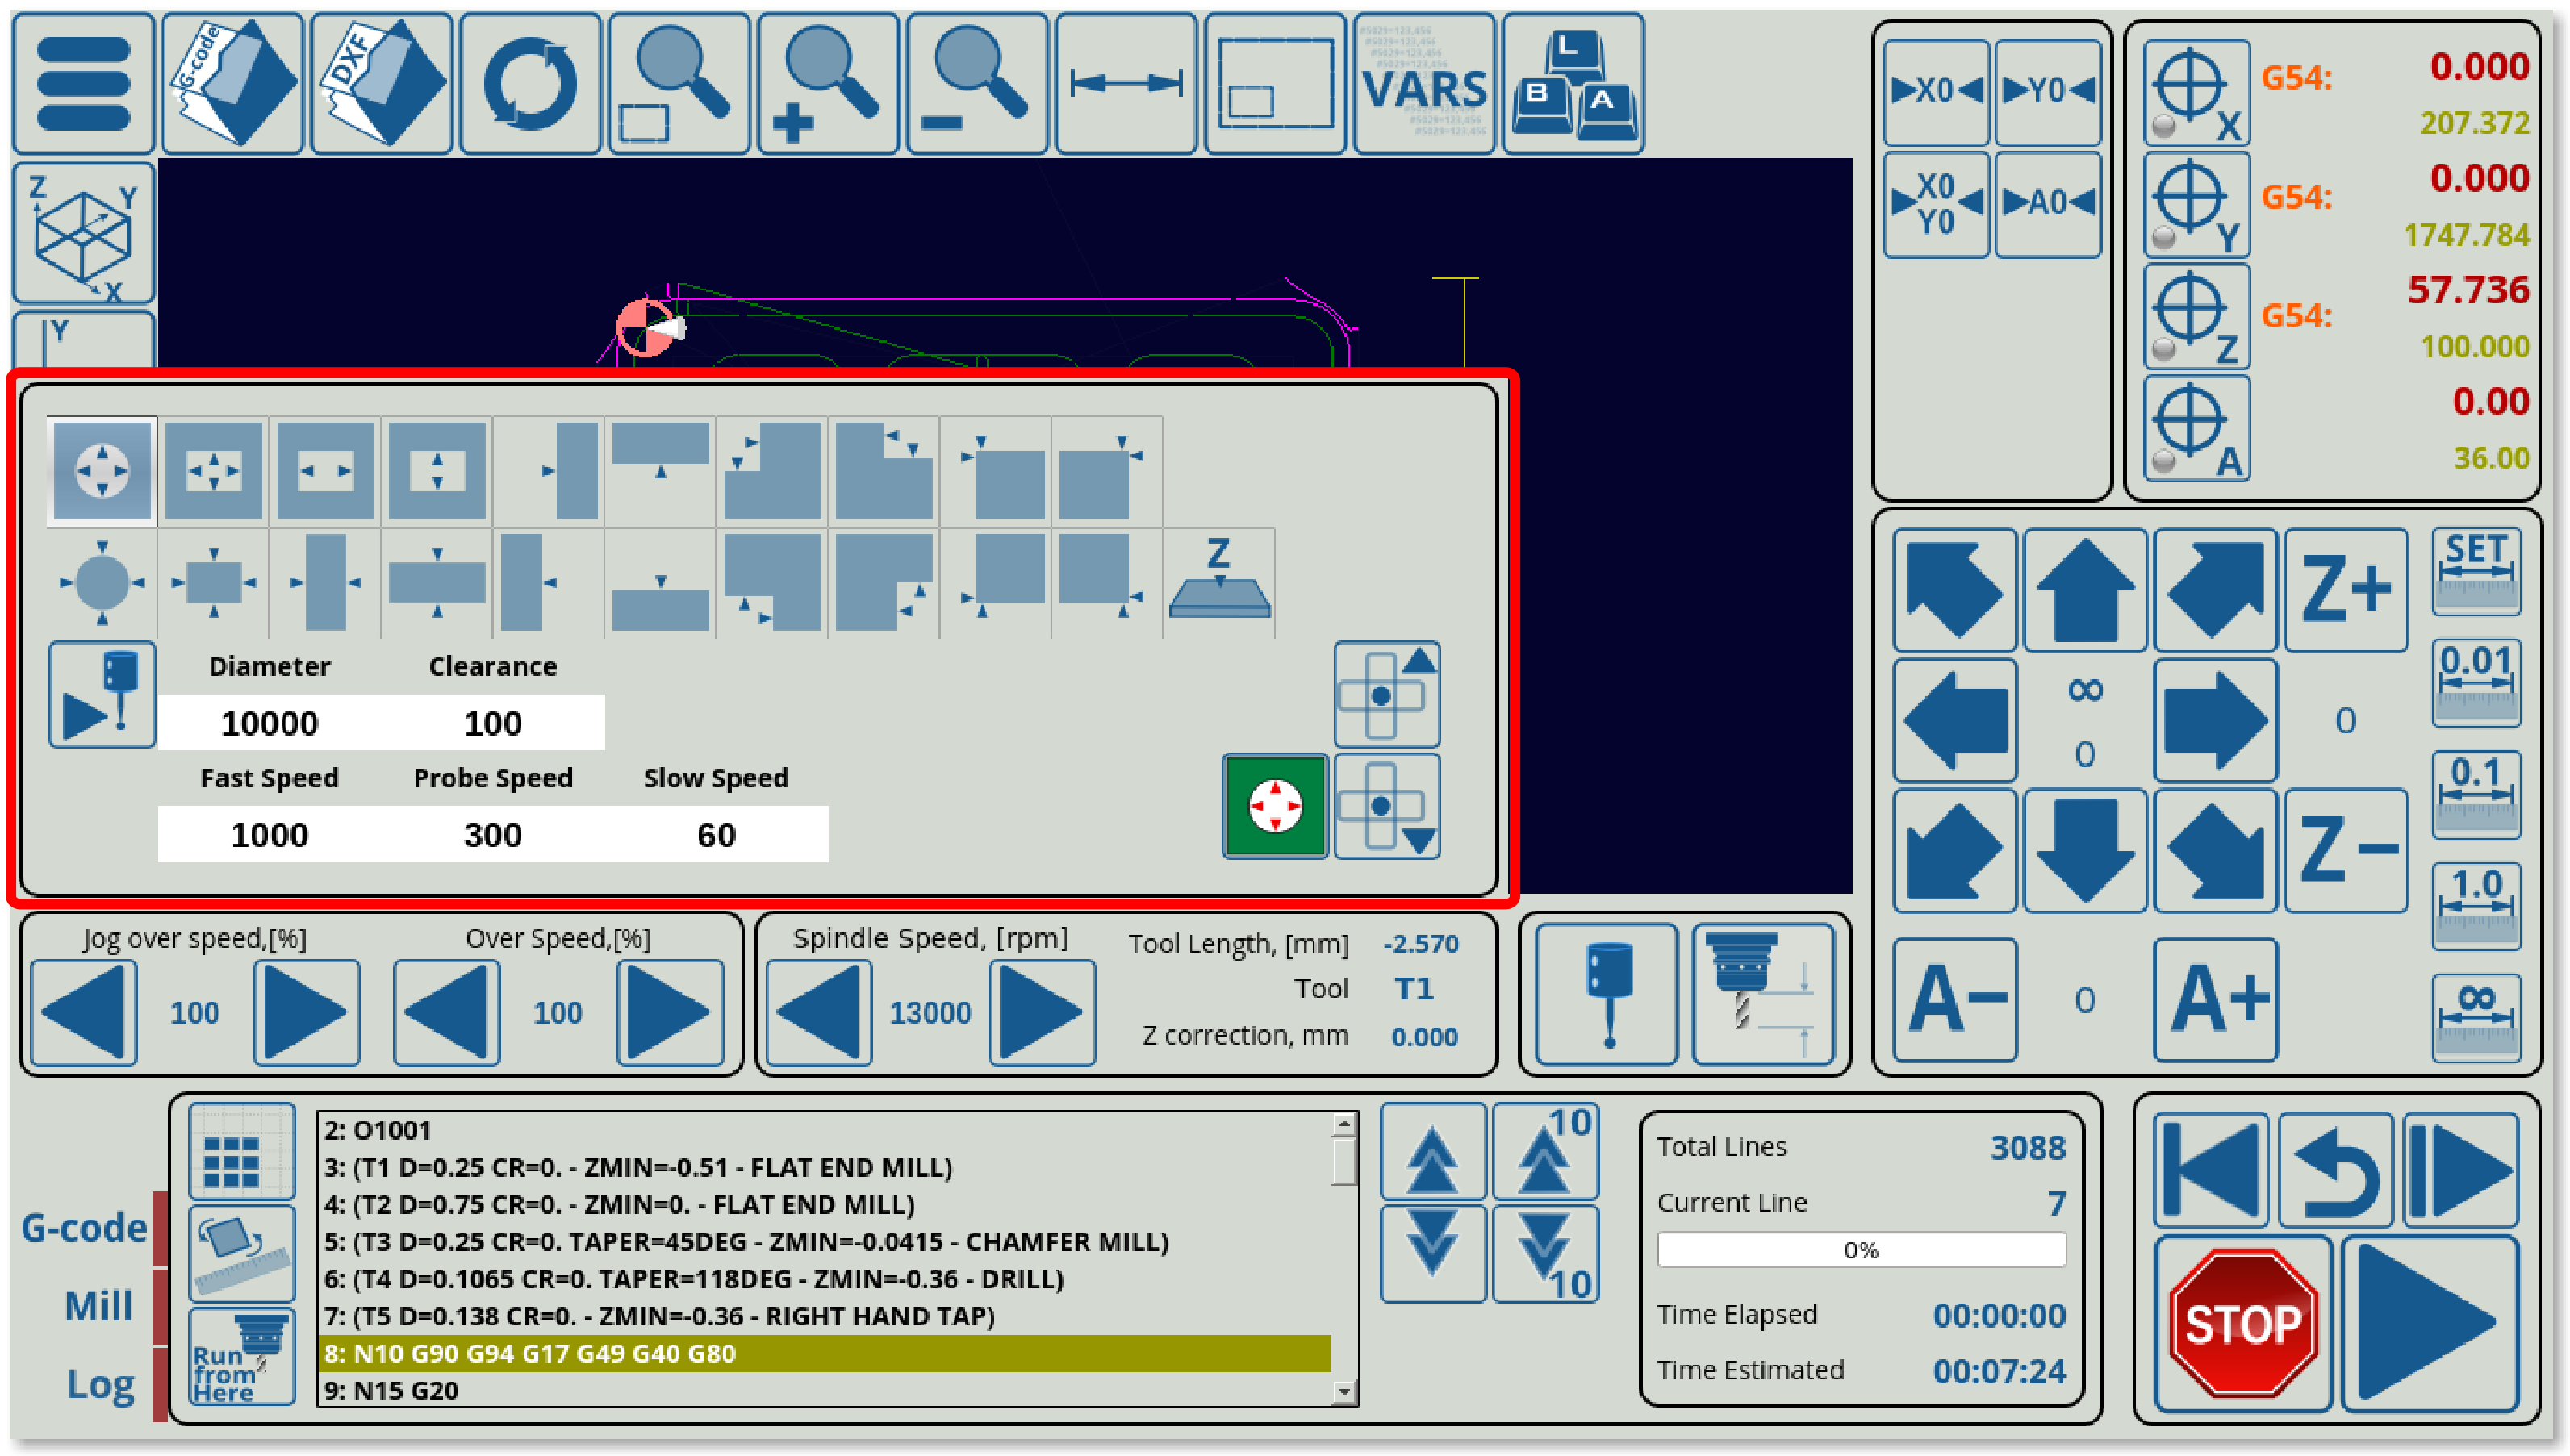
For any edits to the popup window itself, it is necessary to edit the full x-centring.xml file which is found in the X1366M4 profile folder. For example, in order to display the popup in a different location on the screen, it is possible to change the where=“xp” position=“0;490” hidden=“1” line.
For example, if the position value will be switched to 0;195 as compared to 0;479, the popup window will move up:
Note that in order to have this centring widget on the main software screen, one line of code is included in the main cnc-screen.xml file:
<include>x-centring.xml</include>
This will allow the main cnc-screen file to see that the x-centring MyItems widget is located in xp (main screen section). Without it, the centring widget (along with the tool measure widget, which is also defined in the same x-centring.xml file) will not work as the main screen file will not know to import the code from x-centring.xml.
Example 2: Adding new Gas ON/OFF buttons to 1366G profile
In this example, we will be taking the existing X1366G profile (the gas cutting profile) and adding two new buttons so that the operator is able to turn the gas ON and OFF manually. The images for these buttons are not bundled with the myCNC software at the time of writing this manual, so it serves as a good example on how to create a button (or a series of buttons) completely from scratch.
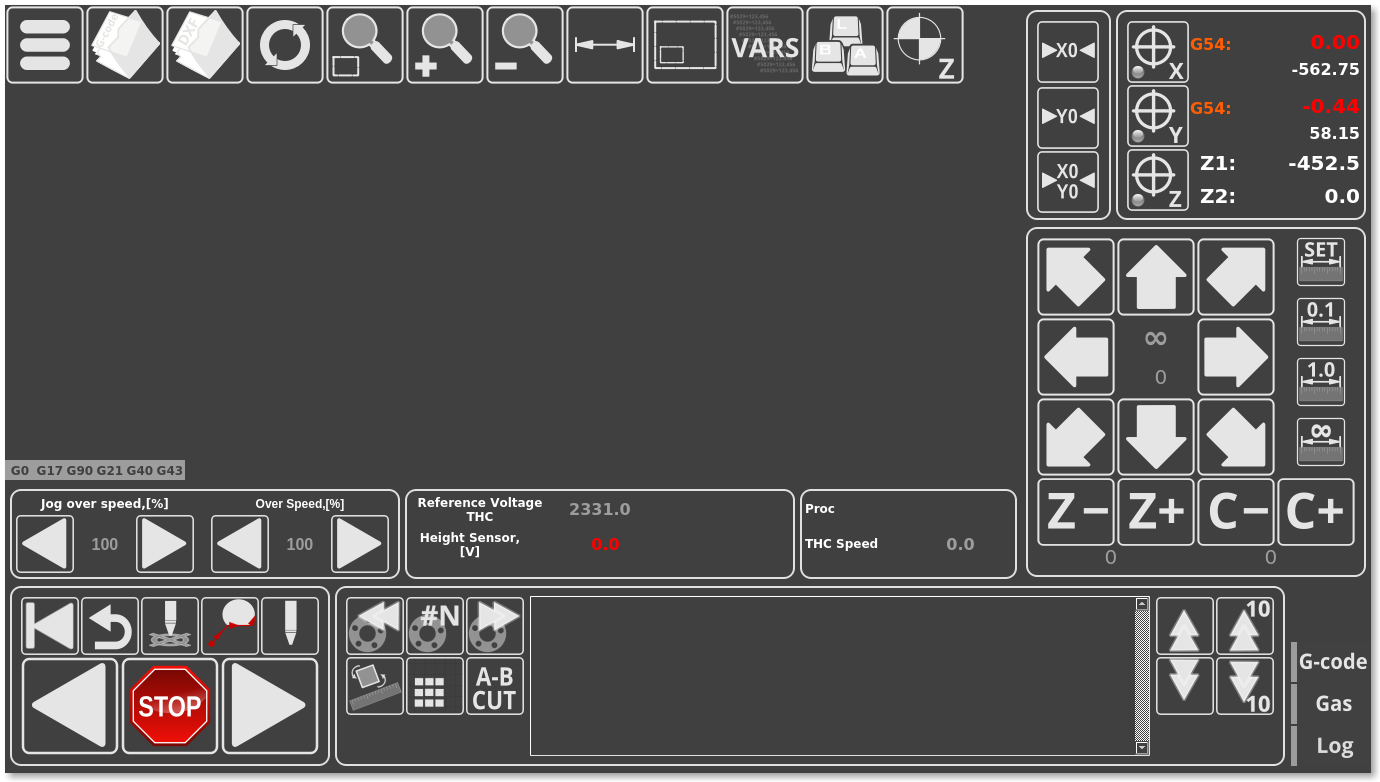
- The original screen of the 1366G profile looks like the screenshot below:
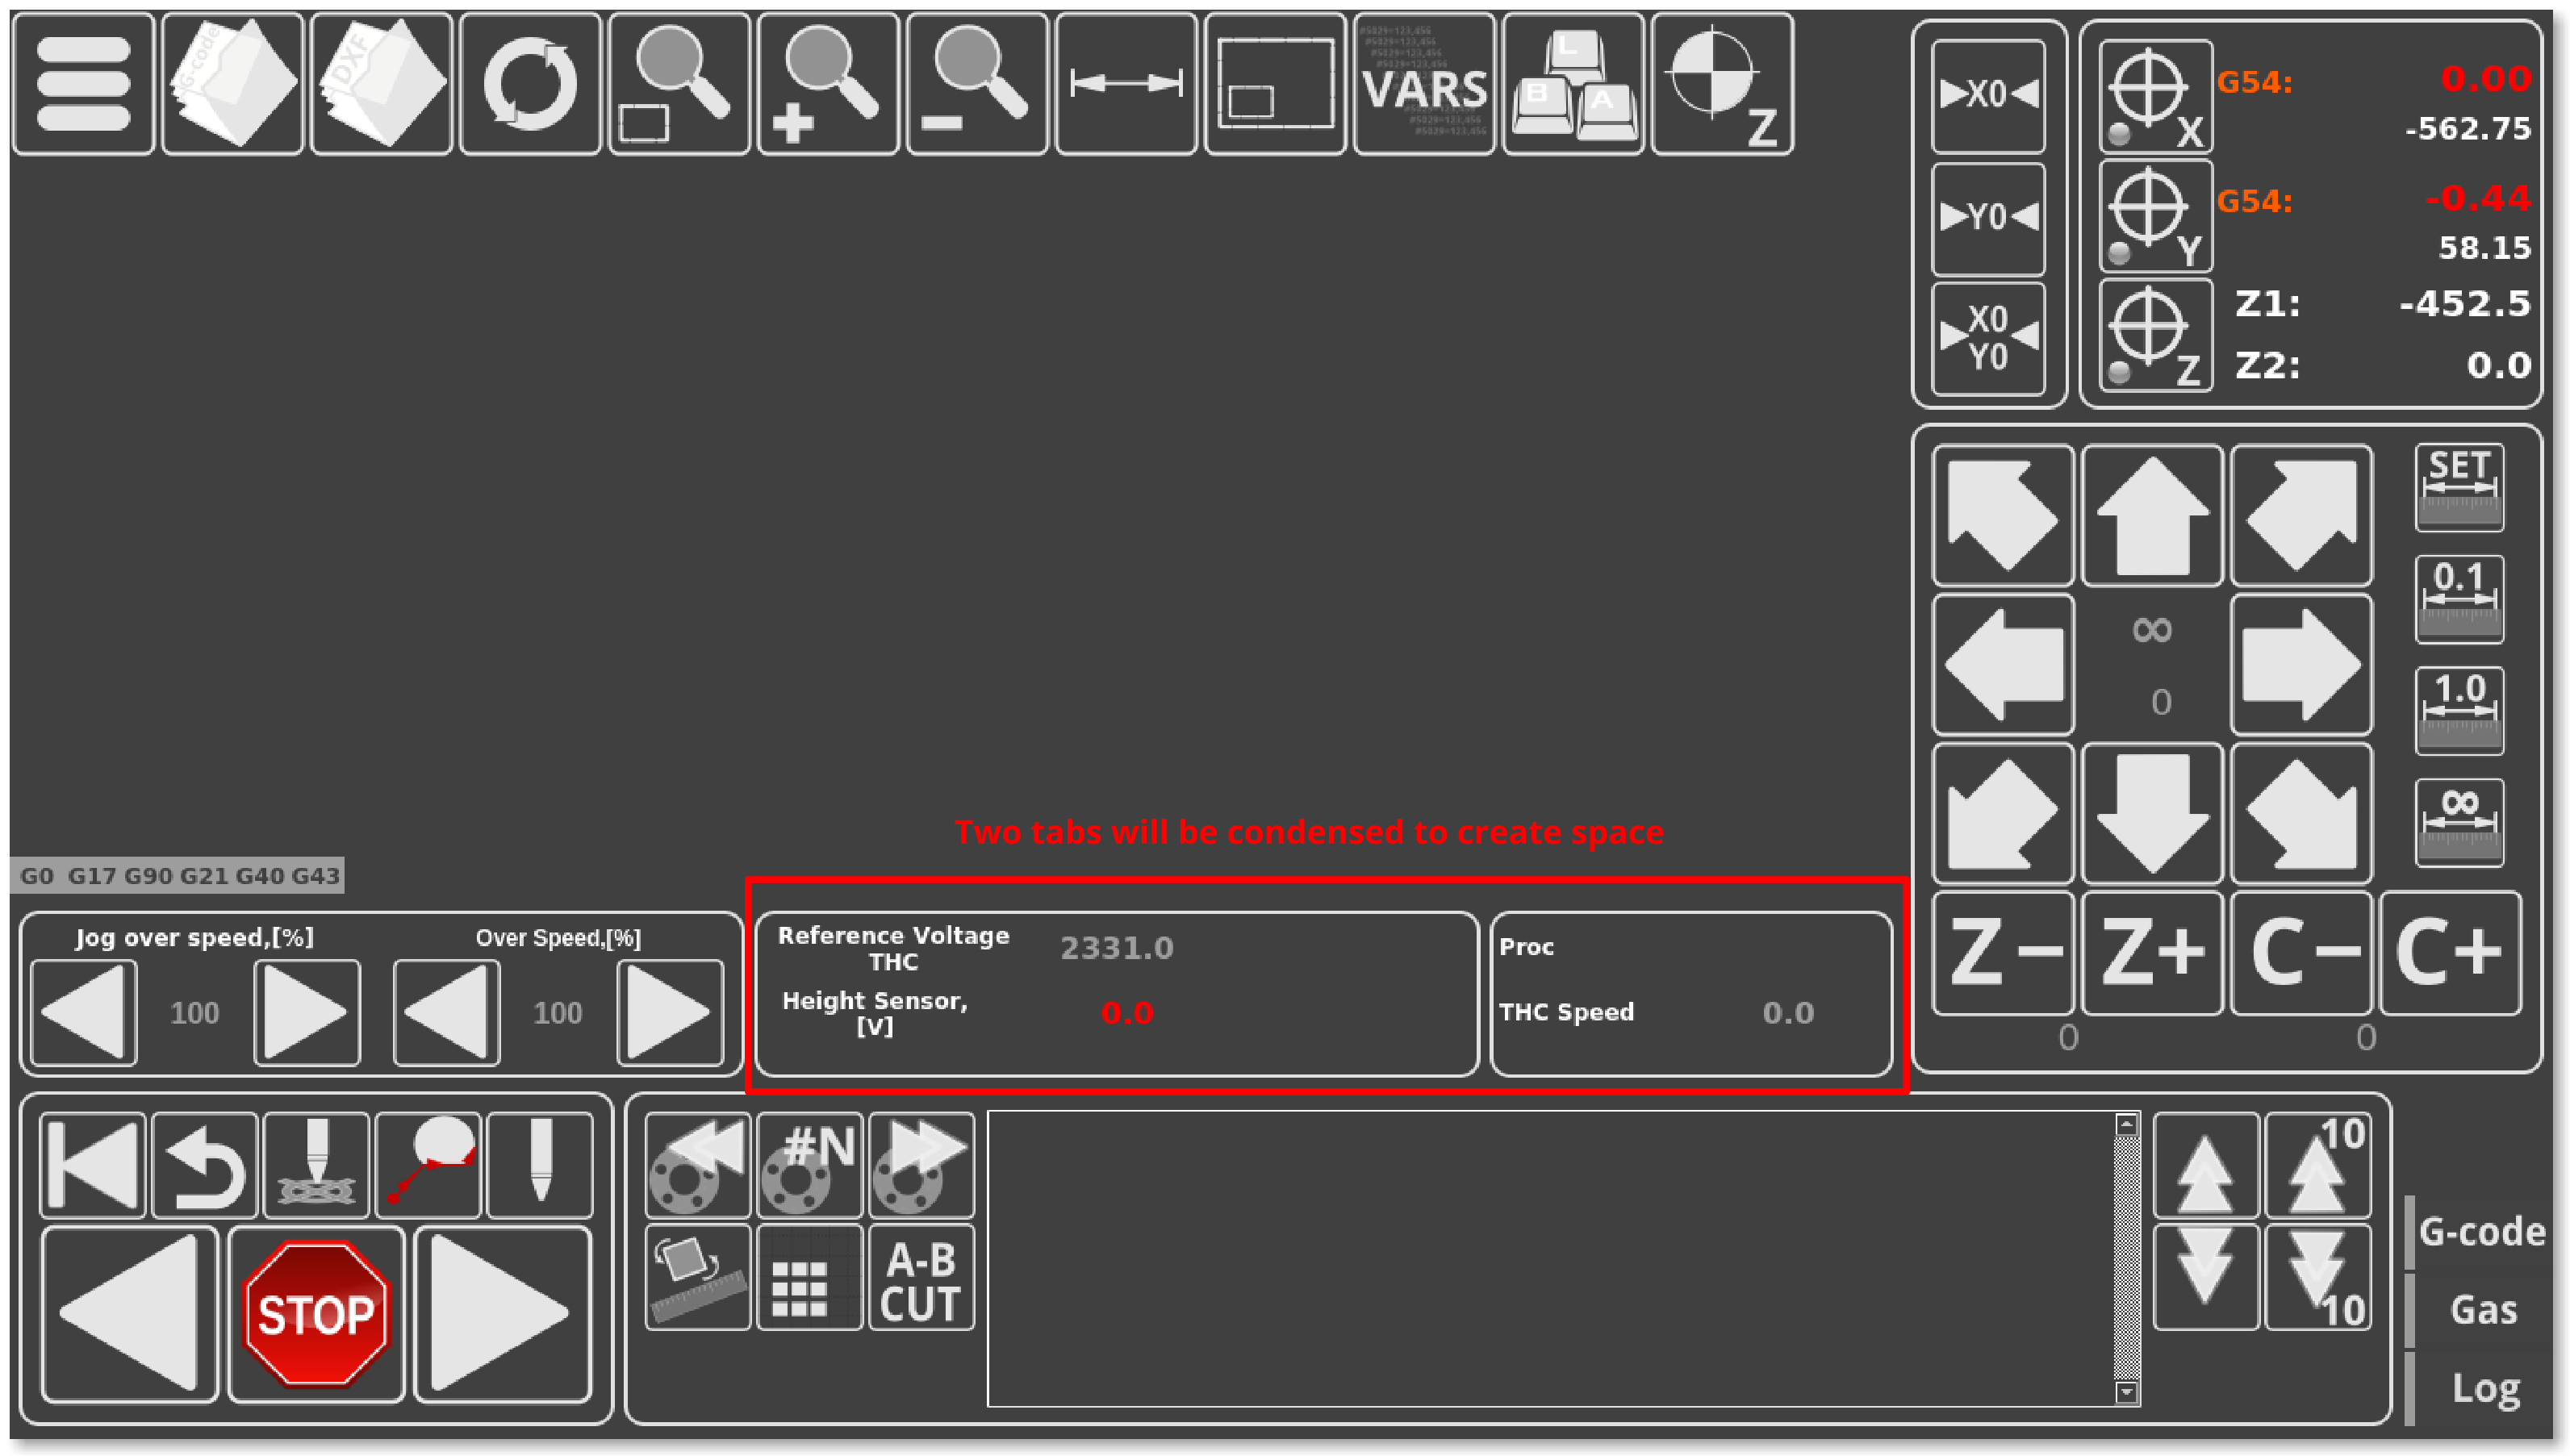
- The new buttons need to be inserted into some space on the main screen, so that they are easily accessible. No such readily available space exists on the screen at this point, so it has to be created. It has been noted that the functions in the two tabs next to the overspeed / jog overspeed buttons can be condensed into one tab.
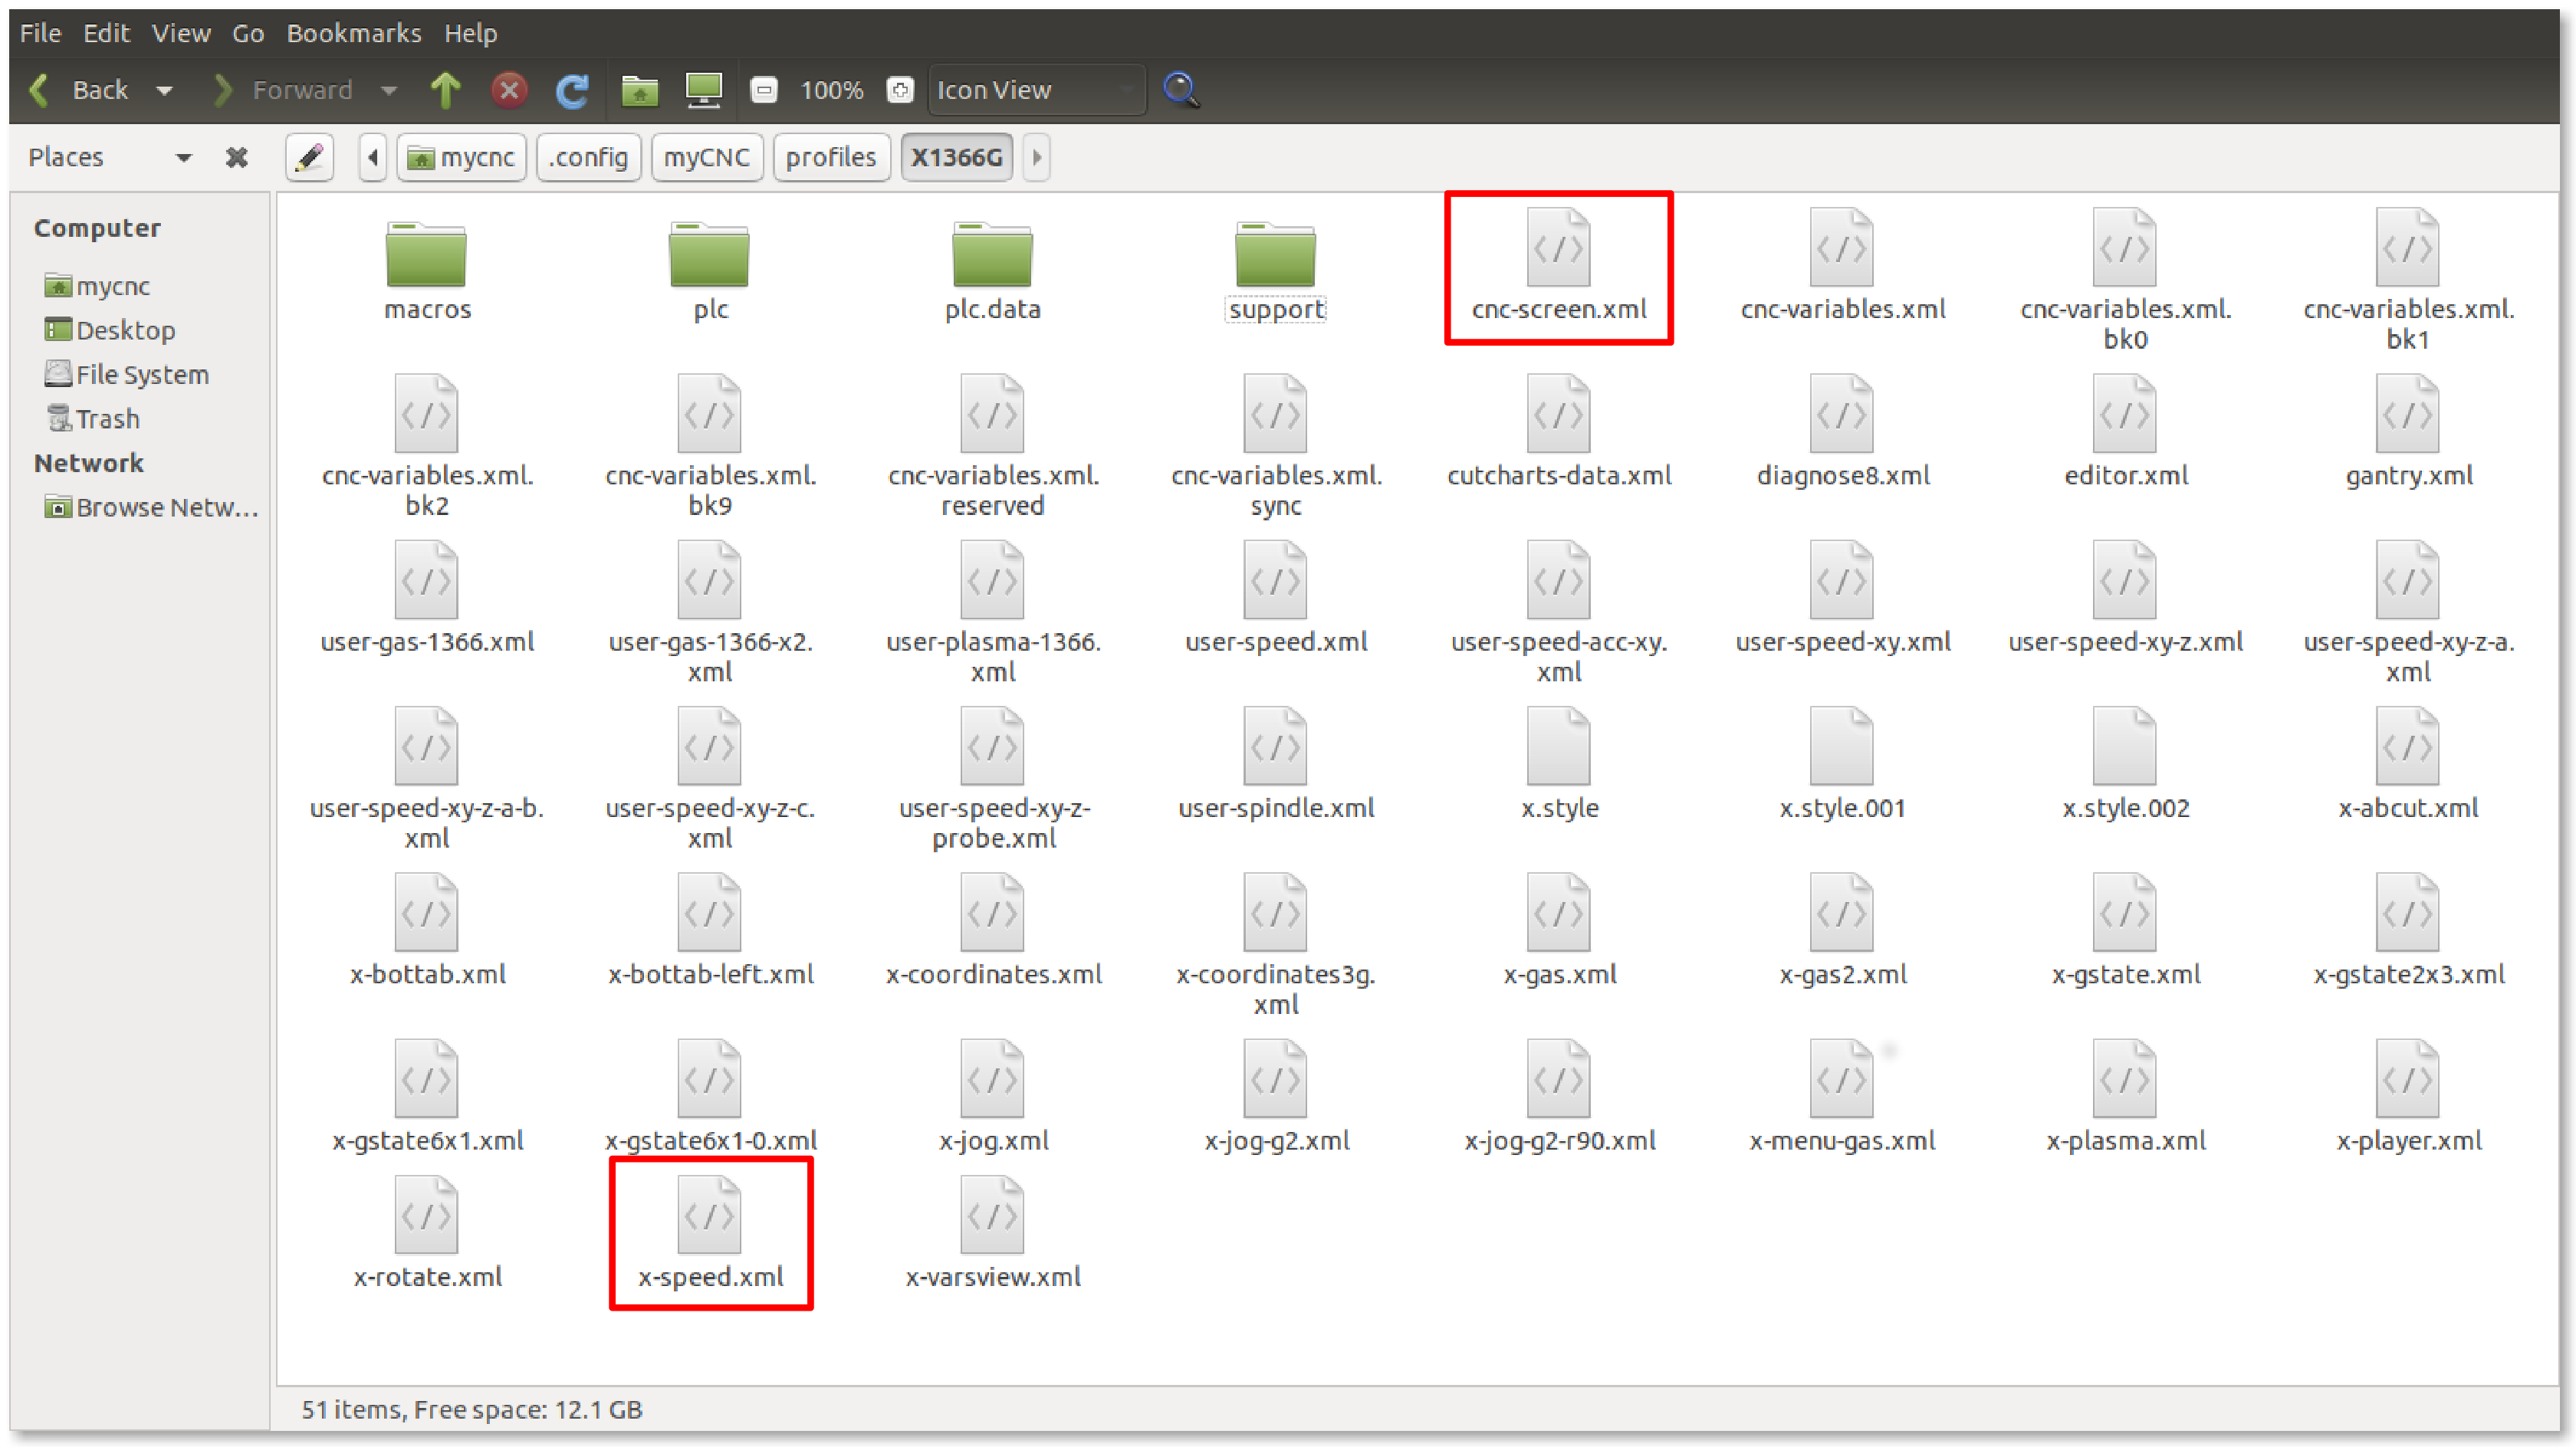
- In order to condense these tabs, we have to head into the config files for the myCNC application. Go to your Home folder, the navigate to
.config/myCNC/profiles/X1366G. In this folder, locate thex-speed.xmlfile and open it in the text editor of your choice (Pluma was used in this example). Note that different sections of the screen and different tabs can be described in different .xml files within the profile folder. What brings them all together is thecnc-screen.xmlfile which lists all the different files which are used when making the layout of the myCNC screen.
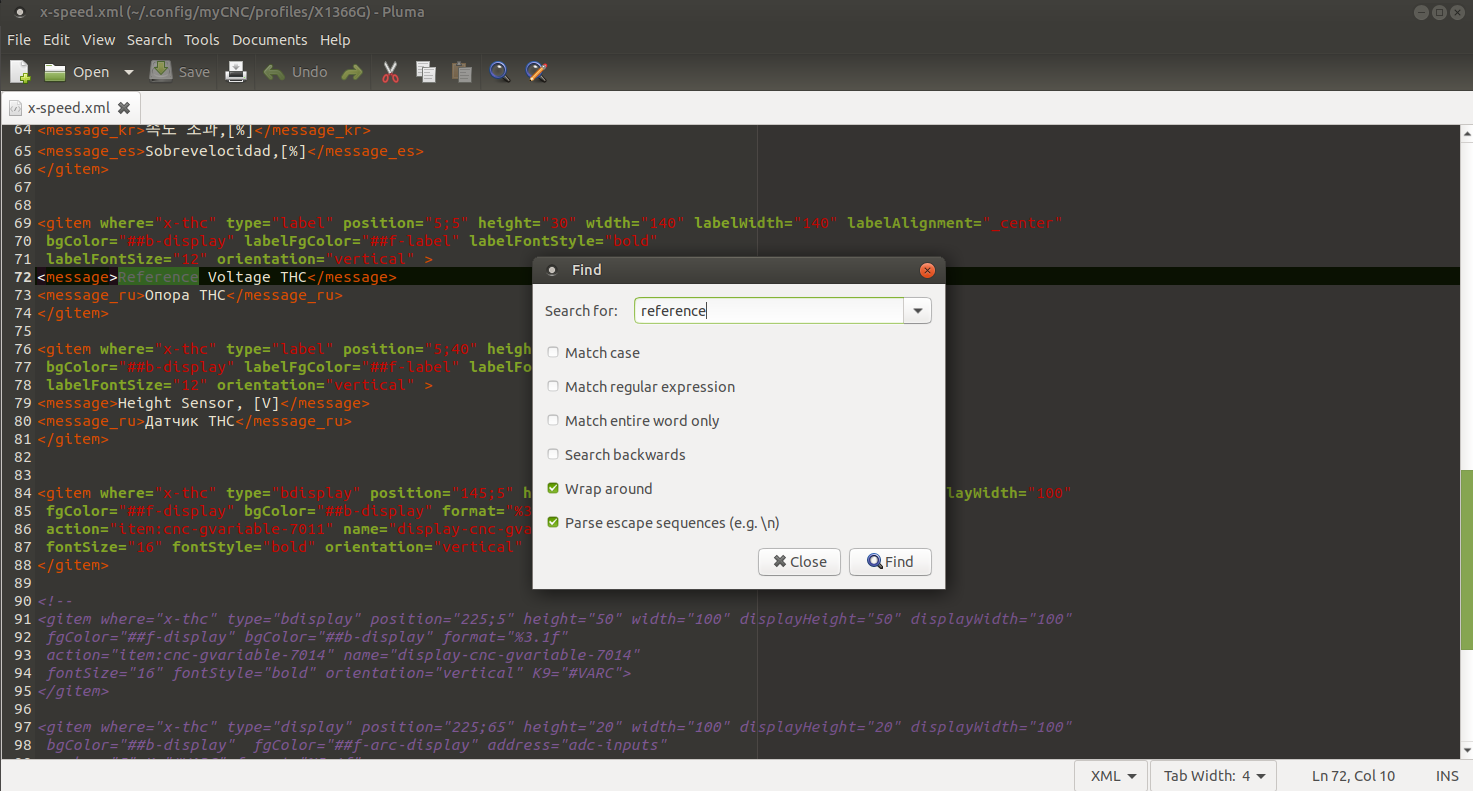
- In the x-speed.xml file, navigate to the section that describes the two tabs which will be condensed (the easiest way to do so would be to use the Ctrl+F function to search for the labels used within these tabs such as “Reference Voltage”)
- It can be seen that the
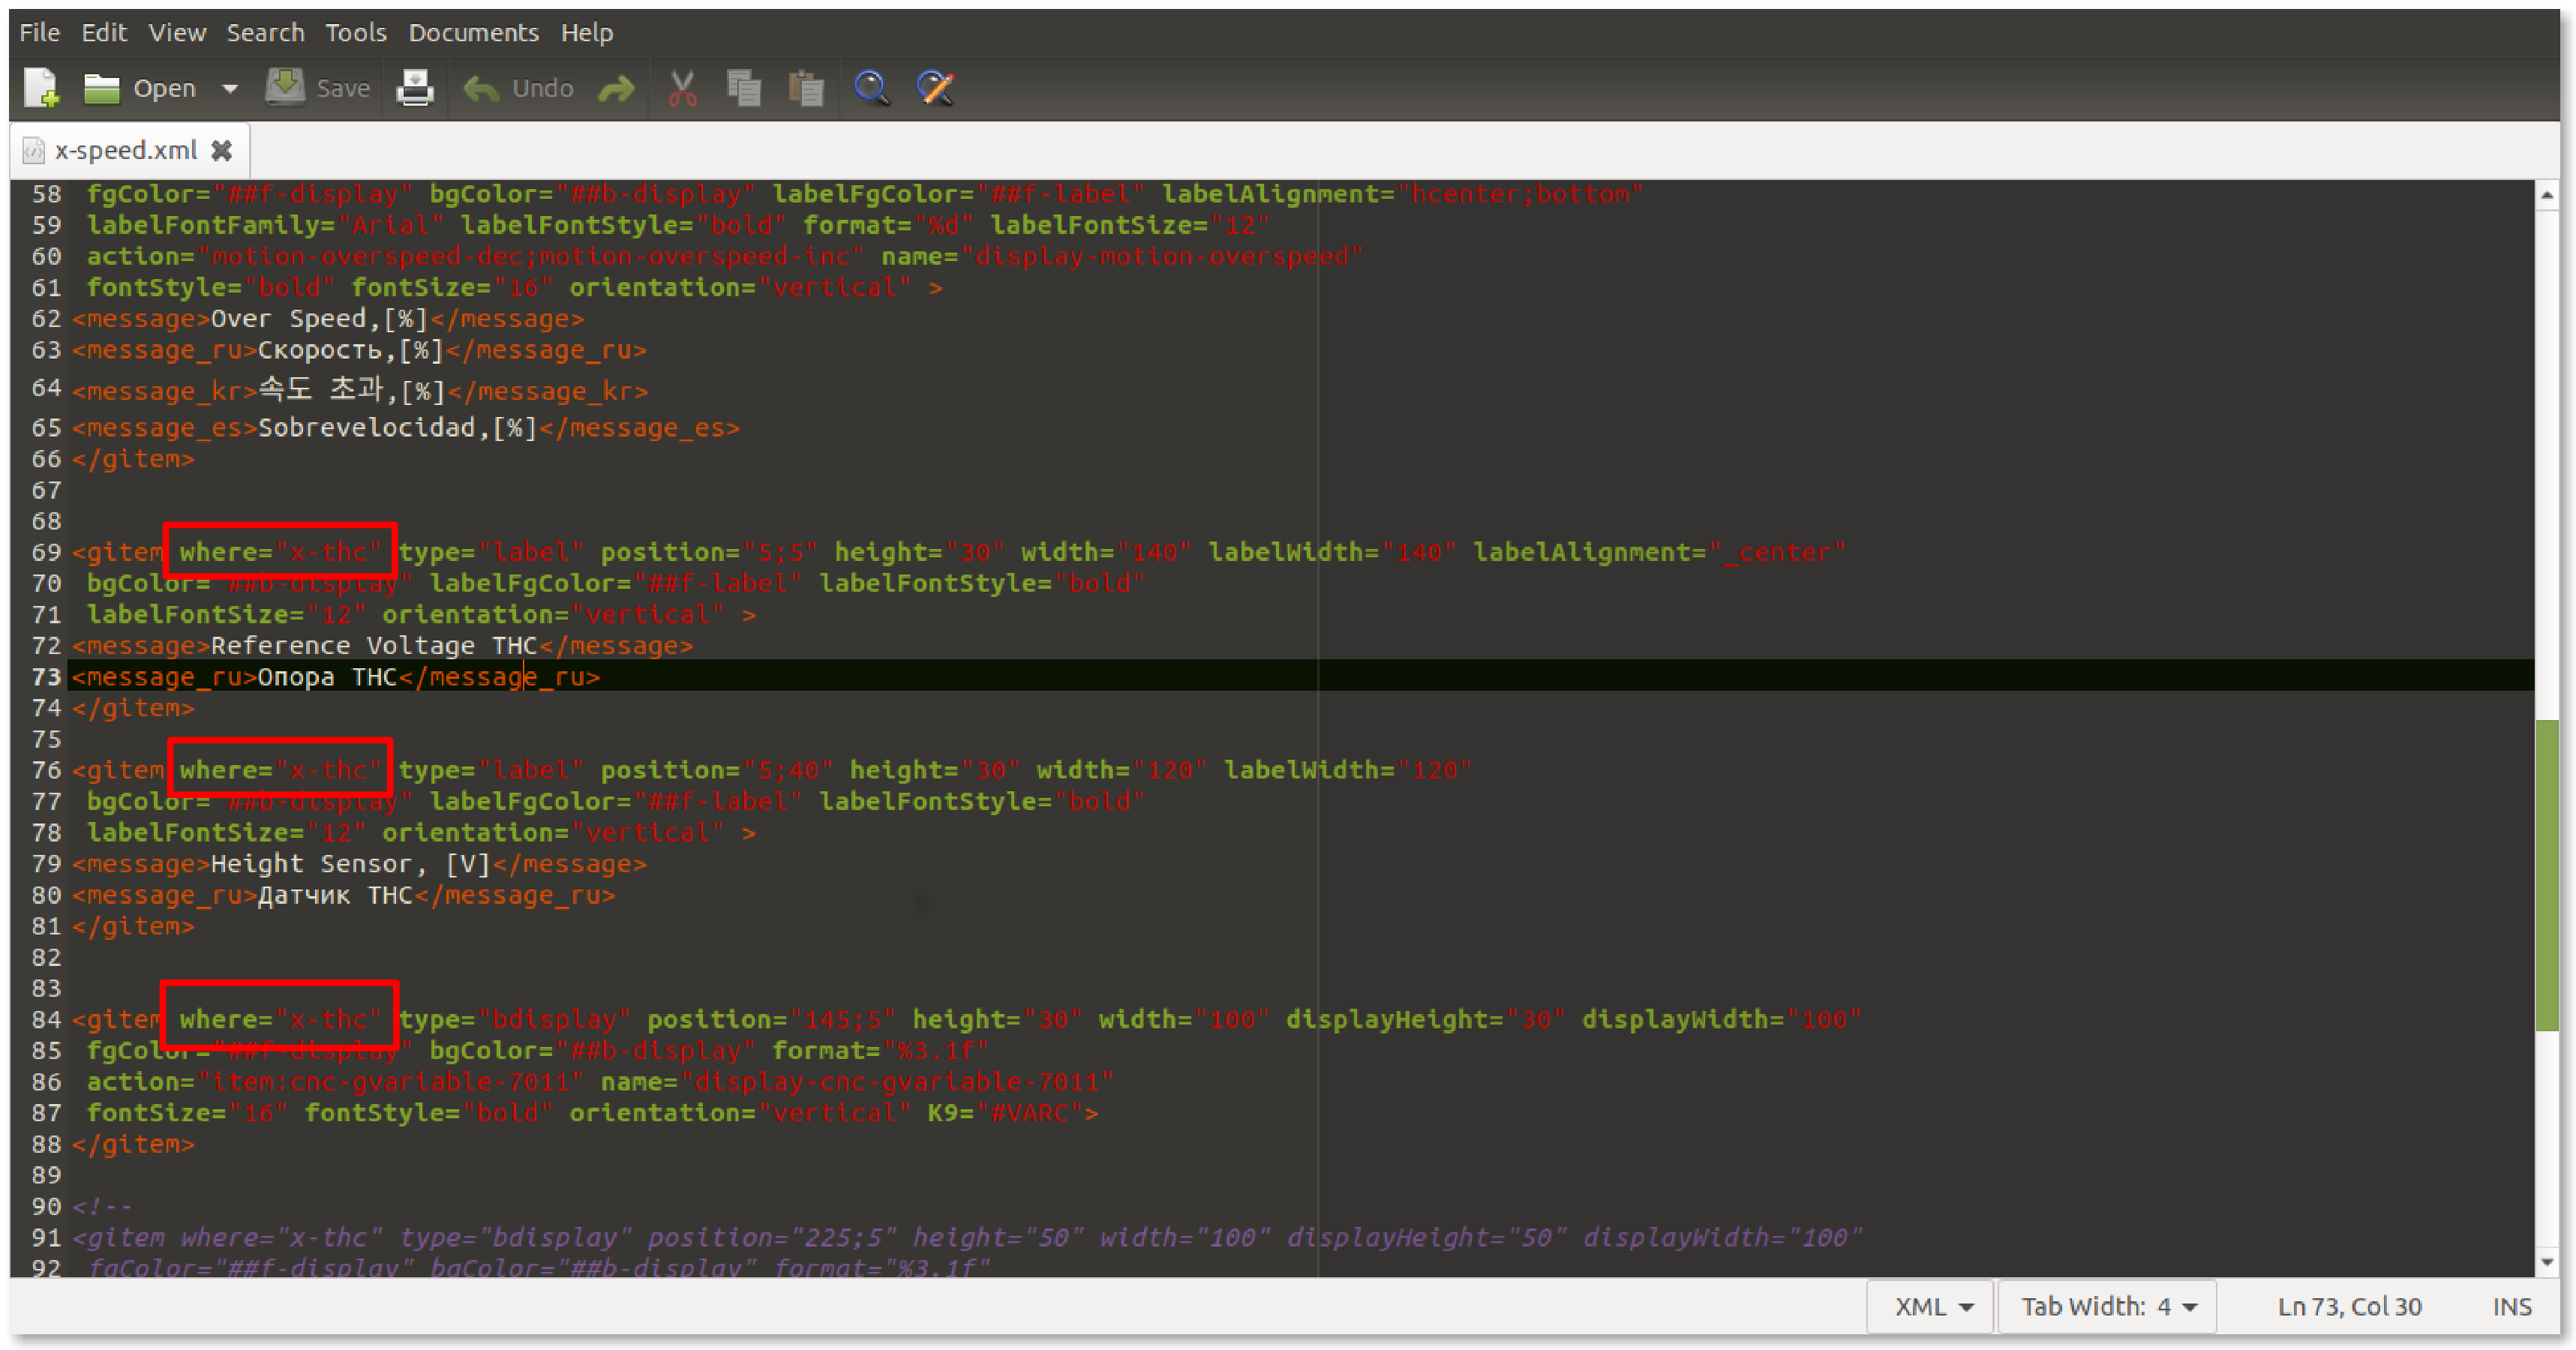
ProcandTHC Speedlabels are located in thex-reservsection, while theReference Voltage THCandHeight Sensorare situated in thex-thcsection (this can be seen in the“where=”field). We will condense the existing labels and display elements entirely into the x-thc, and the new buttons will be inserted into the now-vacant x-reserve tab.
- As a separate note, the Proc label will be removed during this example, as it is rarely used and will not be employed going forward on future myCNC builds.
- Alter the code to have the THC Speed label and its corresponding display element be in the
x-thctab instead of thex-reservetab, and remove the Proc label/display element entirely from the code. Note that the position of the THC Speed line is shifted downwards, as to not conflict with the screen elements already present withinx-thc.
<gitem where="x-thc" type="display" position="70;55" height="30" width="275"
 displayHeight="25" displayWidth="80" labelWidth="205"
 fgColor="##f-display" bgColor="##b-display"
 labelFontStyle="bold"  labelAlignment="_left" labelFgColor="##f-label"
 format="%5.1f" K="1."
 deviation="0.01" name="display-gvariable-5493"
 fontStyle="bold" fontSize="16" orientation="horizontal" >
<message>THC Speed</message>
<message_ru>Z Слежение</message_ru>
<message_es>THC velocidad</message_es>
</gitem>
- The x-reserve tab will be moved to the left, closer towards the overspeed buttons, while the x-thc tab will be moved to the right instead, as control buttons are typically positioned towards the left part of the screen in this profile. In order to do so, locate the code that defines x-thc and x-reserv elements within the text file (search for
name=“x-thc”andname=“x-reserve”). We will be changing their position values, as well as their width and basewidth values to accommodate for the buttons/labels within these tabs.
<gitem where="xp" position="563;484"
 width="450" height="90" basewidth="390" baseheight="90"
 type="frame" border-color="##b-border" border-width="2" border-radius="10"
 name="x-thc" bgColor="##b-main" />
<gitem where="xp" position="401;484"
 width="155" height="90"
 basewidth="155" baseheight="90"
 type="frame" border-color="##b-border" border-width="2" border-radius="10"
 name="x-reserv" bgColor="##b-main" />
- Next, the images for the new Gas ON/OFF buttons need to be added to the myCNC image folder. Note that this is NOT the same folder/path as the profile folder described earlier. The images will need to be added to the theme folder (currently “xp”, as described in the Settings > Config > Screen > Theme field), which will be located (on Ubuntu machines) in
opt/myCNC/art/buttons-no-theme/xp. Note that the last bit of this folder path changes depending on the theme specified in myCNC settings, however the xp theme is used as it is the default on 1366 series profiles.
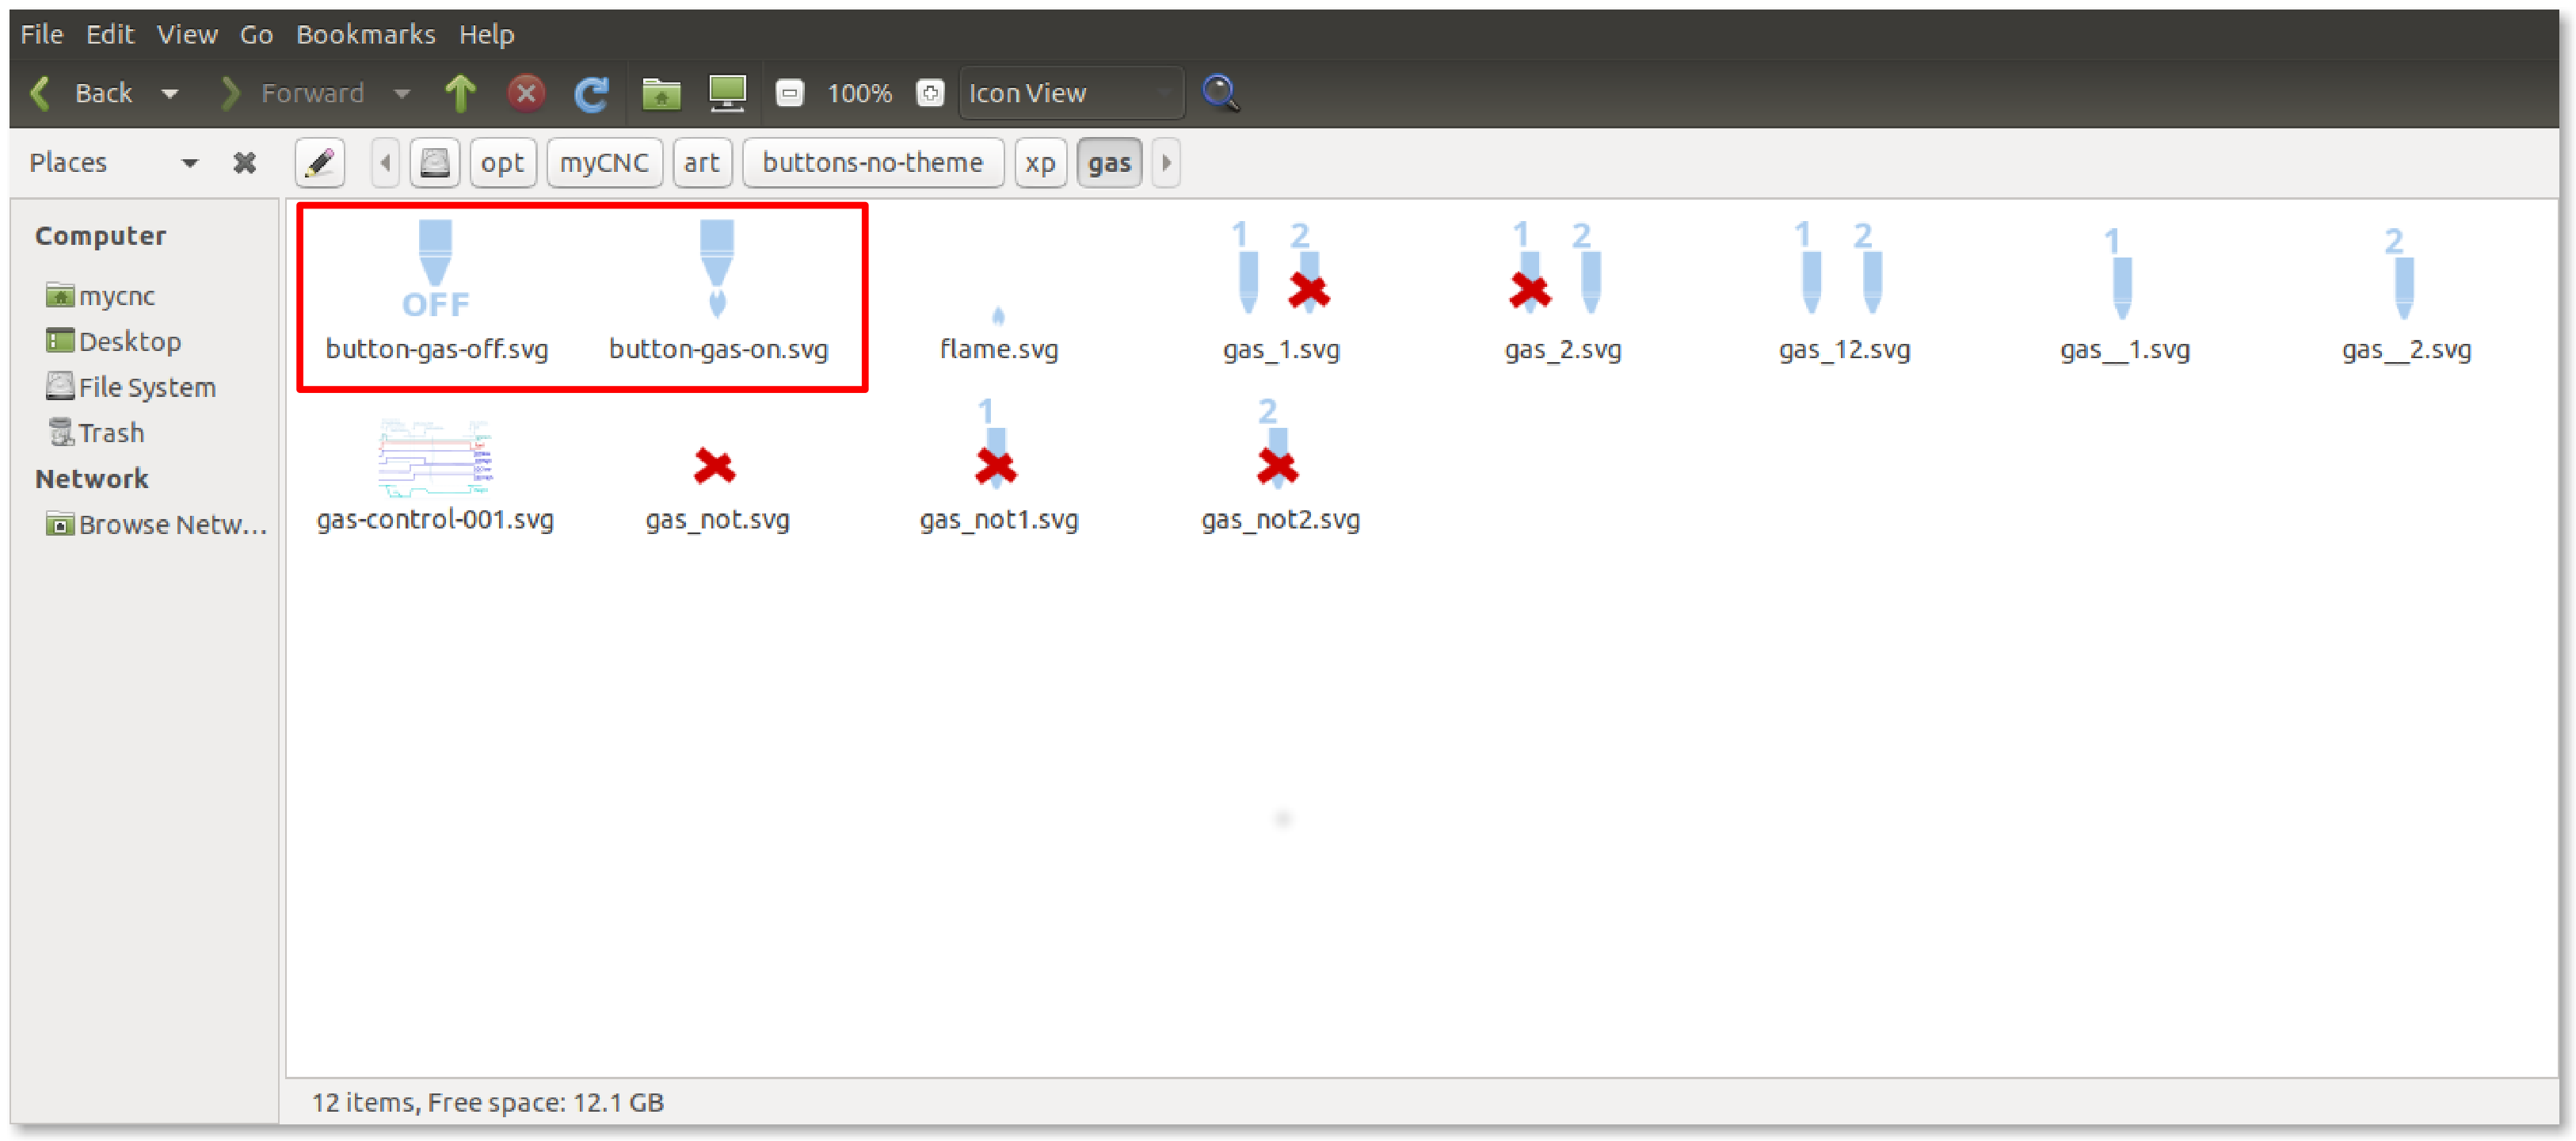
- The two buttons that will be used to turn the gas on and off currently do not have their respective images. These will be added to the
gasfolder within thexptheme folder described above. They will be calledbutton-gas-on.svgandbutton-gas-off.svgrespectively. The images are created using a program capable of making an .svg file, like Inkscape (free, open-source vector graphics application).
- Within the currently existing x-reserv tab, we will now add an
x-reserv-viewMyItems element, as to allow to show buttons and images within the frame. From here on, the buttons will be inserted intox-reserv-viewrather than directly intox-reserv.
<gitem where="x-reserv" name="x-reserv-view" position="2;2"
 width="155" basewidth="90"
 height="155" baseheight="90"
 type="myitems" />
- Above the images that we will be inserting, it is often advisable to create a label in order to denote what the buttons are meant to do. In our example, the button will simply say “Gas”:
<gitem where="x-reserv-view" type="label" position="44;0" height="20" width="70" labelWidth="70"
 bgColor="##b-display" labelFgColor="##f-label" labelAlignment="_center" labelFontStyle="bold"
 labelFontSize="12" orientation="vertical" >
<message>Gas</message>
</gitem>
- At this point, the code for the gas buttons can be inserted. Note how the folder path is written out for the images that we have created and saved in the
gasfolder within thexptheme folder:
<gitem where="x-reserv-view" position="11;23"
 width="60" height="60"
 image="gas/button-gas-on"
 action="TURN-GAS-ON"
 type="button" />
<gitem where="x-reserv-view" position="81;23"
 width="60" height="60"
 image="gas/button-gas-off"
 action="TURN-GAS-OFF"
 type="button" />
NOTE: THE ACTIONS CURRENTLY USED IN THIS CODE ARE PLACEHOLDERS.
CORRECT ACTIONS WILL BE ADDED LATER
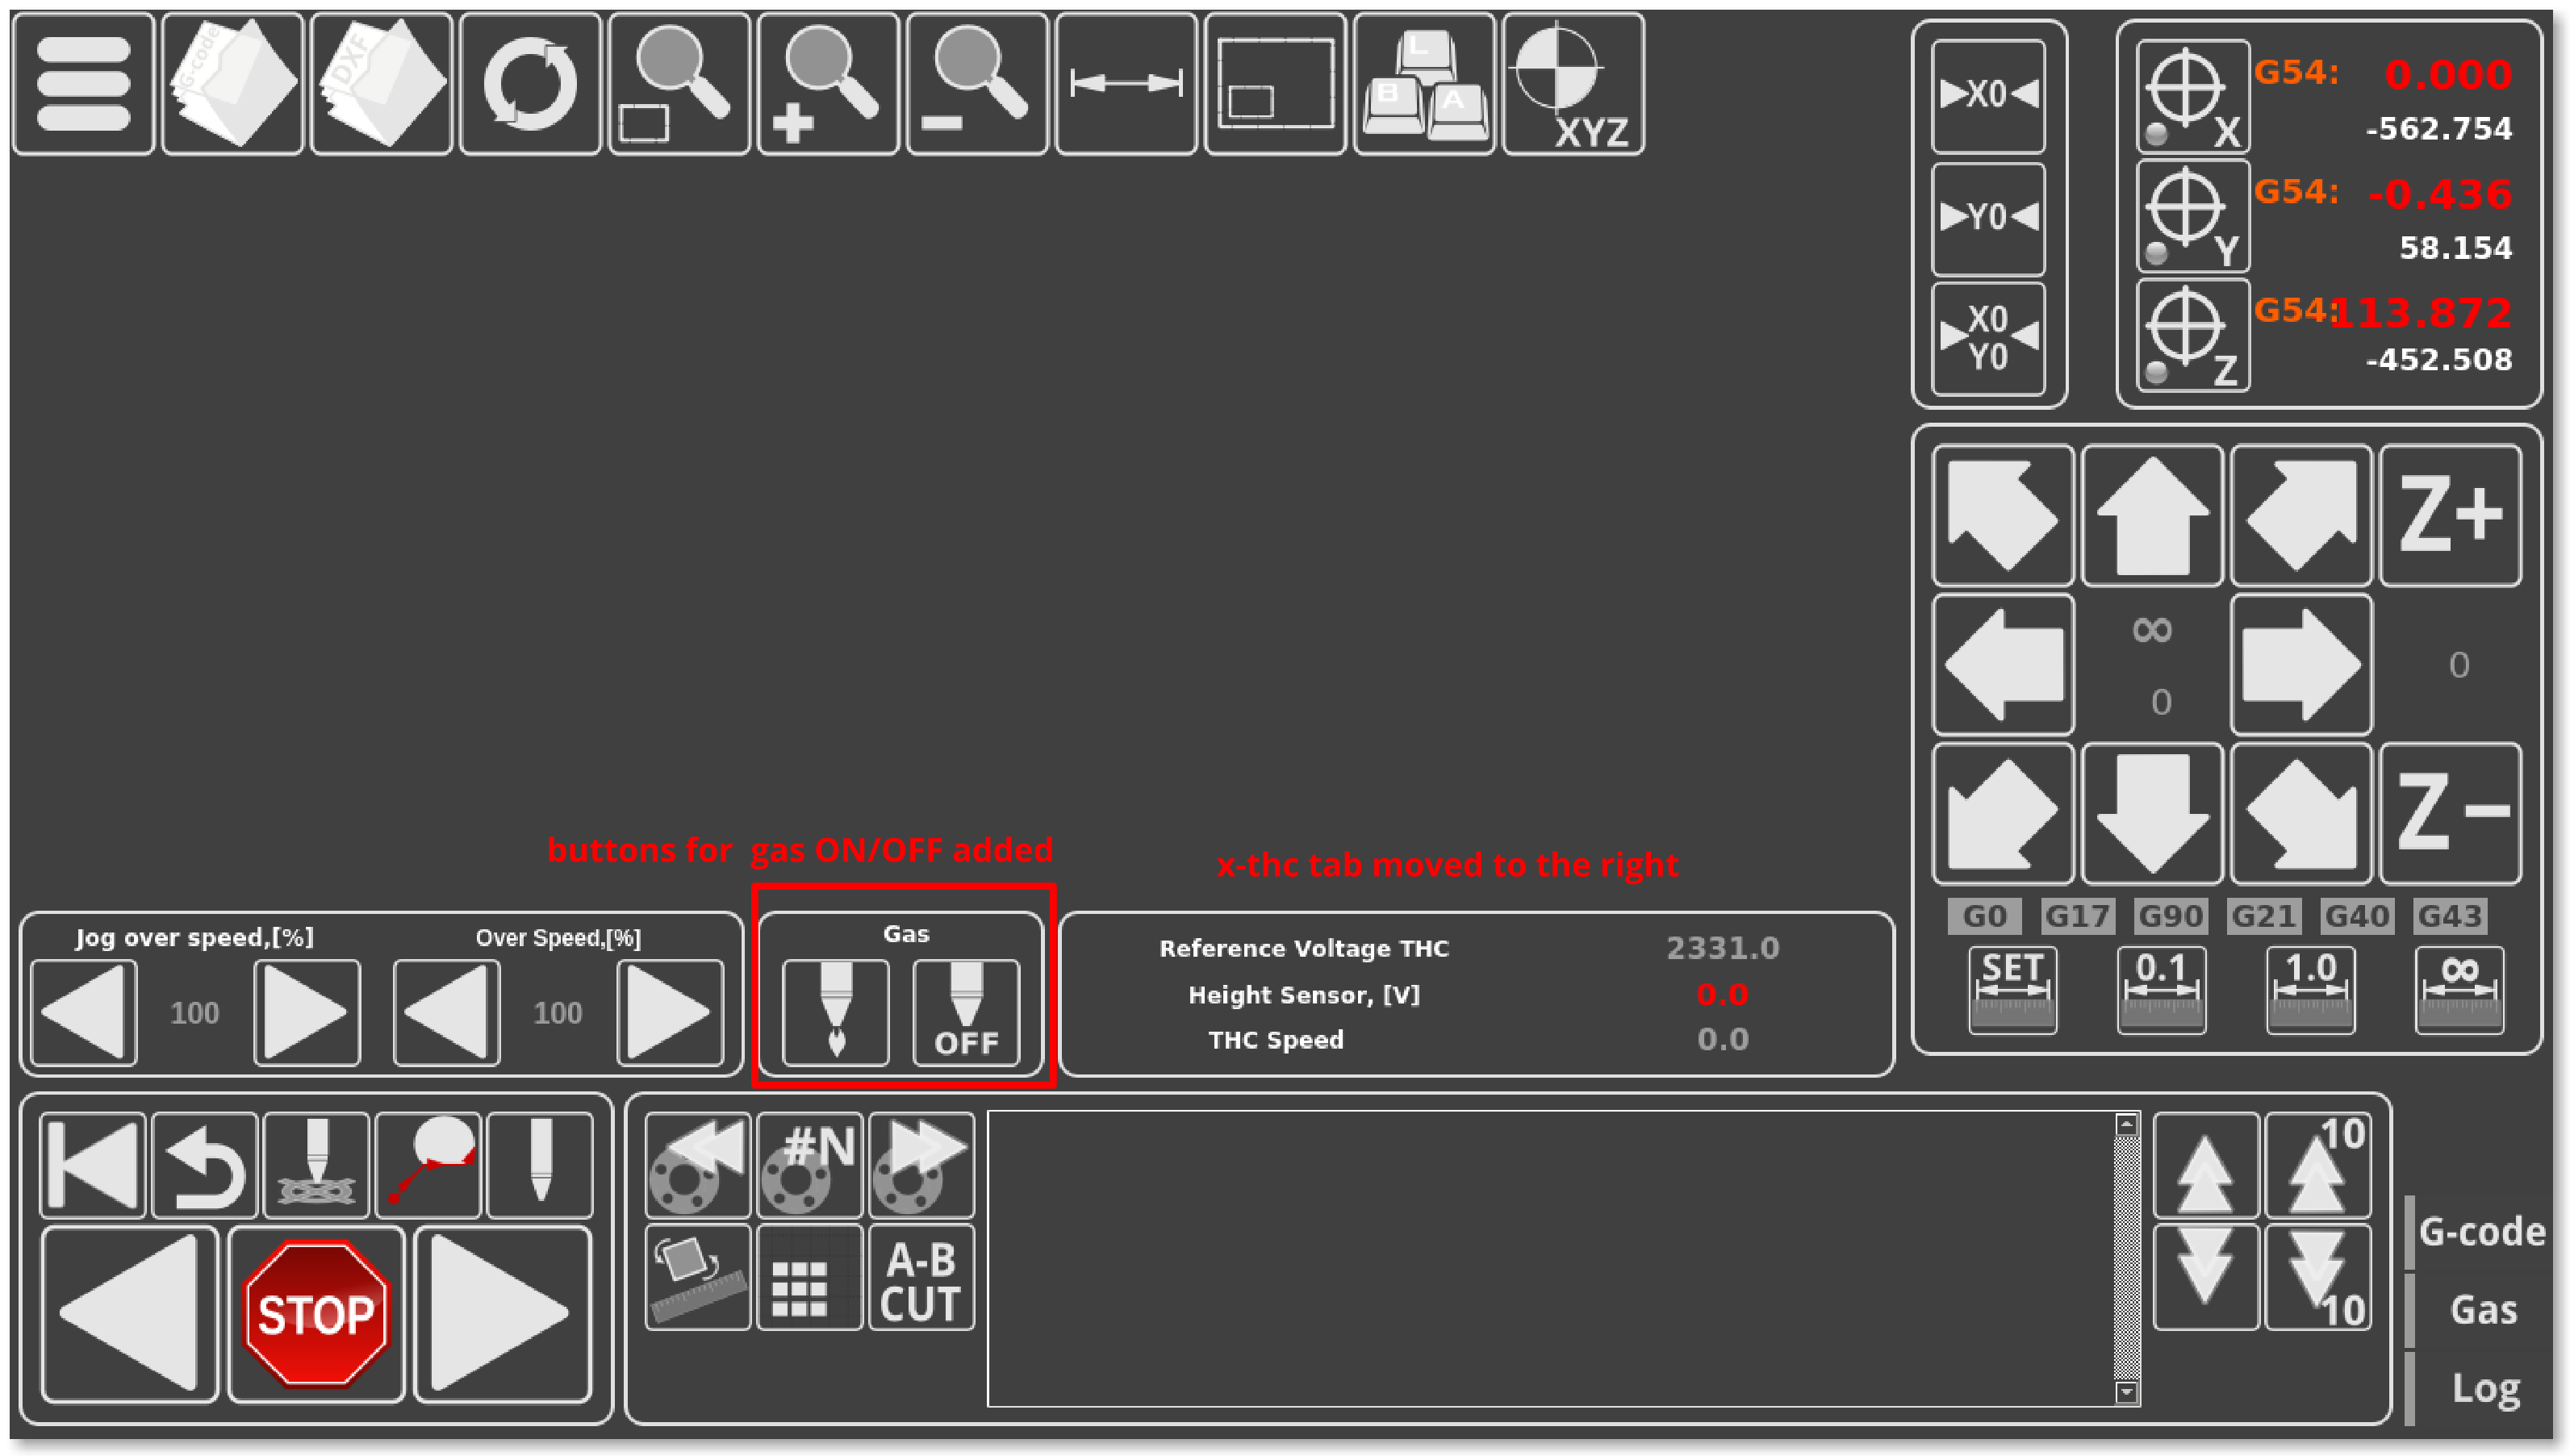
- At this point, after saving the
x-speed.xmlfile and reloading the myCNC application, your screen should look like this:
As can be seen in the screenshot above, the program now has two new on-screen buttons for gas on/gas off, as well as having the previously available information condensed into relocated x-thc tab.
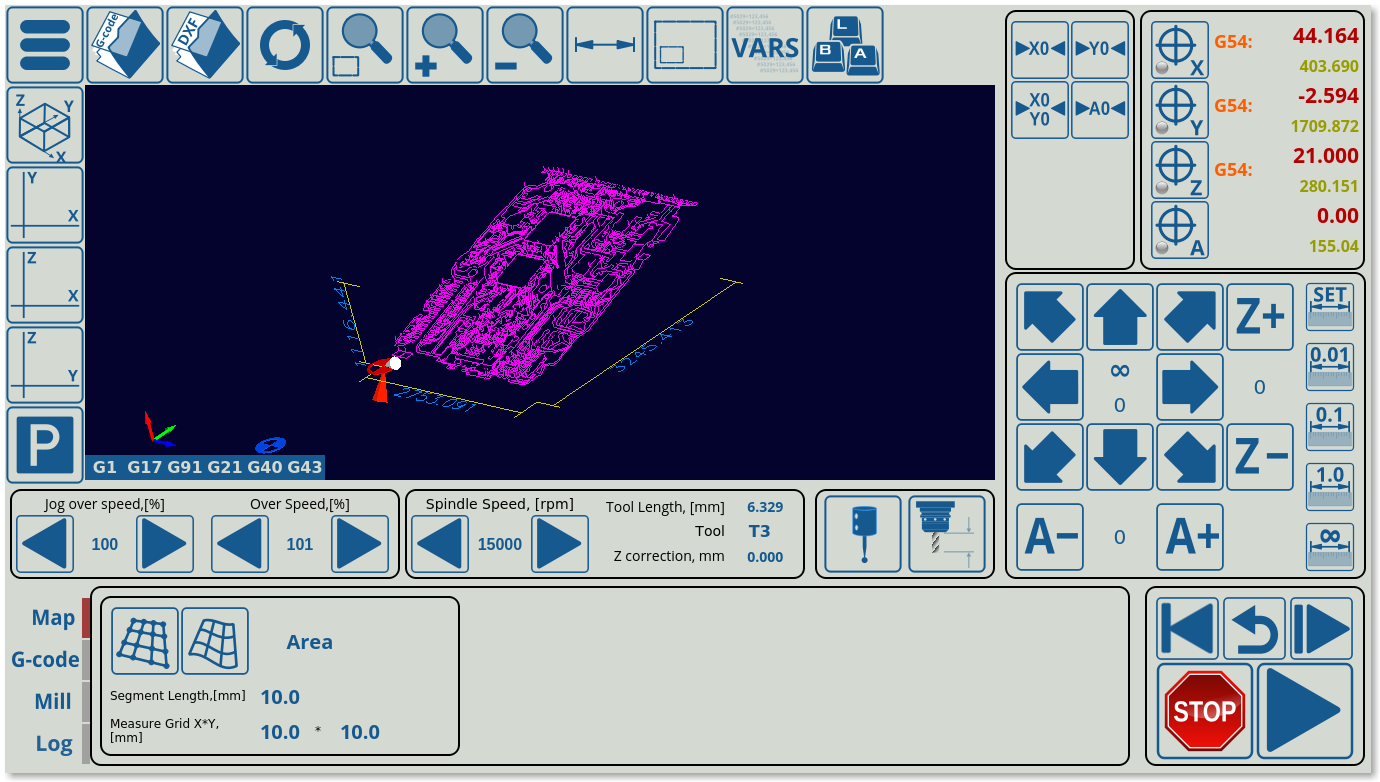
Example 3: Adding a tab next to the Mill, Log and G-code tabs
In this example, we will be editing the existing 1366M4 profile by adding a new tab to the already existing Mill, Log and G-code tabs which can be found on the bottom of the main profile screen. This tab will contain some buttons to adjust the current G-code program file with regards to a z-height map of the working material that will be created using a probe (a similar feature already exists on the X1366V profile at the time of writing this manual).
- The code for the bottom tab can be found in the
x-bottab-left-mill.xmlfile in the main profile folder (X1366M4). This file should be specified in thecnc-screen.xmlfile, to indicate to the program that this code will be included on the main screen. The line in thecnc-screen.xmlfile should look the following:
<include>x-bottab-left-mill.xml</include>
Note that this file (the file containing the bottom tab code) is different for different profiles - for example, the 1366V profile uses the x-bottab-camera.xml file instead.
- Upon opening the
x-bottab-left-mill.xmlfile, find the following chunk of code:
<gitem where="x-bottab" name="x-mill" position="85;0"
 width="1040" basewidth="1040" height="180" baseheight="180"
 type="frame" border-color="##b-border" border-width="2" border-radius="10"
 bgColor="##b-main"  hide-list="x-nclist;x-log" exclusive="yes"  />
- This is followed by similar code for x-log and x-nclist, and outlines the basics of each of the three already existing tabs. First of all, it is necessary to add a fourth chunk of code, which we will call
x-mapping.
<gitem where="x-bottab"
 name="x-mapping" position="85;0"
 width="1040" height="180" basewidth="1040" baseheight="180"
 type="frame" border-color="##b-border" border-width="2" border-radius="10"
 bgColor="##b-main" hide-list="x-log;x-mill;x-nclist" exclusive="yes" />
Note that the hide-list for this code specifies all the other tabs that will be hidden when the x-mapping tab is open. Note that the exclusive flag is set to “yes”, indicating that only one such tab/window will be open at one time. In a similar fashion, it is necessary to add that x-mapping will be hidden when the other tabs are open in their respective code. For example, the Mill tab will have its code altered like so (each of the other tabs will have to have x-mapping added to the hide-list):
<gitem where="x-bottab" name="x-mill" position="85;0"
 width="1040" basewidth="1040" height="180" baseheight="180"
 type="frame" border-color="##b-border" border-width="2" border-radius="10"
 bgColor="##b-main"  hide-list="x-nclist;x-log;x-mapping" exclusive="yes"  />
- Next, the button to switch to the Map tab will be added. It is done through the following code:
<gitem where="x-bottab" position="5;12"
 width="80" height="40" skinbase="flat"
 xattr="0;0;80;40;led;red;round"
 images="vbutton-right-led-off;vbutton-right-led-on" address="widget"
 image="mapping-left"
 action="mywidget-show:x-mapping" type="xbutton"/>
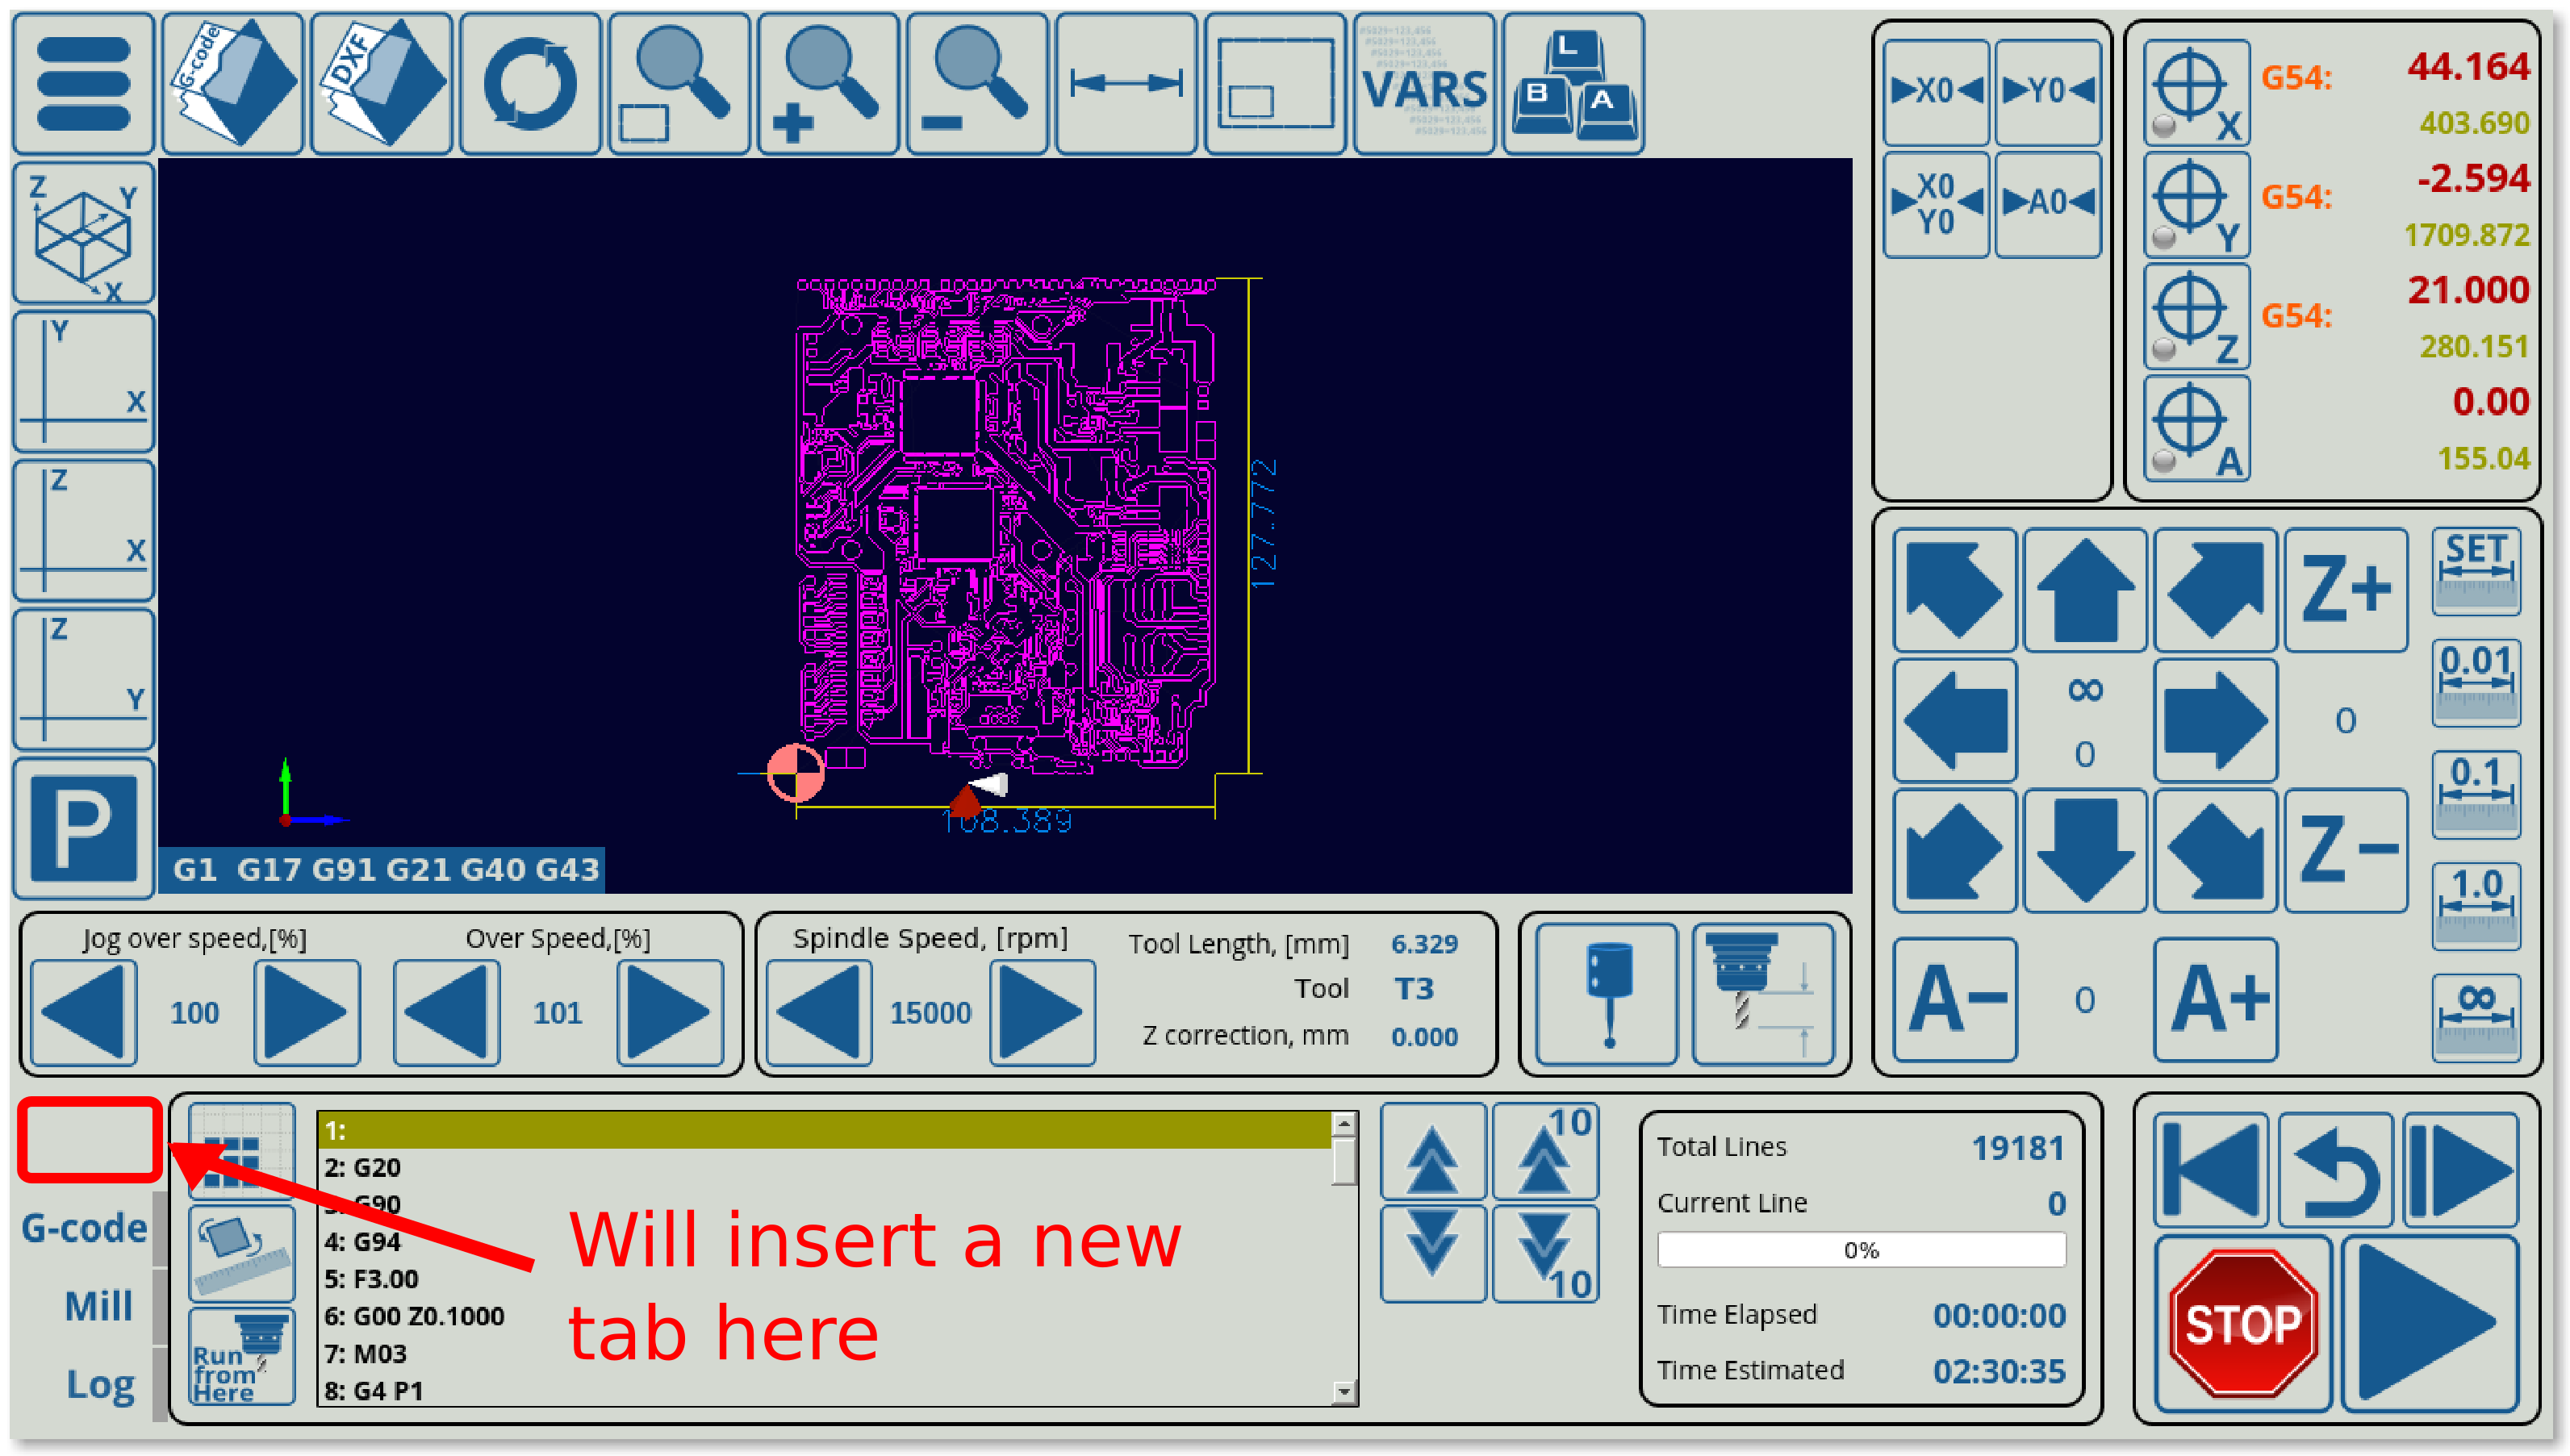
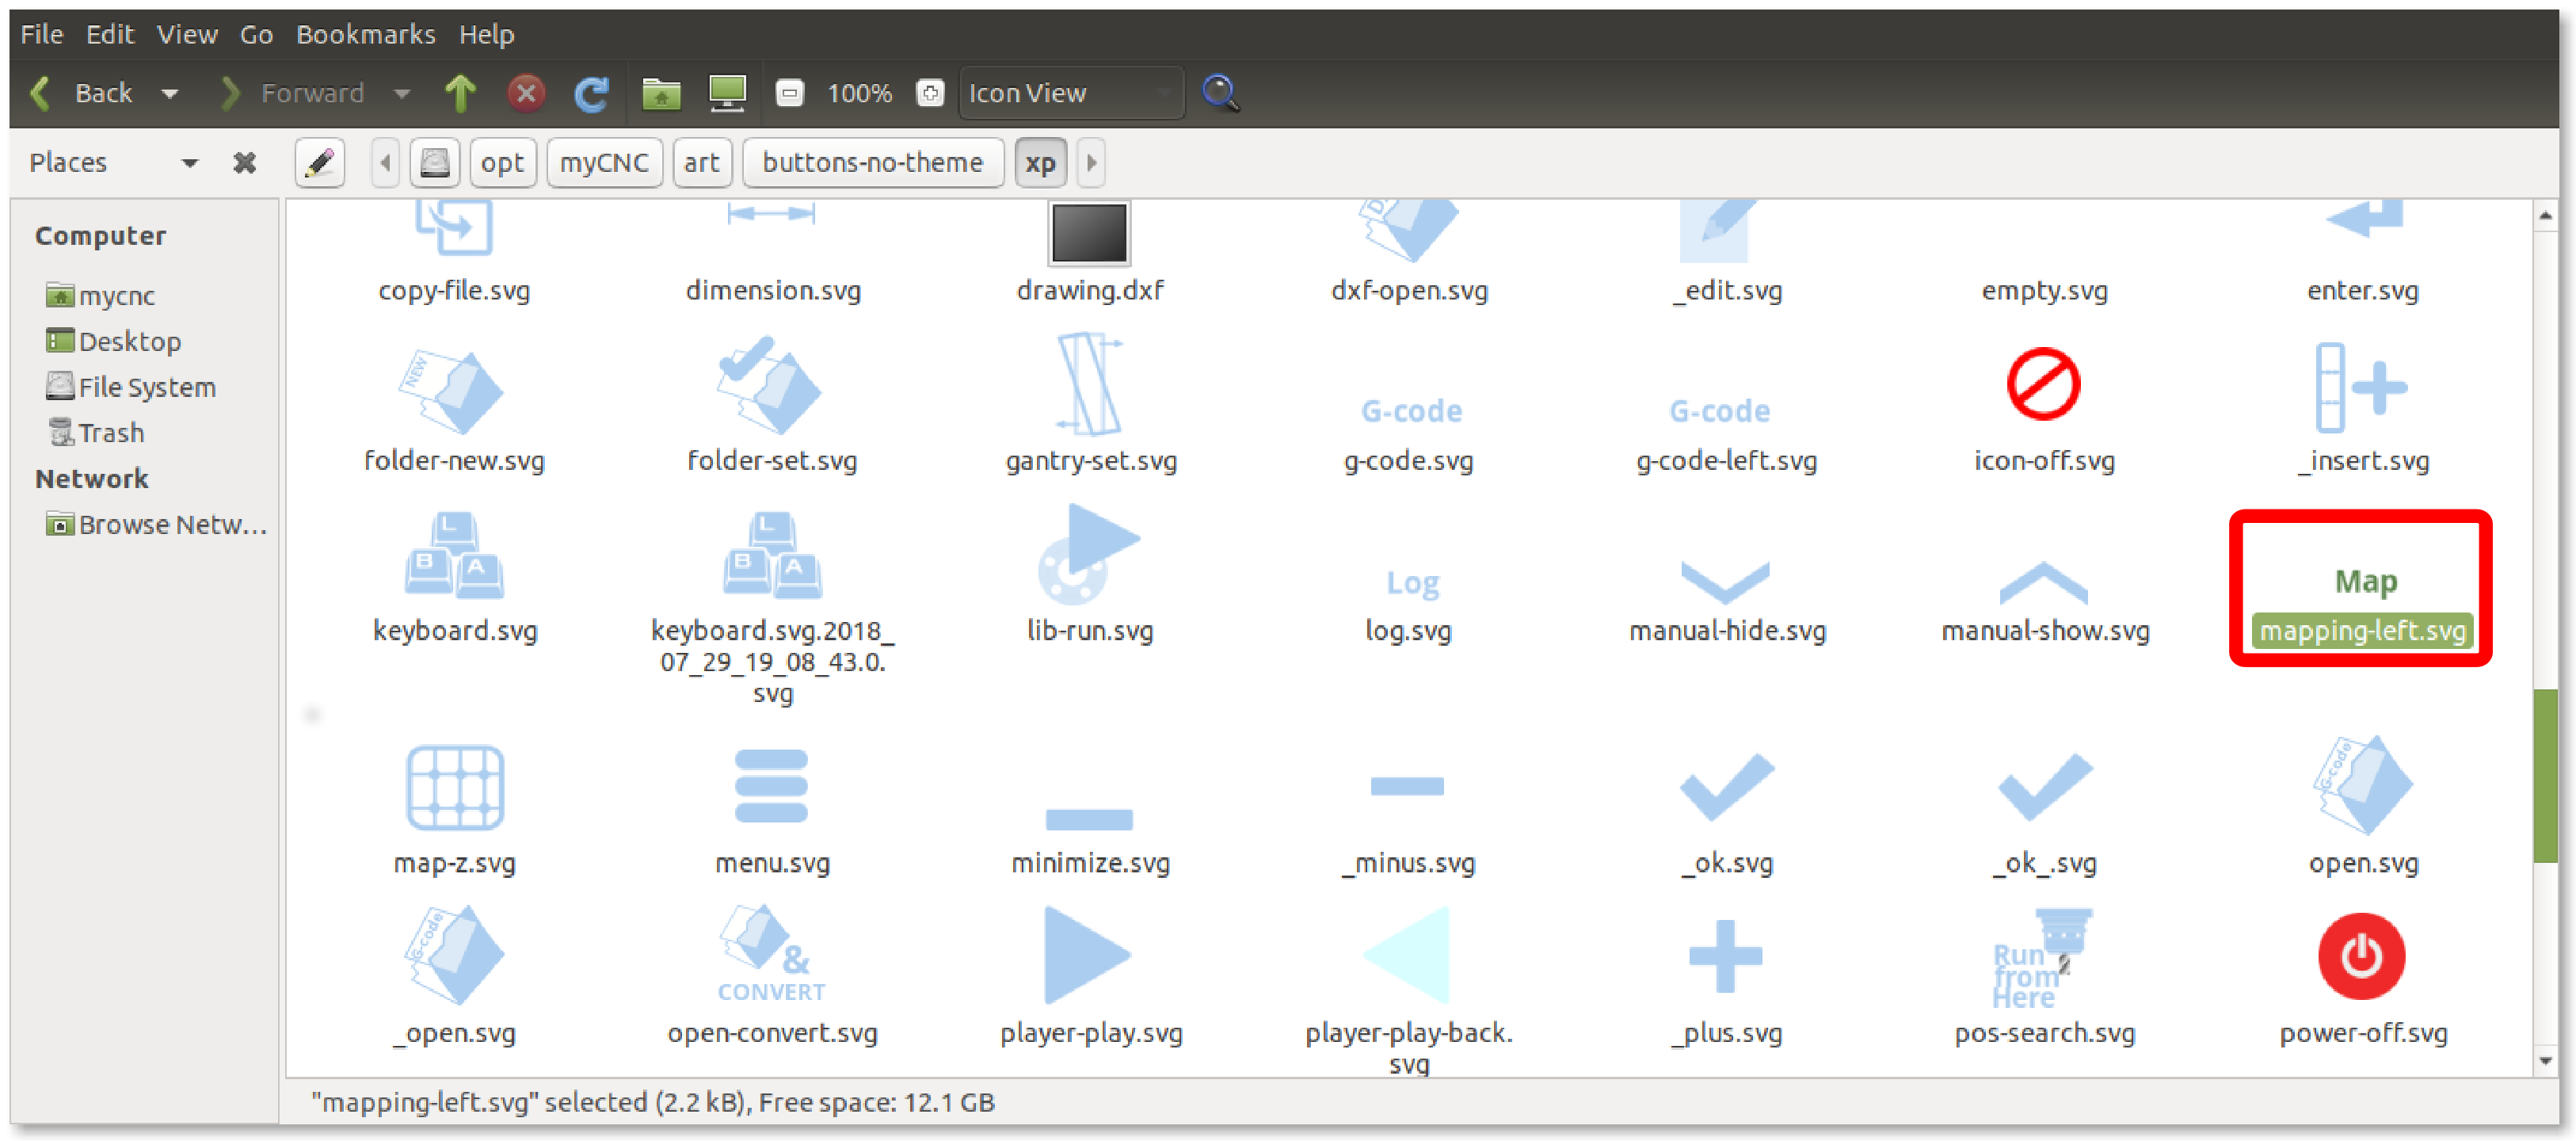
- Note that this refers to an image that is not used anywhere else in the application, so it is necessary to create it. We can do so by adding a new image with the name
mapping-left.svgto themyCNC/art/buttons-no-theme/xpfolder (if the default xp theme is used). An image with the word “Map” was created and added to that folder in this step using the Inkspace application (any application which can edit and export .svg files will work):
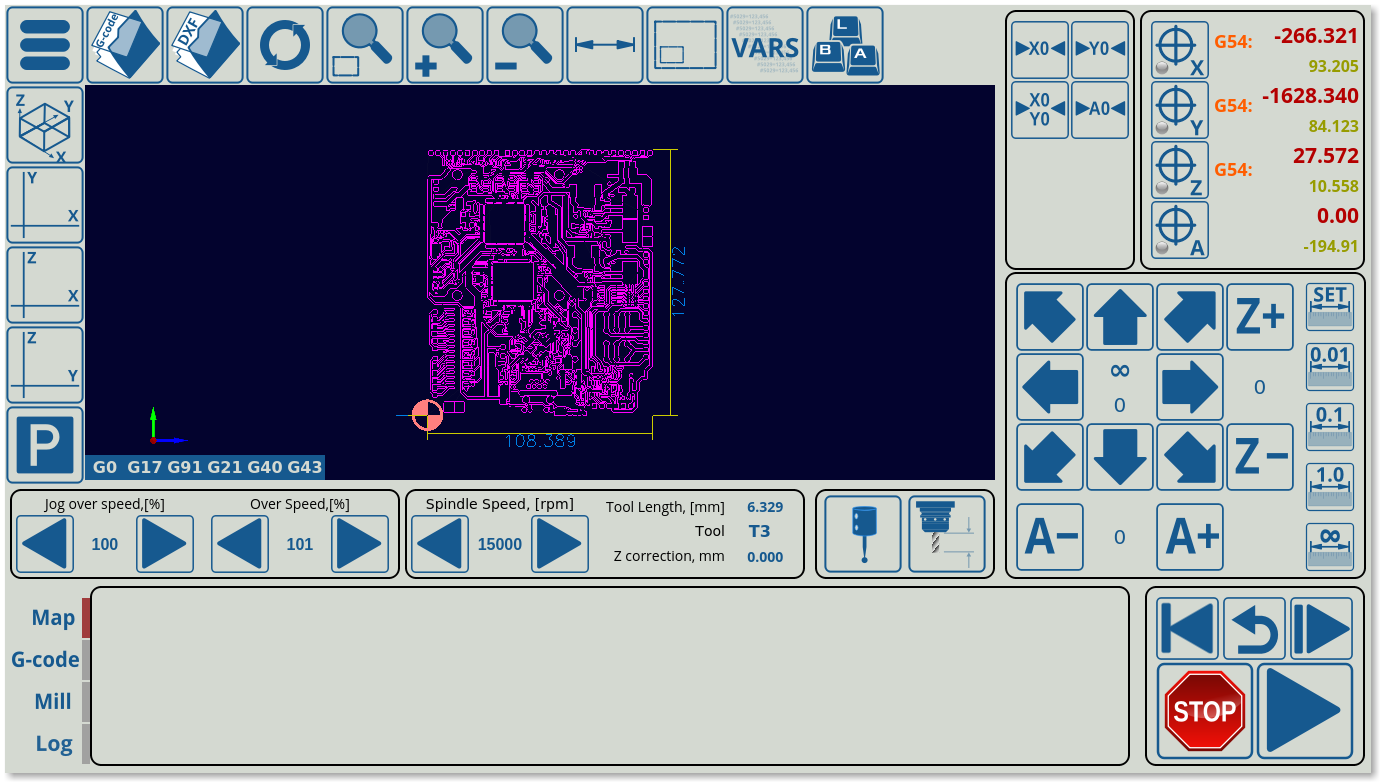
The screen should look like this at this point (note the newly added blank tab in the bottom section of the program):
- Next, the frame around the buttons inside the x-mapping tab will be inserted using the following code:
<gitem where="x-mapping"
 name="map-z-frame" position="10;10"
 width="360" basewidth="360" height="160" baseheight="160"
 type="frame" border-color="##b-border" border-width="2" border-radius="10"
 bgColor="##b-main"  hidden="no" />
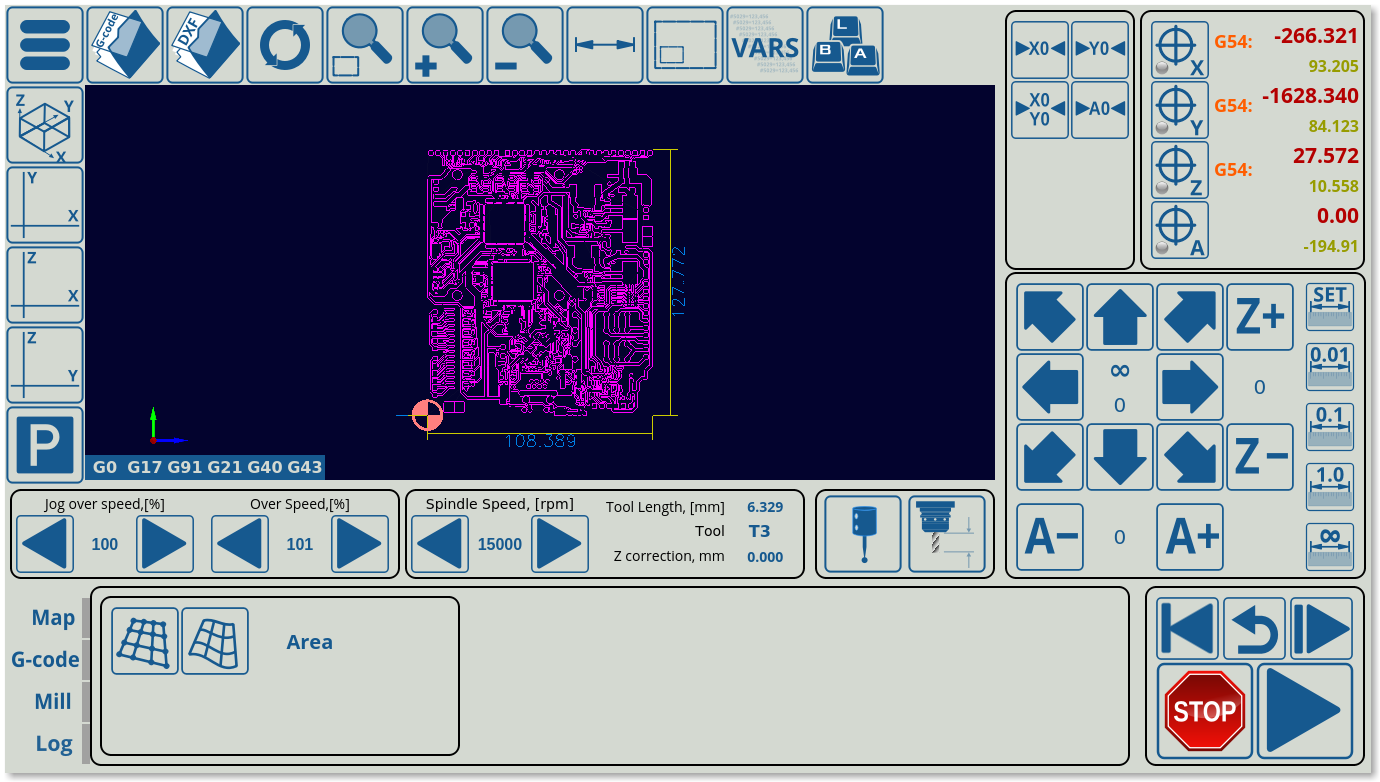
The frame will appear in the previously blank Map tab (not filling in the entire tab, as its width and height have only been specified to be 360,160)
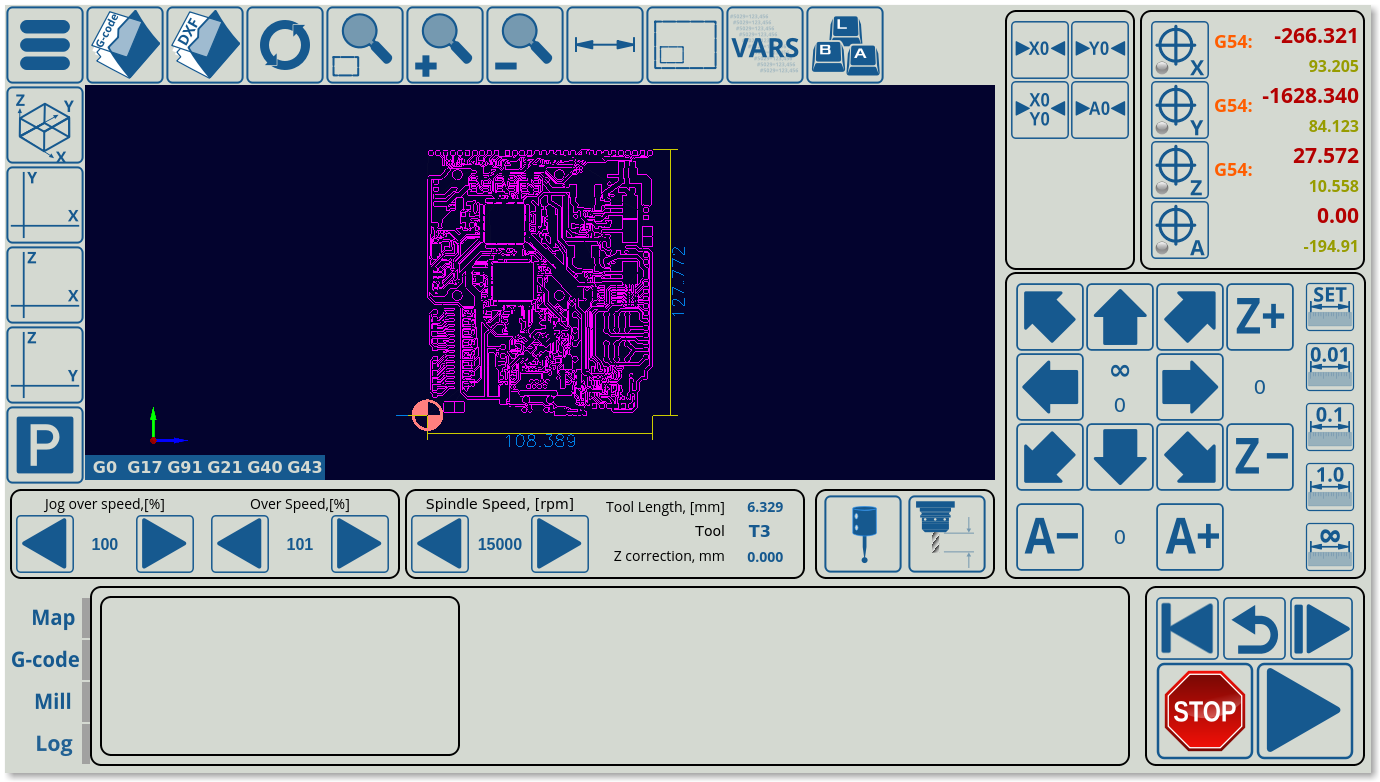
- Inside this frame, the map-z-view element will be inserted. Note that this code does not change anything visually, as it simply creates a new section within the existing frame into which other visual elements will be inserted in the next steps:
<gitem where="map-z-frame" name="map-z-view" position="5;5"
 width="350" basewidth="350"
 height="150" baseheight="150"
 type="myitems" />
- Inside the map-z-view, which is our actual window of the tab, the two buttons and the RadioDisplay element will be inserted:
<!--BUTTON FOR MAP GENERATION-->
<gitem where="map-z-view" position="5;5"
 width="70" height="70"
 image="probing/map-z-probe"
 action="zmap-generate"
 type="button" />

<!--BUTTON FOR APPLYING THE GENERATED MAP TO THE ORIGINAL FILE-->
<gitem where="map-z-view" position="75;5"
 width="70" height="70"
 image="probing/map-z-convert"
 action="zmap-apply"
 type="button" />

<!--SELECTION OF AREA/RECTANGLE FOR PROBING-->
<gitem where="map-z-view" position="150;5"
 displayWidth="110" width="110" height="70"  displayAlignment="_center"
 fgColor="##f-display"
 format="Rectangle;Area" fontFamily="Open Sans" fontSize="20"
 type="radio-display" deviation="0.5"
 action="cnc-gvariable-toggle-8255"
 name="display-cnc-gvariable-8255"
 bgColor="##b-display" fontStyle="bold">
</gitem>
- Near these buttons, the other necessary elements of the window will be added. In this example, these are used to show that we can now keep adding buttons, frames and other display elements into the already existing
x-mappingtab (and specifically, into themap-z-viewwithin themap-z-frame) that we have created.
<gitem where="map-z-view" position="5;80"
 displayWidth="60" width="200" height="30"  displayAlignment="_center"
 labelWidth="140"
 fgColor="##f-display"
 format="%1.1f" fontFamily="Open Sans" fontSize="20"
 type="bdisplay" deviation="0.05"
 action="item:cnc-gvariable-8250"
 name="display-cnc-gvariable-8250"
 bgColor="##b-display" fontStyle="bold">
<message>Segment Length,[mm]</message>
</gitem>

<gitem where="map-z-view" position="5;110"
 displayWidth="60" width="200" height="40"  displayAlignment="_center"
 labelWidth="140"
 fgColor="##f-display"
 format="%1.1f" fontFamily="Open Sans" fontSize="20"
 type="bdisplay" deviation="0.05"
 action="item:cnc-gvariable-8251"
 name="display-cnc-gvariable-8251"
 bgColor="##b-display" fontStyle="bold">
<message>Measure Grid X*Y,[mm]</message>
</gitem>

<gitem where="map-z-view" position="205;110"
 displayWidth="60" width="80" height="40"  displayAlignment="_center"
 labelWidth="10"
 fgColor="##f-display"
 format="%1.1f" fontFamily="Open Sans" fontSize="20"
 type="bdisplay" deviation="0.05"
 action="item:cnc-gvariable-8252"
 name="display-cnc-gvariable-8252"
 bgColor="##b-display" fontStyle="bold">
<message>*</message>
</gitem>
The final result will look like this, with the frame containing the buttons and other on-screen elements within the x-mapping tab visible when clicking the newly created Map button:
From here on, it is possible to continue adding display elements to this tab in the remaining space, by creating subsections similar to the map-z-frame section created earlier. See more information on the possible screen elements in the MyCNC Screen Configuration manual.
Example 4: Rotating the visualization and orientation changes within myCNC
The orientation changes for your visualization and workflow (by rotating the visualization 90/180/270 degrees, etc) are done in three major ways:
- The 2D screen visualization (for example, on plasma/gas profiles)
- For your hotkeys (matching the arrow keys to the new visualization that you have rotated by +-90/180/270 degrees), and
- Adjusting the movement within the Part Rotation widget.
Going through these step by step:
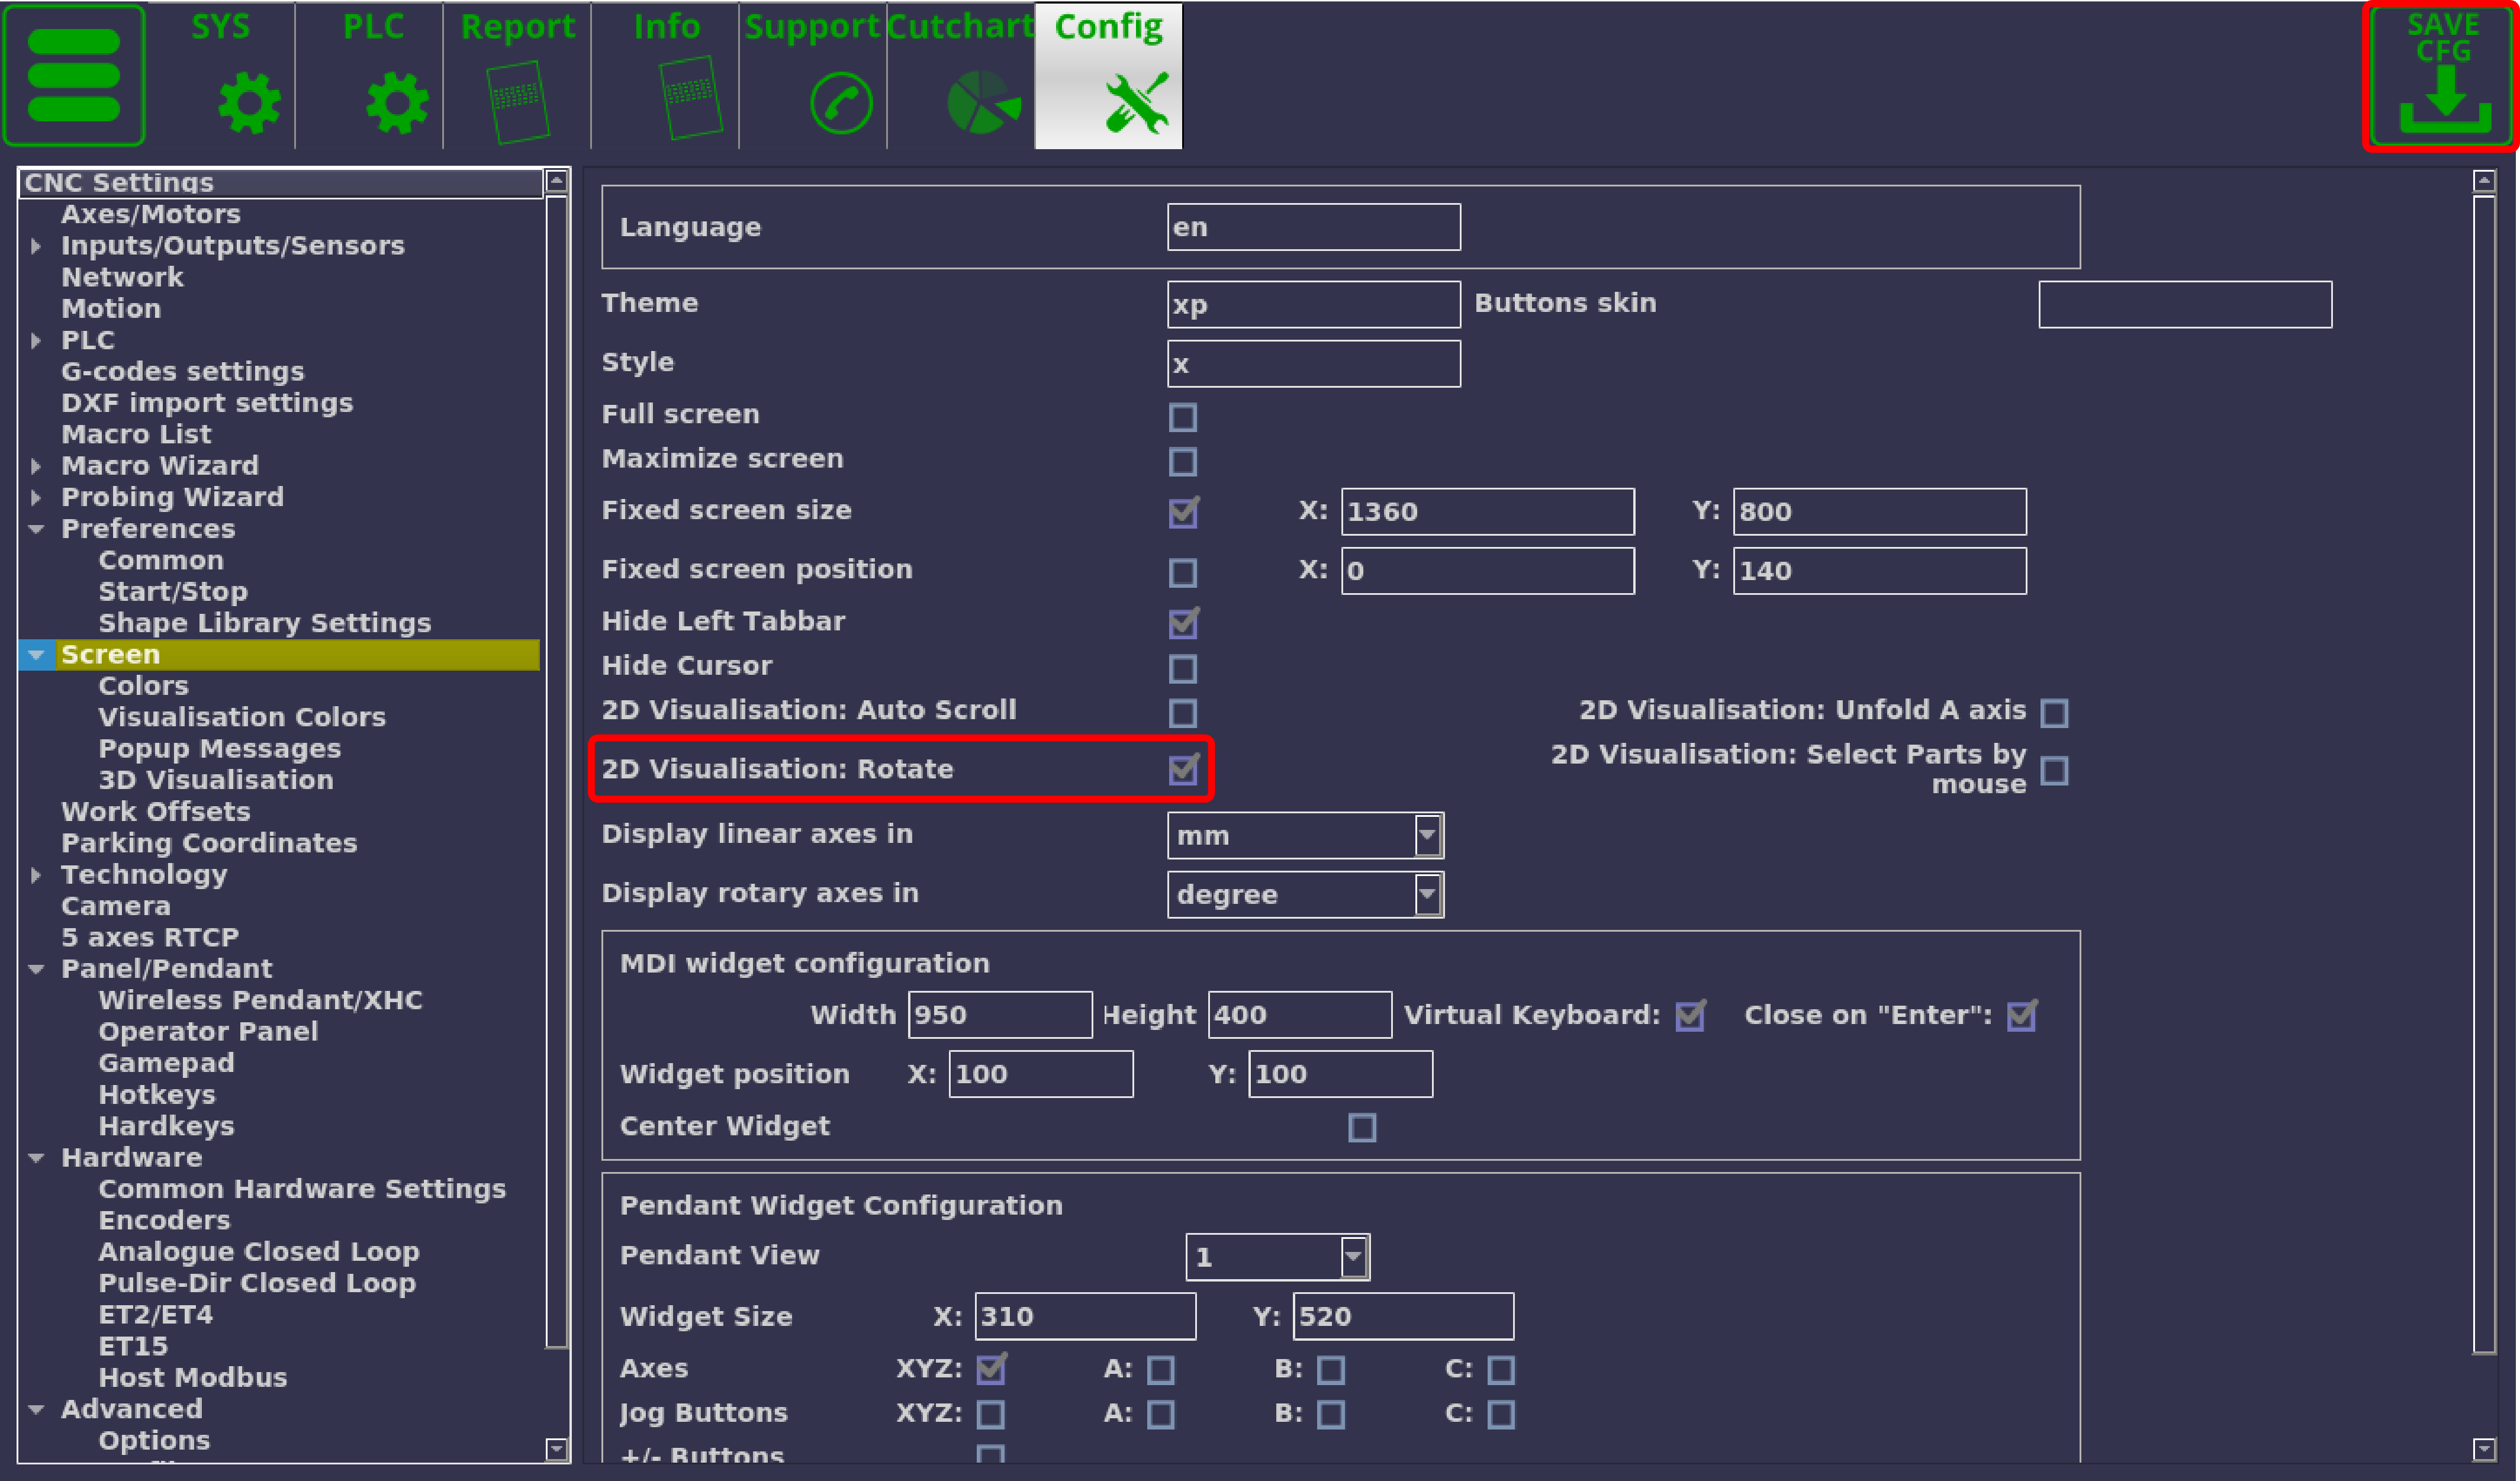
1) Head into Settings → Config → Screen, and then locate and enable the 2D visualization: Rotate option. 2D visualization: Rotate rotates the file visualization 90 degrees off its original layout, with linear axes that can be displayed in mm or inches. This is done for visualization purposes only, and does not impact the actual measurements of the original file (i.e. you will still move in the positive x-direction in the original G-code file when pressing the X+ button from the main screen's jog tab, etc).
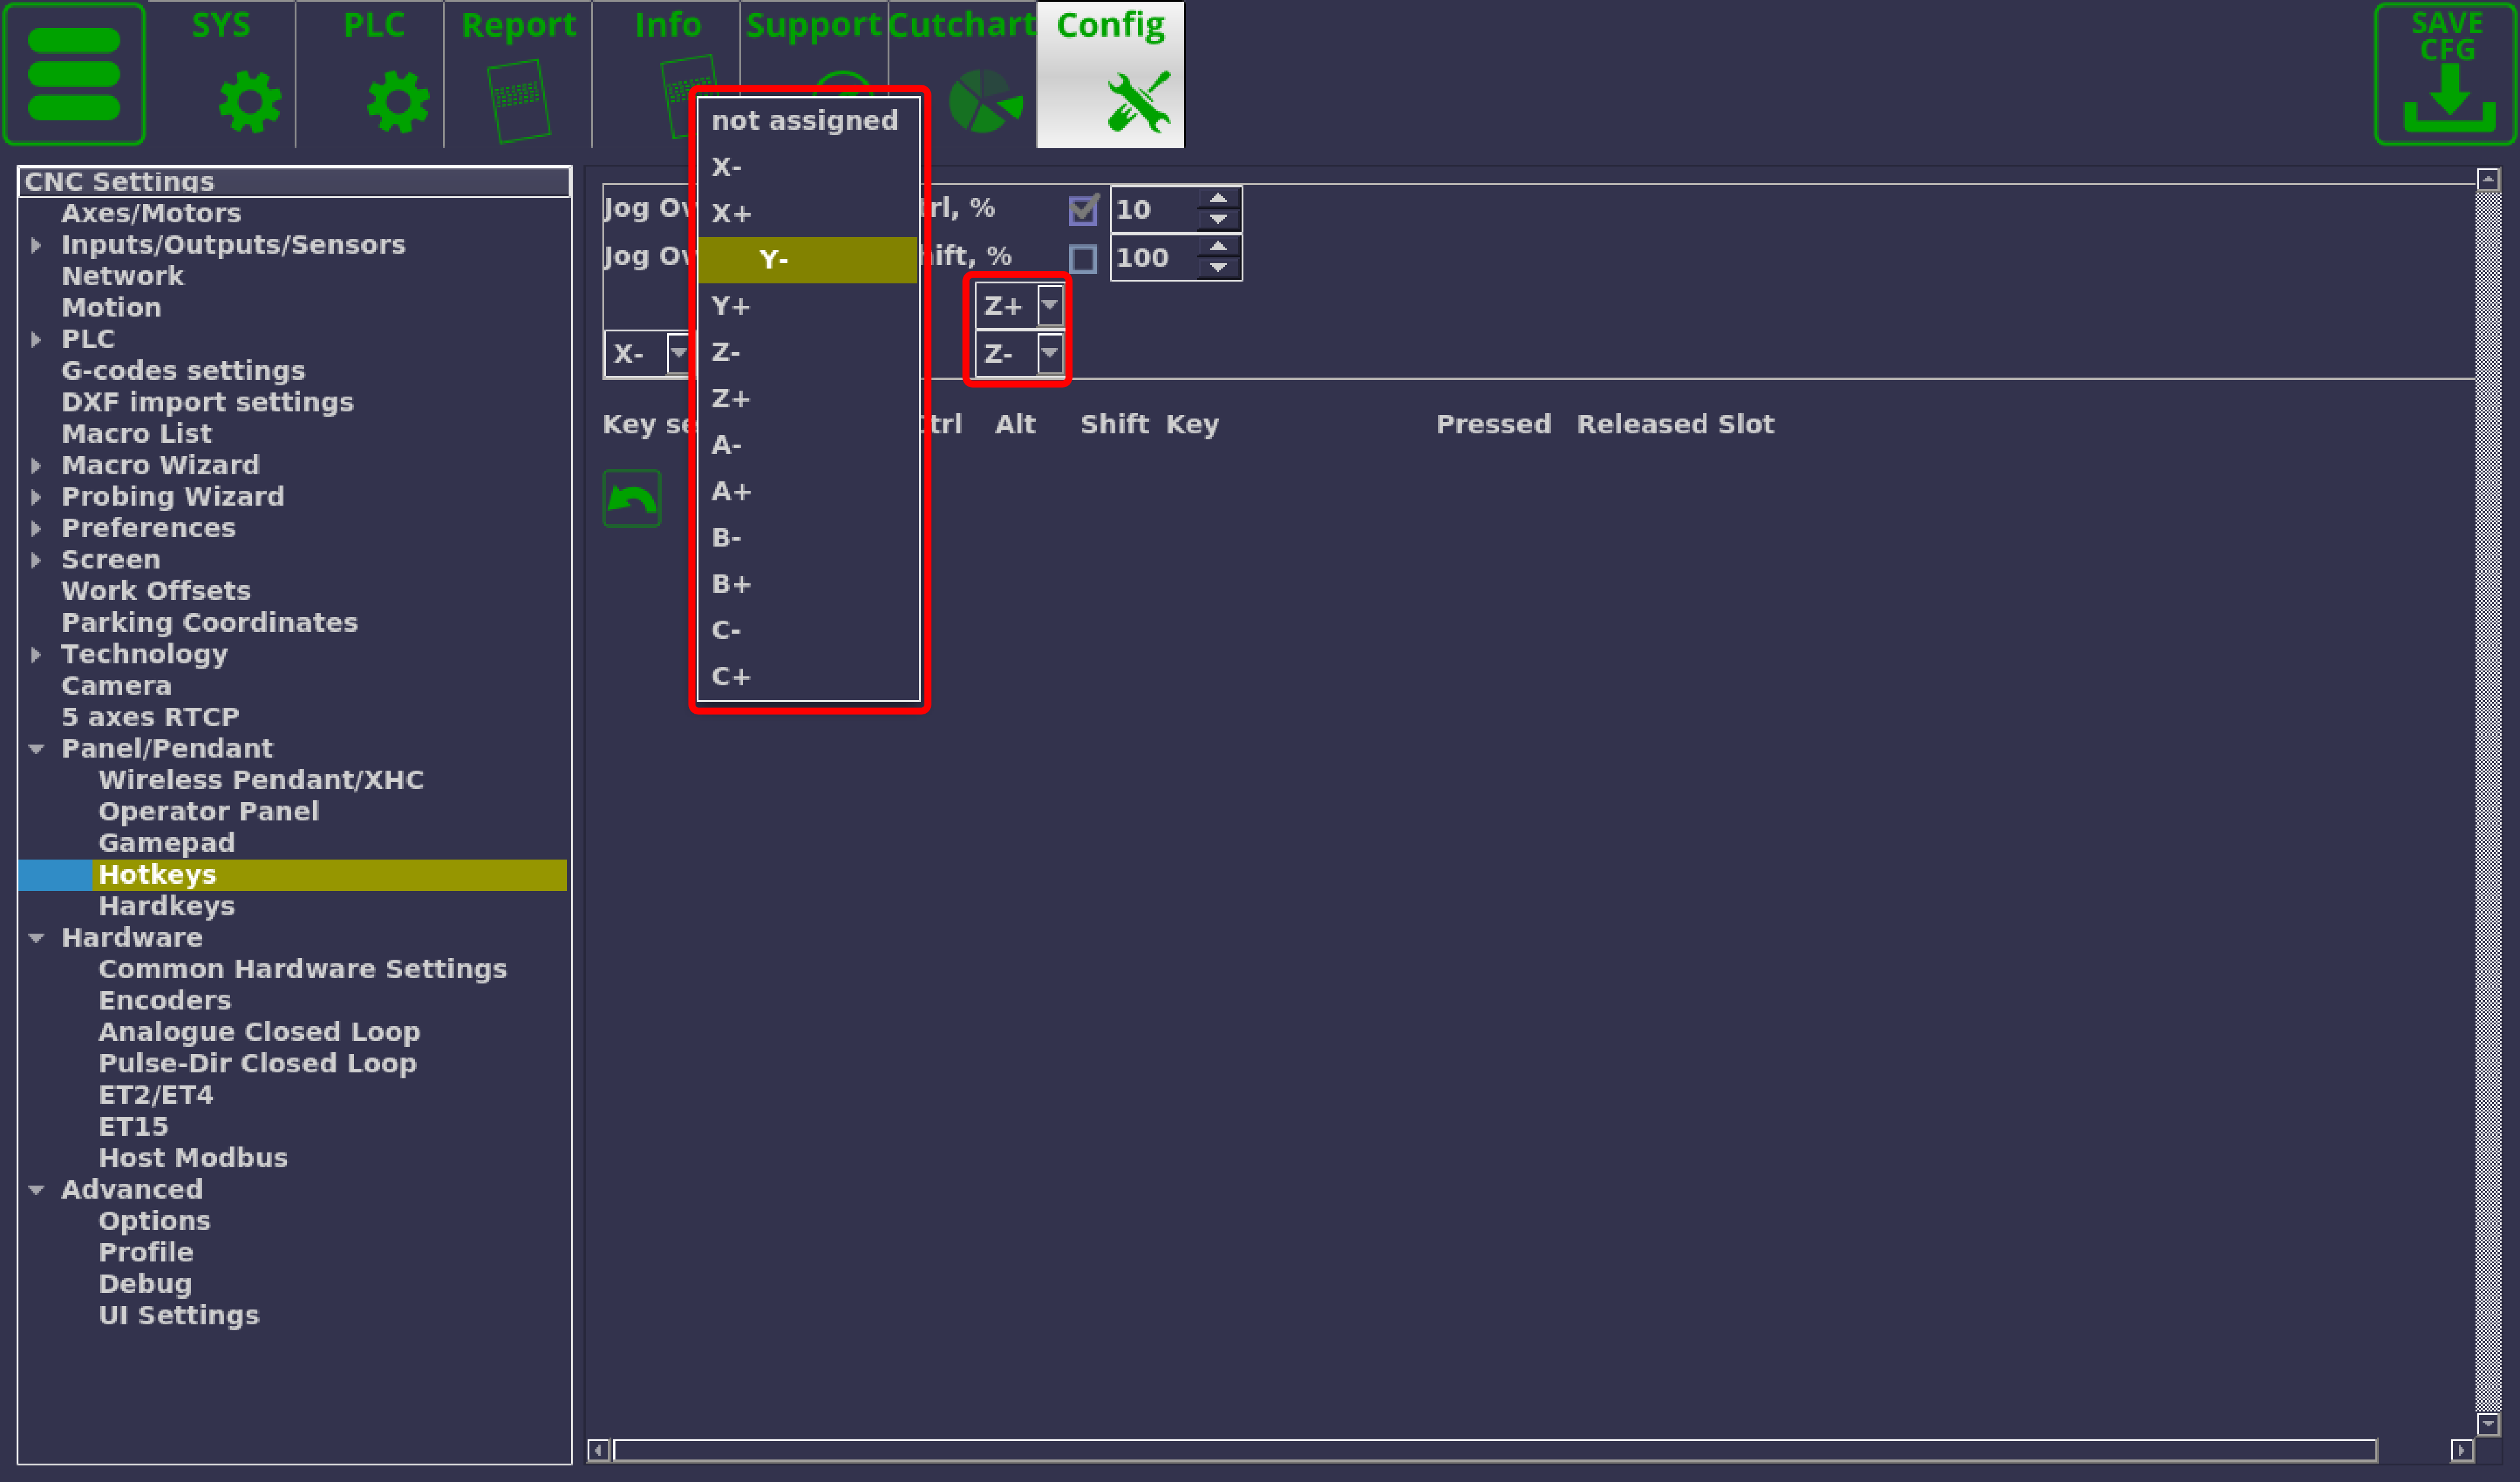
2) Hotkeys settings can be found in Settings → Config → Panel/Pendant → Hotkeys - in this window you can reassign the actions that are bound to your keyboard's arrow keys to match your desired orientation (for example, switching the default Arrow Up from Y+ to Y-, etc):
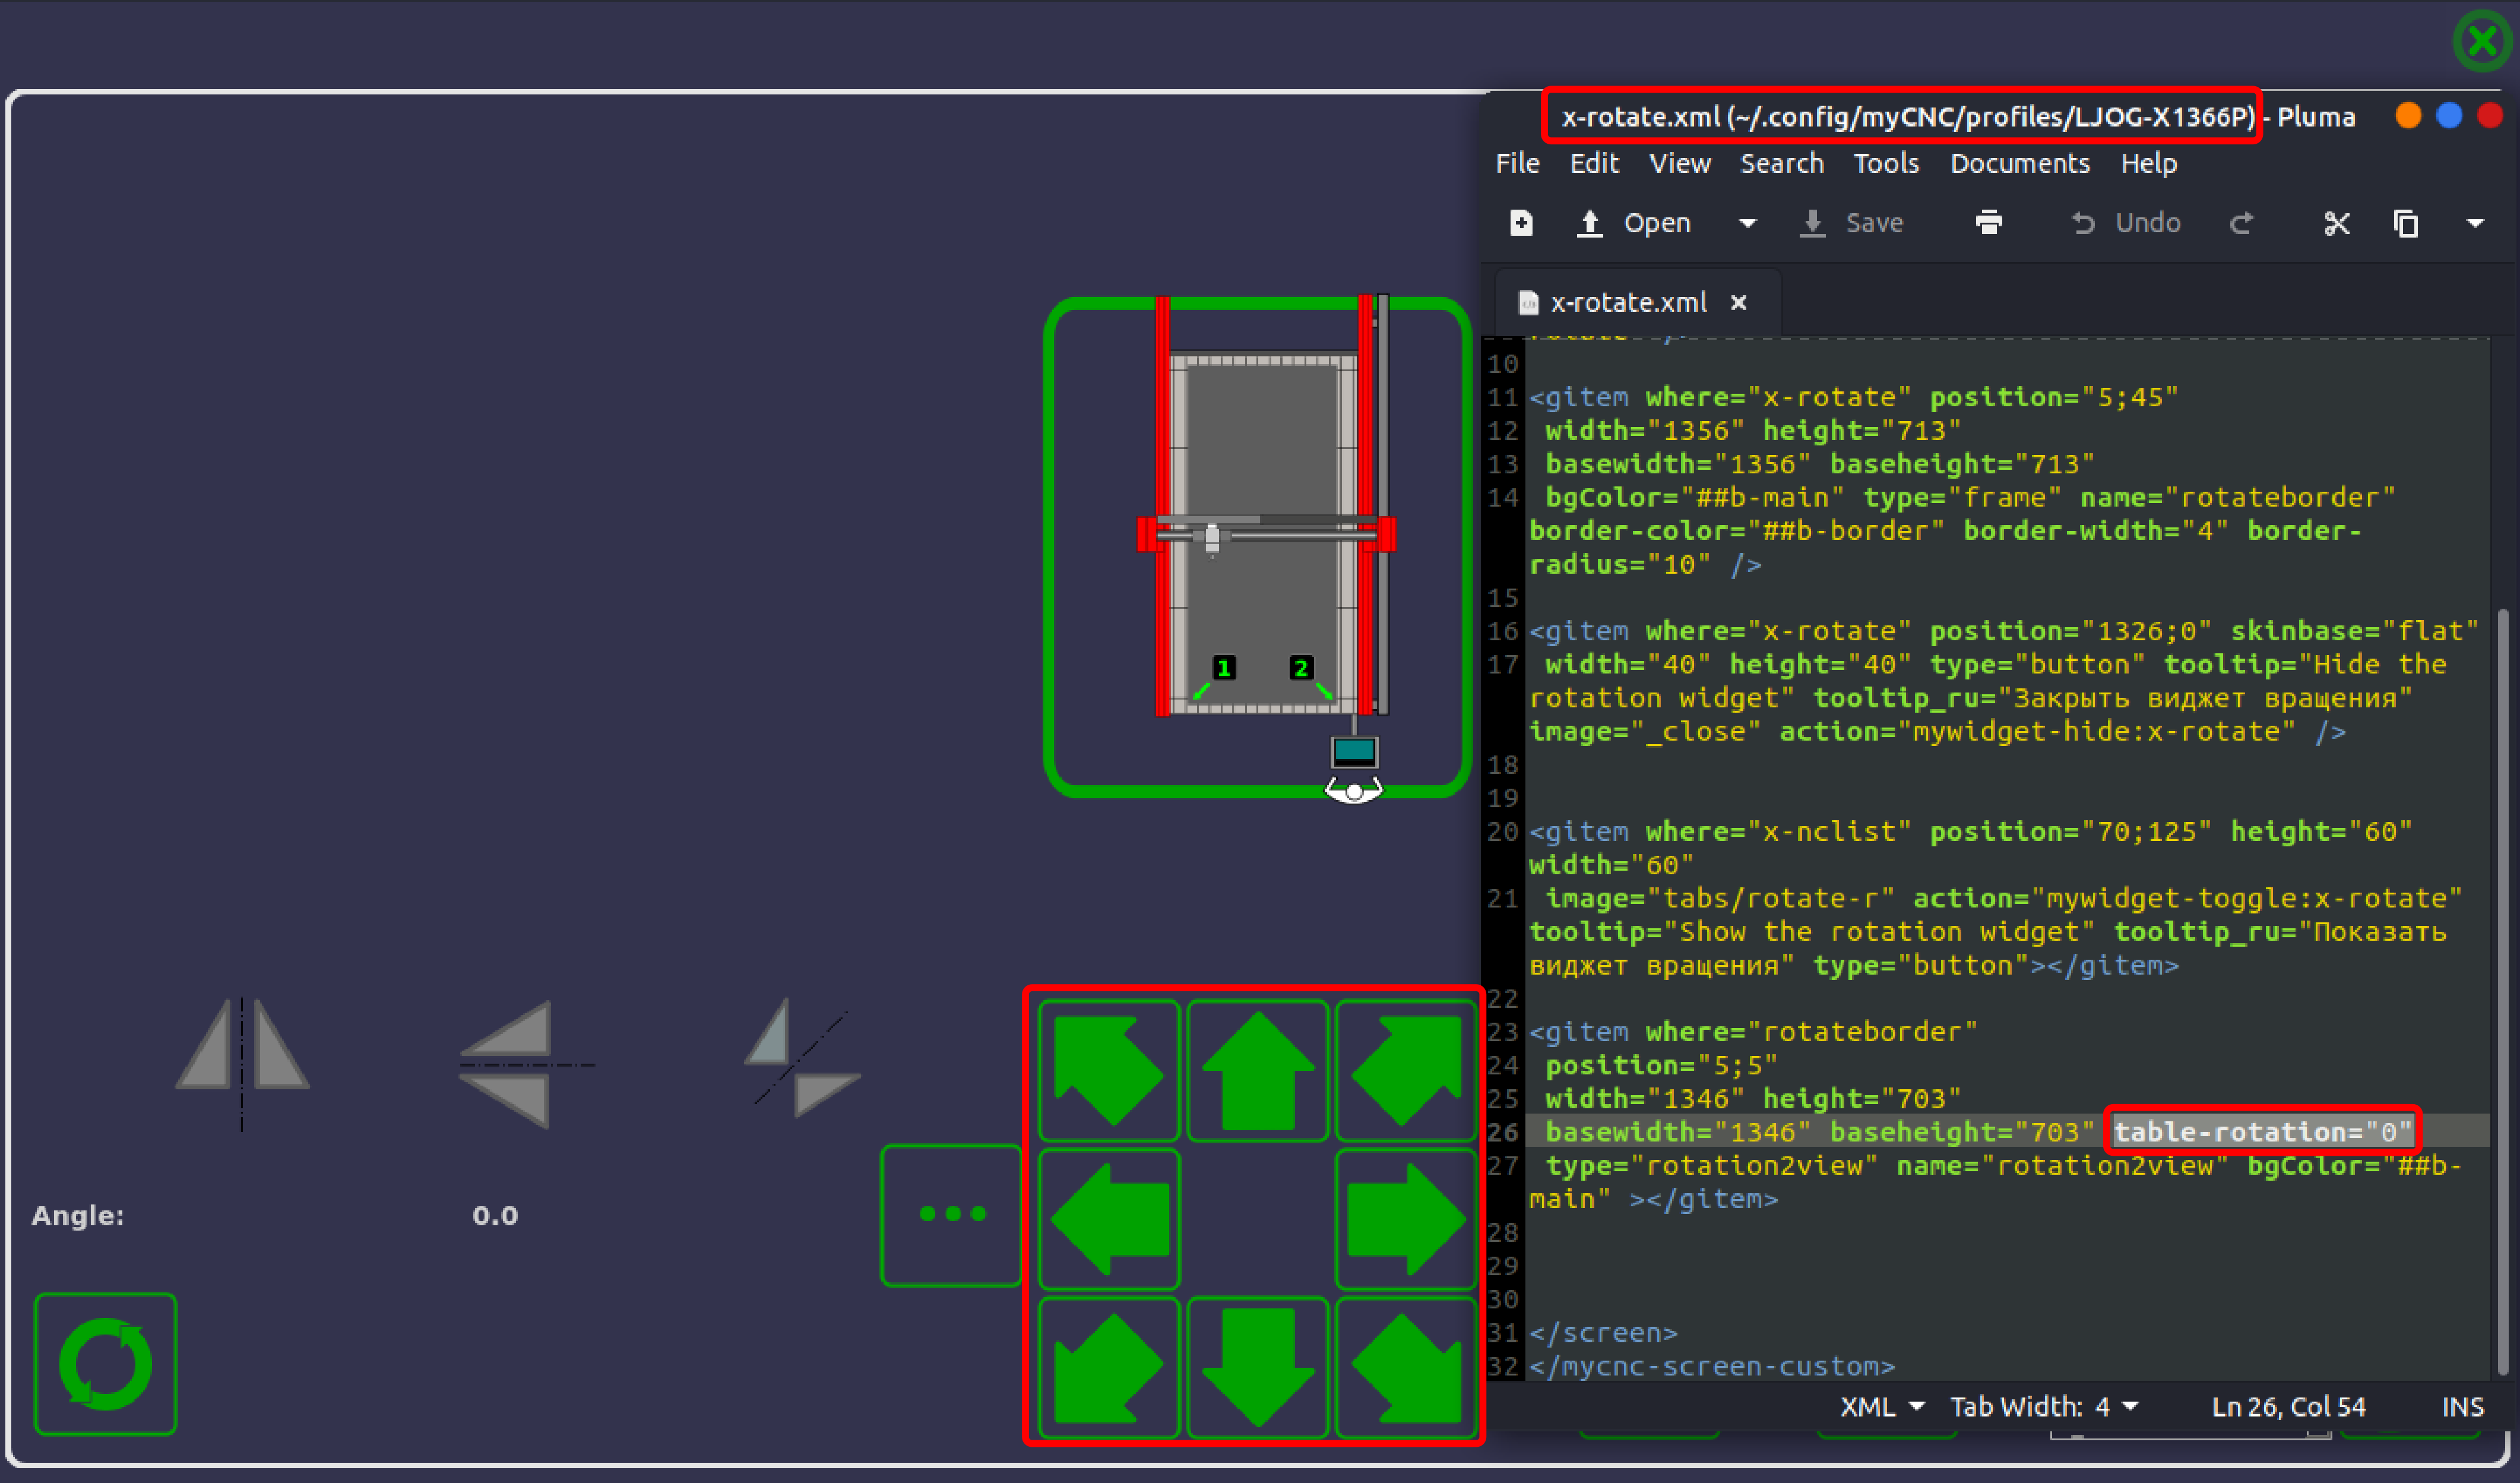
3) Rotation widget editing is done through the .xml file (x-rotate.xml) which can be found in your profile's main folder (for example, on Ubuntu MATE it will be in ~/.config/myCNC/profiles/X1366P for the default plasma cutting profile).
Scroll down to the following section:
<gitem where="rotateborder"
 position="5;5"
 width="1346" height="703"
 basewidth="1346" baseheight="703" table-rotation="0"
 type="rotation2view" name="rotation2view" bgColor="##b-main" ></gitem>
and change the table-rotation value. By default it is set to 0, changing it to -90, for example, will rotate the motion setup for the jog buttons in the Rotation tab by -90 degrees:
Example 5: Add a custom client logo to the main myCNC screen
This example is similar to Examples 1 and 2 (adding a single element to the main myCNC screen). However, it is geared specifically towards clients wanting to customize myCNC with their logo, and the code provided here can be used without changes, provided the naming scheme for the files and the folders is maintained by the user.
WARNING: It is often recommended to create a backup of your profile folder, in case you'd like to revert back to the original profile for any reason.
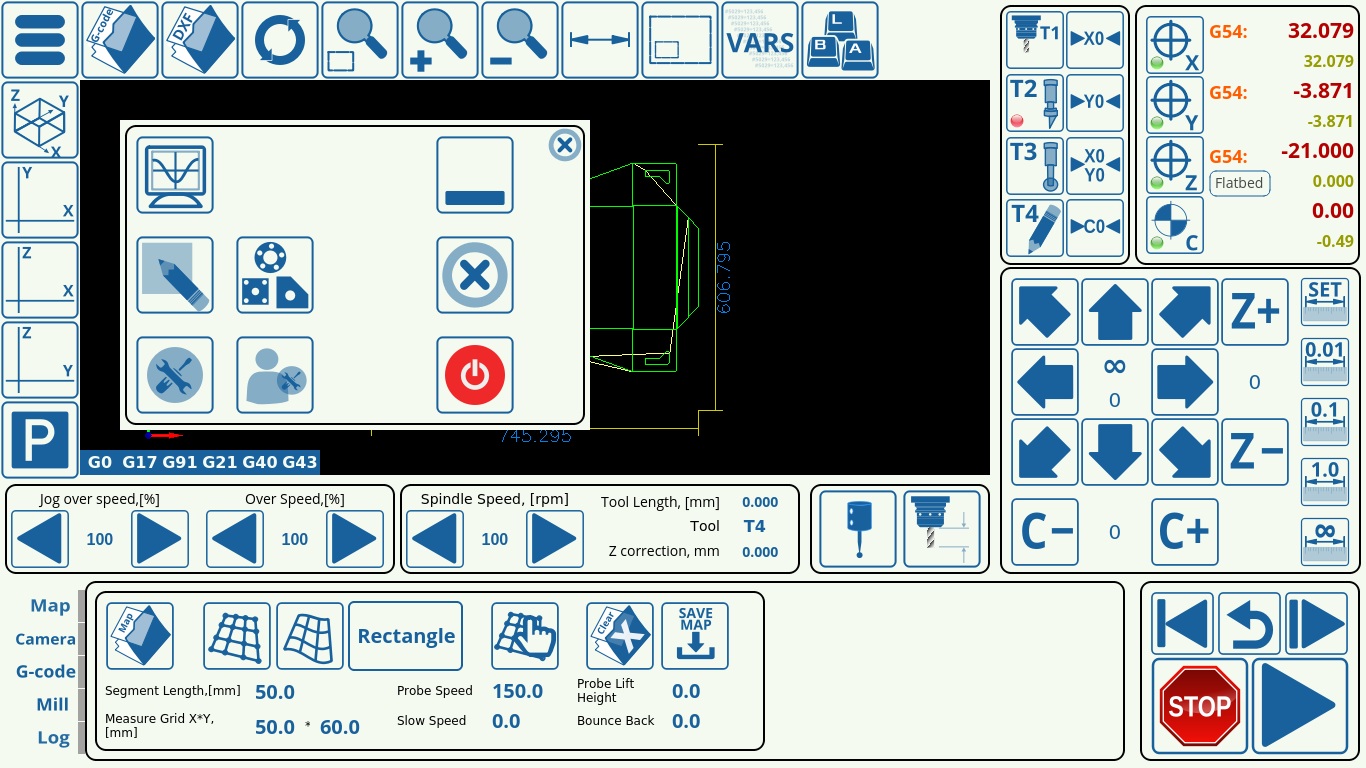
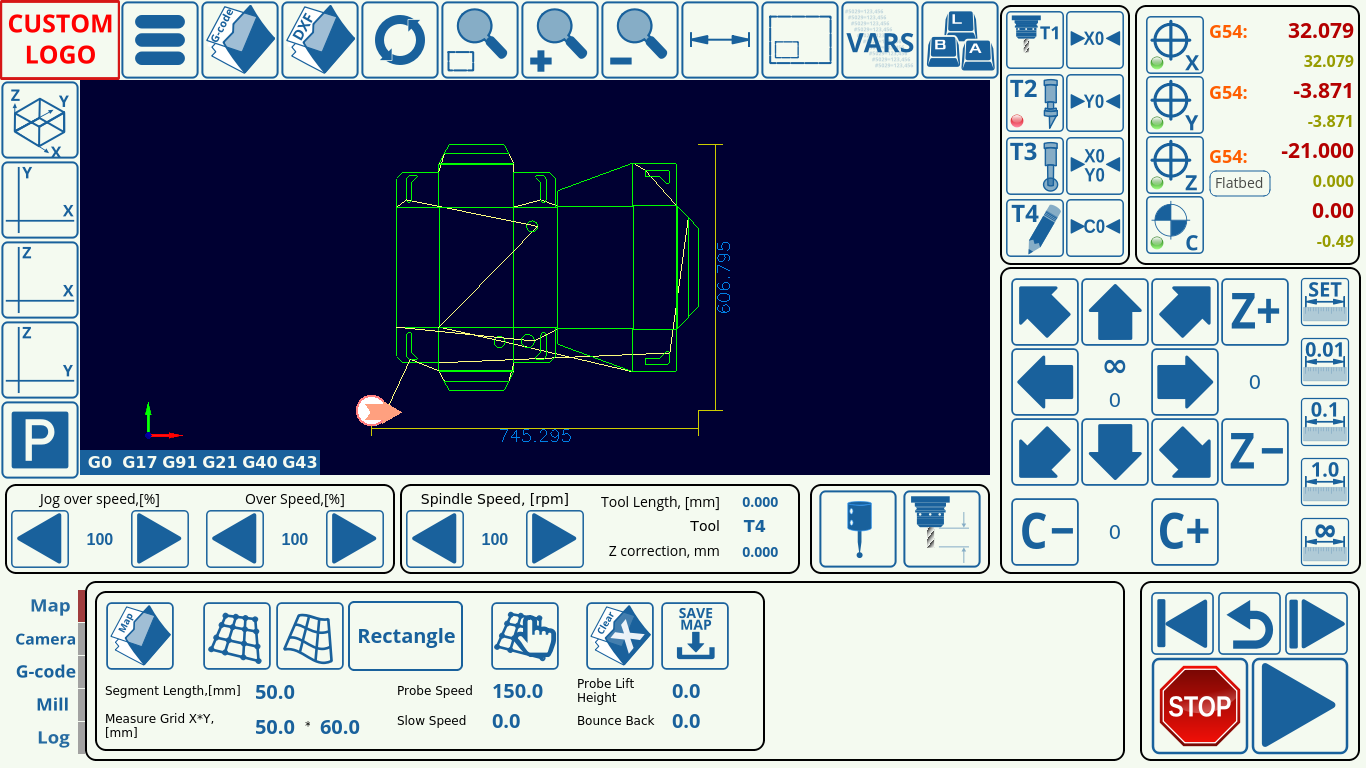
The screen below is what the original screen in this example looks like. We aim to add a small 3×2 logo in the top left corner of the screen (by moving the top strip of buttons to the right to provide some extra space):
In this example, we will be using a 120×80 pixel custom logo. If the user does not want to modify the code below, they have to maintain a 3 by 2 width/height ration in their custom logo as well - other sizes may need slight adjustments in the positioning (more on that later).
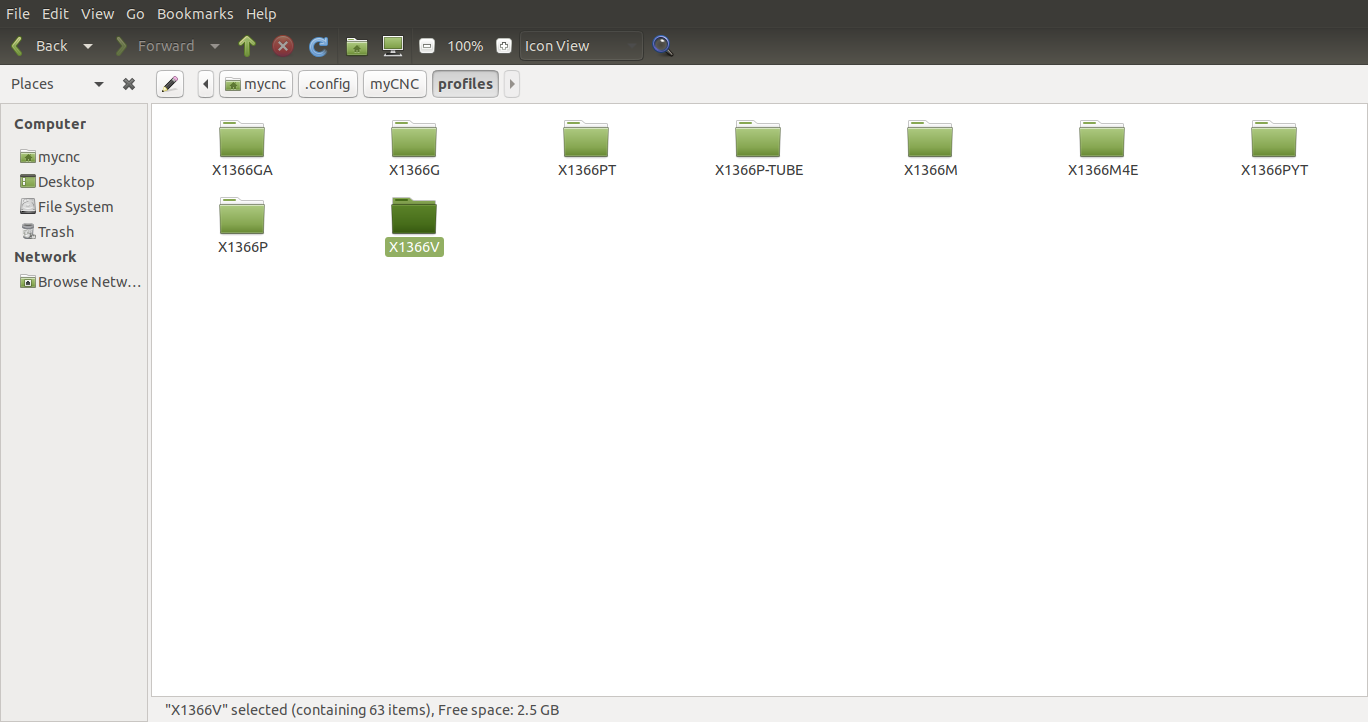
1) To begin with, navigate to your myCNC profile folder (located in home/USERNAME/.config/myCNC/profiles). In the case of this example, the computer username is “mycnc”, so the pathname will be home/mycnc/.config/myCNC/profiles/X1366V, since the X1366V profile is used.
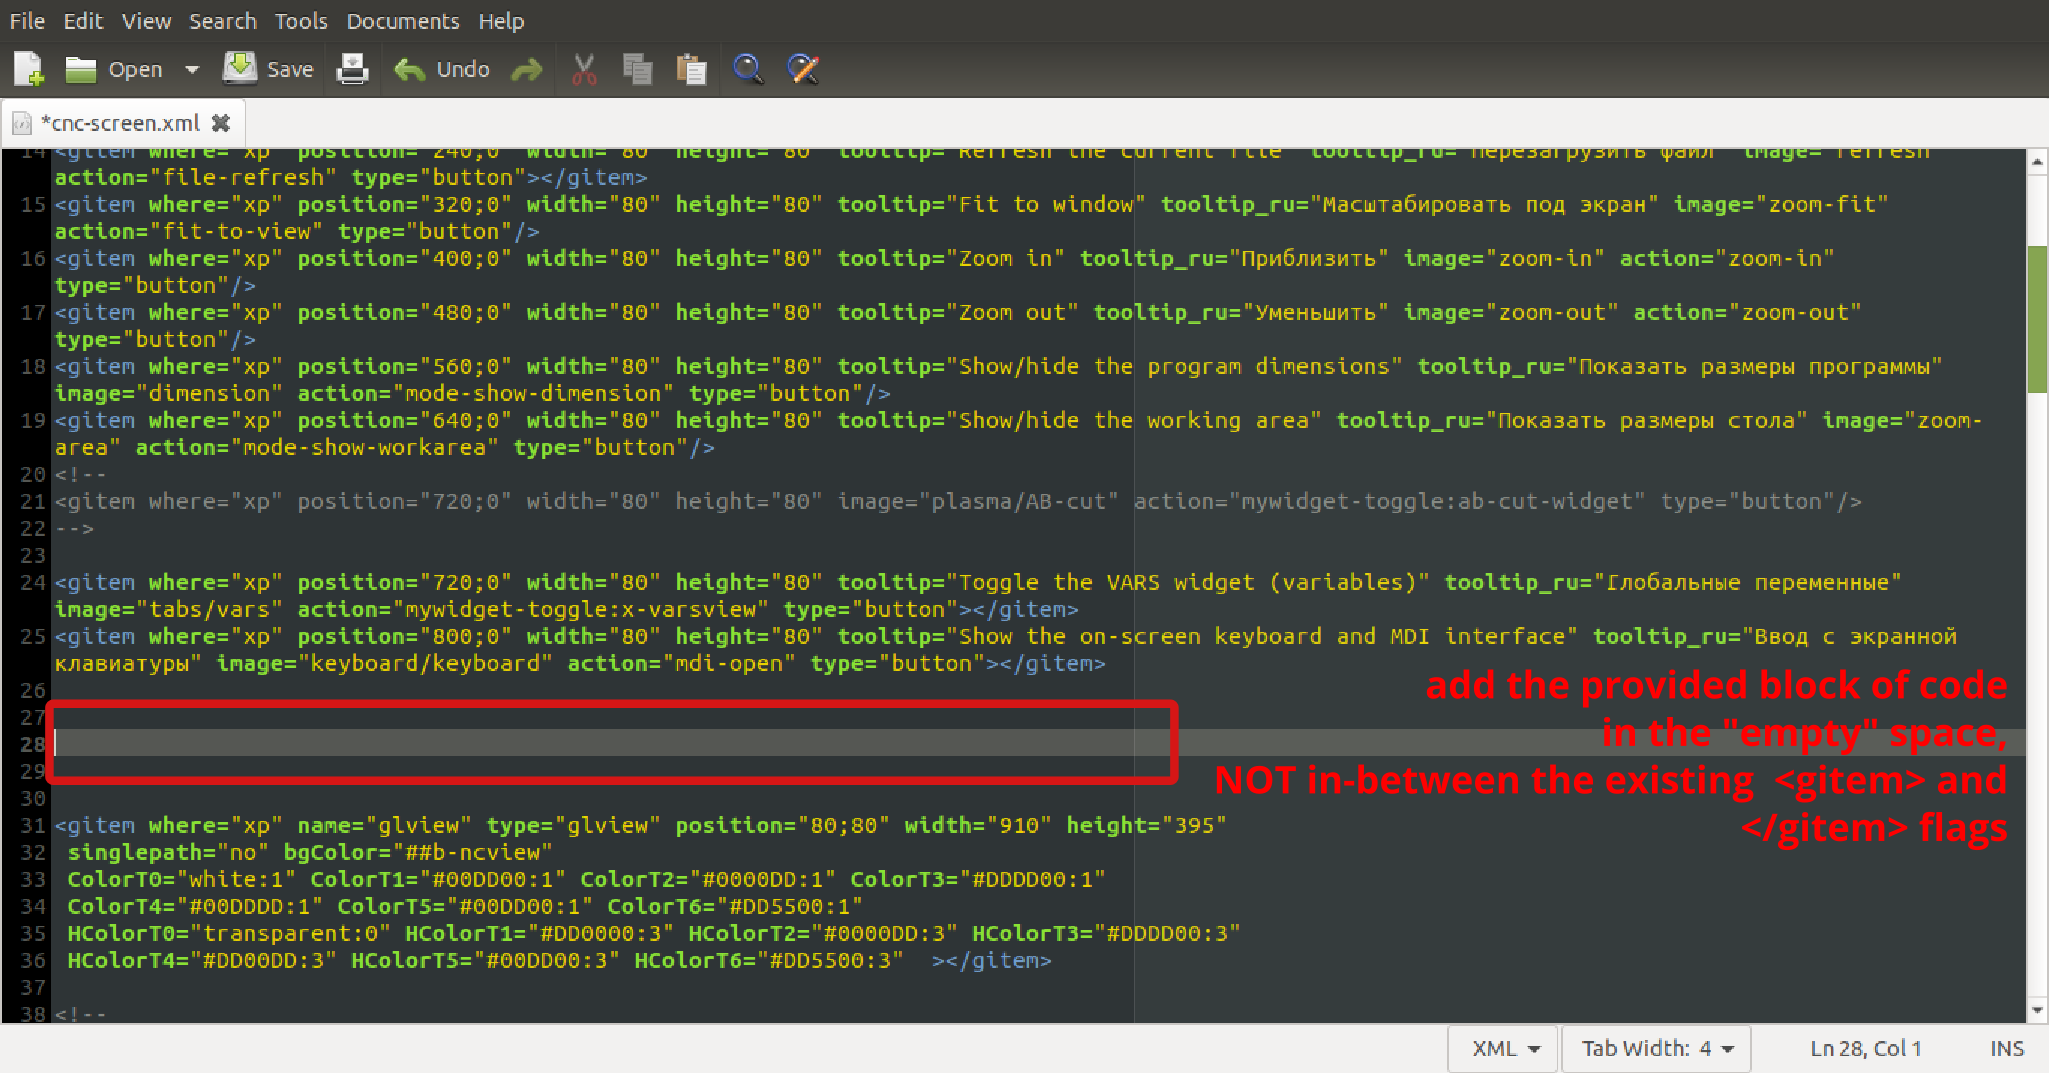
2) Within your profile folder, locate and open the cnc-screen.xml file in your text editor of choice (Pluma has been used in this example):
3) Next, we will insert the following block of code into an empty line (not between existing <gitem> and </gitem> flags, which are used for the other screen elements):
<!--CUSTOM LOGO  -->
<gitem  where="xp" name="custom-logo" bgColor="##b-widget"  type="myitems"
skin="logo/custom-logo"
position="0;0" width="120" height="80" />
4) Next, move every button in the top row of the screen by 120 pixels to the right relative to their old position - this is done by changing the position attribute (the first value is for the x-position, the second for the y-position). Depending on the profile, the exact code may differ somewhat, but starting from something like this:
<gitem where="xp" position="80;0"  width="80" height="80"
tooltip="Open a G-code file" tooltip_ru="Открыть файл" image="open"
action="open" type="button"></gitem>
<gitem where="xp" position="160;0" width="80" height="80"
tooltip="Open a DXF file" tooltip_ru="Открыть DXF файл" image="dxf-open"
action="dxf-import" type="button"></gitem>
<gitem where="xp" position="240;0" width="80" height="80"
tooltip="Refresh the current file" tooltip_ru="Перезагрузить файл" image="refresh"
action="file-refresh" type="button"></gitem>
<gitem where="xp" position="320;0" width="80" height="80"
tooltip="Fit to window" tooltip_ru="Масштабировать под экран" image="zoom-fit"
action="fit-to-view" type="button"/>
<gitem where="xp" position="400;0" width="80" height="80"
tooltip="Zoom in" tooltip_ru="Приблизить" image="zoom-in"
action="zoom-in" type="button"/>
<gitem where="xp" position="480;0" width="80" height="80"
tooltip="Zoom out" tooltip_ru="Уменьшить" image="zoom-out"
action="zoom-out" type="button"/>
<gitem where="xp" position="560;0" width="80" height="80"
tooltip="Show/hide the program dimensions" tooltip_ru="Показать размеры программы" image="dimension"
action="mode-show-dimension" type="button"/>
<gitem where="xp" position="640;0" width="80" height="80"
tooltip="Show/hide the working area" tooltip_ru="Показать размеры стола" image="zoom-area"
action="mode-show-workarea" type="button"/>
<!--
<gitem where="xp" position="720;0" width="80" height="80"
image="plasma/AB-cut"
action="mywidget-toggle:ab-cut-widget" type="button"/>
-->

<gitem where="xp" position="720;0" width="80" height="80"
tooltip="Toggle the VARS widget (variables)" tooltip_ru="Глобальные переменные" image="tabs/vars"
action="mywidget-toggle:x-varsview" type="button"></gitem>
<gitem where="xp" position="800;0" width="80" height="80"
tooltip="Show the on-screen keyboard and MDI interface"
tooltip_ru="Ввод с экранной клавиатуры" image="keyboard/keyboard"
action="mdi-open" type="button"></gitem>
to something akin to this:
<gitem where="xp" position="200;0"  width="80" height="80"
tooltip="Open a G-code file" tooltip_ru="Открыть файл" image="open"
action="open" type="button"></gitem>
<gitem where="xp" position="280;0" width="80" height="80"
tooltip="Open a DXF file" tooltip_ru="Открыть DXF файл" image="dxf-open"
action="dxf-import" type="button"></gitem>
<gitem where="xp" position="360;0" width="80" height="80"
tooltip="Refresh the current file" tooltip_ru="Перезагрузить файл" image="refresh"
action="file-refresh" type="button"></gitem>
<gitem where="xp" position="440;0" width="80" height="80"
tooltip="Fit to window" tooltip_ru="Масштабировать под экран" image="zoom-fit"
action="fit-to-view" type="button"/>
<gitem where="xp" position="520;0" width="80" height="80"
tooltip="Zoom in" tooltip_ru="Приблизить" image="zoom-in"
action="zoom-in" type="button"/>
<gitem where="xp" position="600;0" width="80" height="80"
tooltip="Zoom out" tooltip_ru="Уменьшить" image="zoom-out"
action="zoom-out" type="button"/>
<gitem where="xp" position="680;0" width="80" height="80"
tooltip="Show/hide the program dimensions" tooltip_ru="Показать размеры программы" image="dimension"
action="mode-show-dimension" type="button"/>
<gitem where="xp" position="760;0" width="80" height="80"
tooltip="Show/hide the working area" tooltip_ru="Показать размеры стола" image="zoom-area"
action="mode-show-workarea" type="button"/>
<!--
<gitem where="xp" position="720;0" width="80" height="80" image="plasma/AB-cut"
action="mywidget-toggle:ab-cut-widget" type="button"/>
-->

<gitem where="xp" position="840;0" width="80" height="80"
tooltip="Toggle the VARS widget (variables)" tooltip_ru="Глобальные переменные" image="tabs/vars"
action="mywidget-toggle:x-varsview" type="button"></gitem>
<gitem where="xp" position="920;0" width="80" height="80"
tooltip="Show the on-screen keyboard and MDI interface"
tooltip_ru="Ввод с экранной клавиатуры" image="keyboard/keyboard"
action="mdi-open" type="button"></gitem>
Notice how the only change between the two blocks of code is in the position= line, with the x-position being shifted by 120 pixels to the right to accommodate for our new 120×80 custom logo. After you have completed the changes, save the cnc-screen.xml file.
5) Additionally, we have to move the main menu button, which as you can see is absent from the code above. The exact file you will be editing will depend on your profile. Scroll down to the bottom of the cnc-screen.xml file you have open, and check which exact file contains your menu (this will have a name such as x-menu.xml or x-menu-mill.xml, and differs depending on your profile). After you have confirmed the name of that file, navigate back to the profile folder (/home/USERNAME/.config/profiles/PROFILENAME), and open that menu XML file in your text editor.
In that file (x-menu-mill.xml in case of this example), change the following line from this:
 <gitem where="xp" position="0;0" image="menu" height="80" width="80"
tooltip="Show/hide the main menu" action="mywidget-toggle:x-menu-base" type="button" />
to this:
<gitem where="xp" position="120;0" image="menu" height="80" width="80"
tooltip="Show/hide the main menu" action="mywidget-toggle:x-menu-base" type="button" />
and save the file. The exact line may look a little different depending on the profile, however if in doubt, search for the words image=“menu” to locate the exact line in question and change the position value from 0;0 to 120;0.
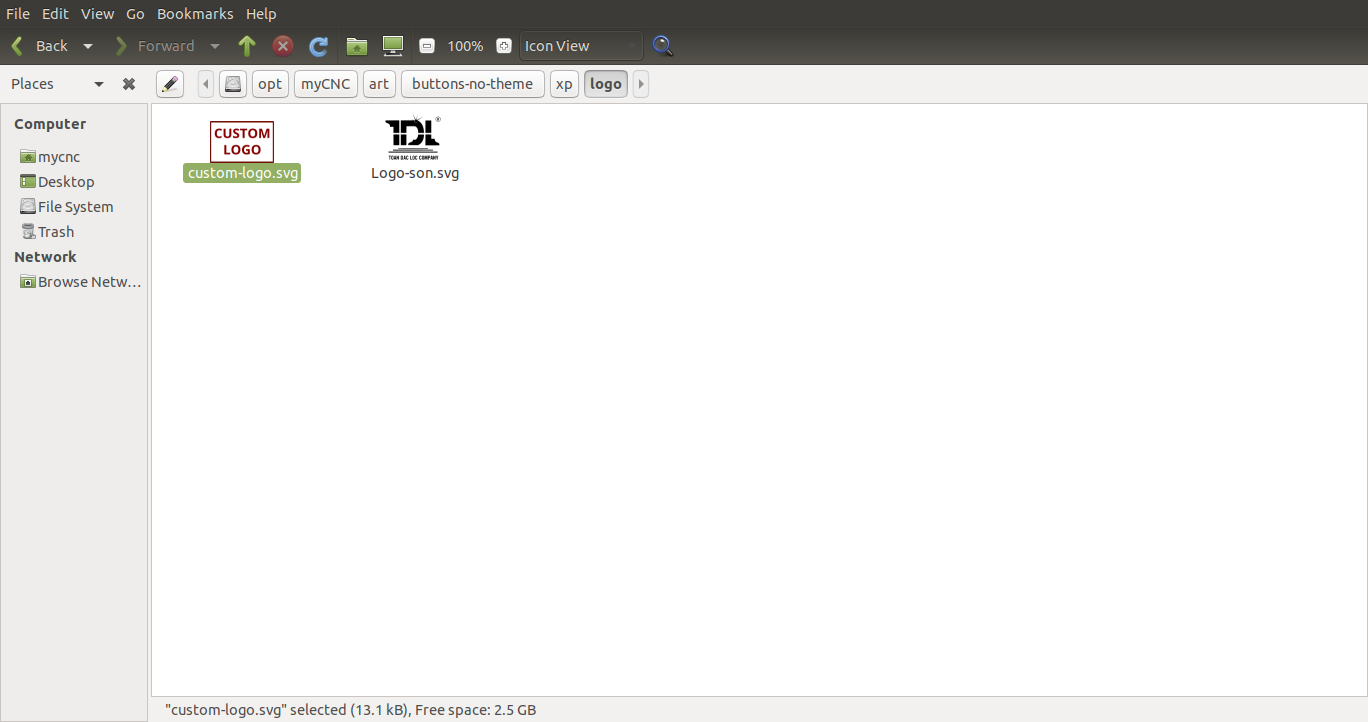
6) Next, we need to add our 120×80 px logo to the right folder. Navigate to /opt/myCNC/art/buttons-no-theme/xp/logo, and place your custom 3×2 SVG logo (named custom-logo.svg) into this folder. Note that if the name of the file, the folder, or the size of the logo are different, the above code must be changed to accomodate these differences.
After this is done, reload the myCNC applications. The changes should now take effect:
Editing the fonts in built-in menus using x.style
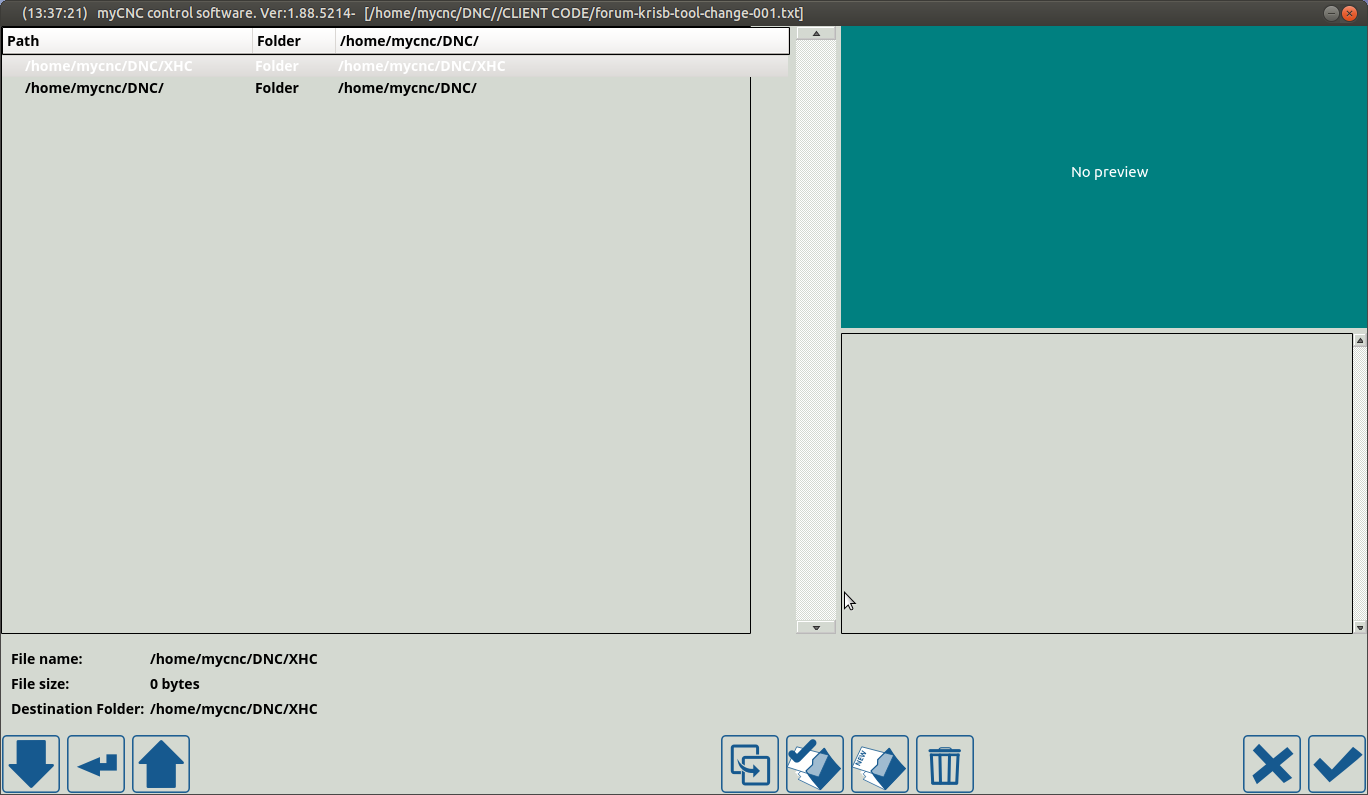
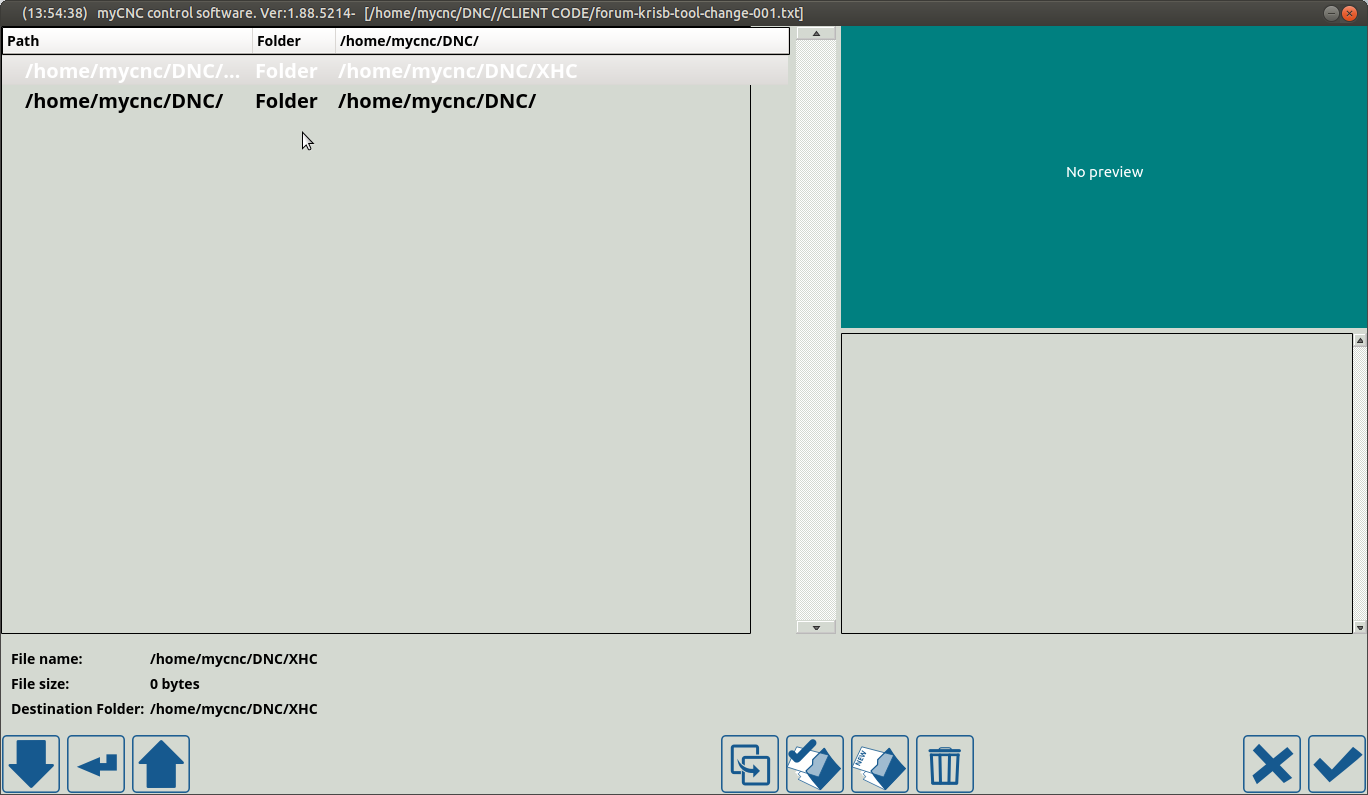
It is possible to edit the fonts and font sizes for built-in menus (like the G-code Open file menu shown below):
Adjusting the font size for this window can be done using the x.style file in your profile folder. To edit it:
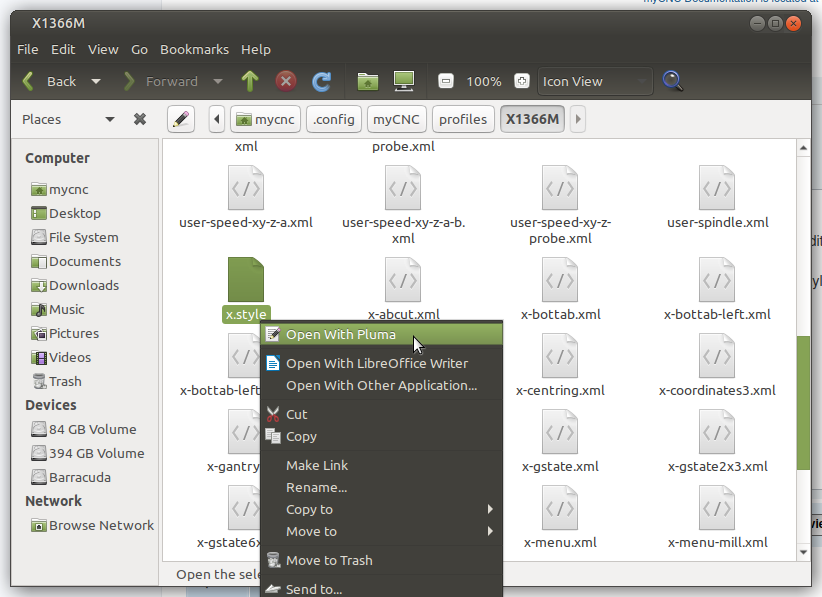
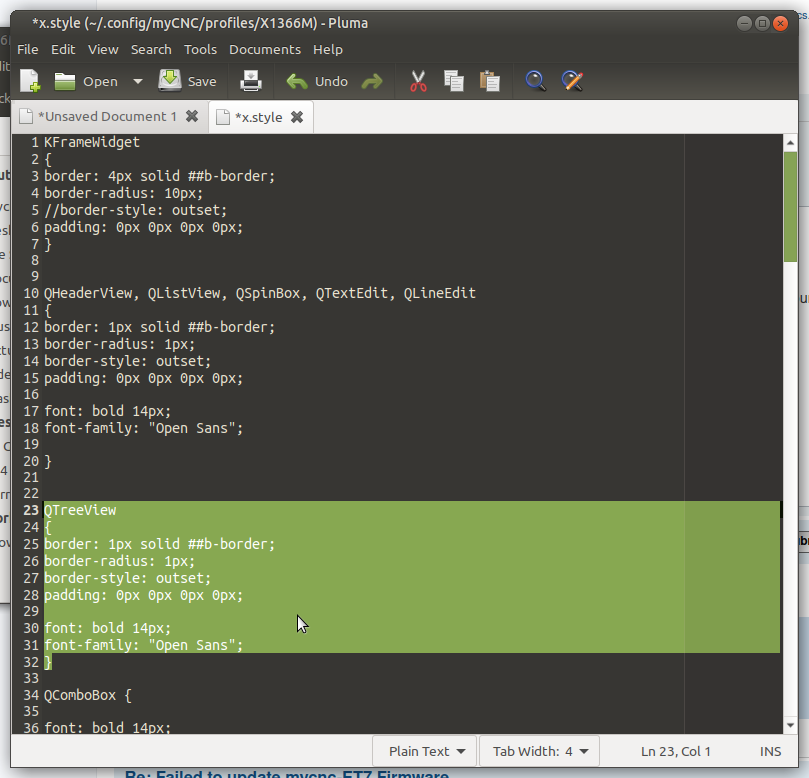
1) Navigate to your profile folder (in this manual, X1366M will be used as an example) and open x.style in your preferred text editor of choice:
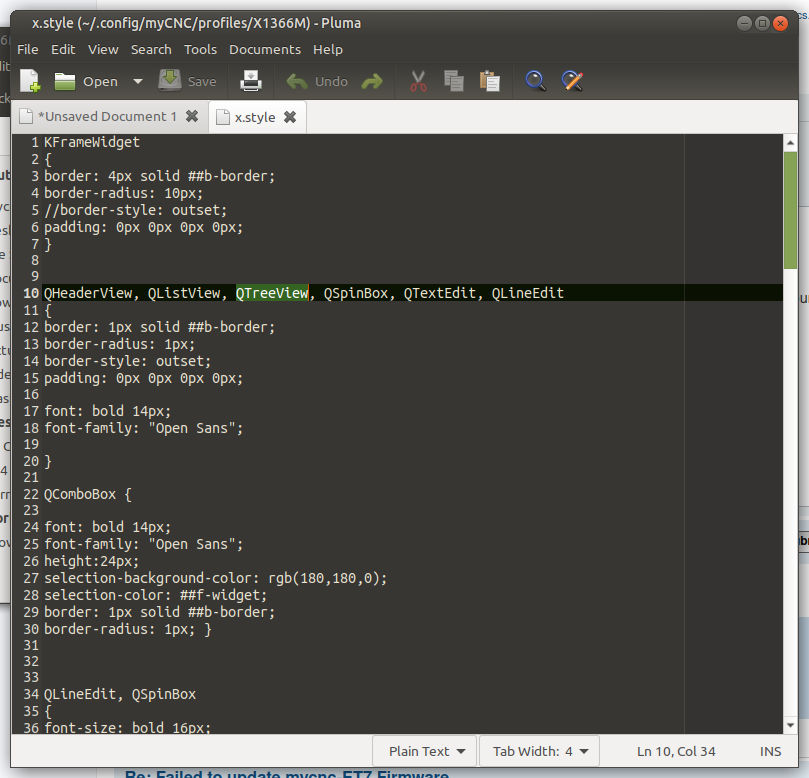
2) Locate the QTreeView entries that deal with font sizes (there should be one at the beginning of the file) and remove “QTreeView” from the line it's currently in (usually located with QTextEdit and QLineEdit entries).
Note: on certain profiles (such as the plasma cutting series) you will have to edit the two first instances of QTreeView in the code instead. Do not delete the QTreeView lines that deal with background color:
3) Add the following block of code for QTreeView instead:
QTreeView
{
border: 1px solid ##b-border;
border-radius: 1px;
border-style: outset;
padding: 0px 0px 0px 0px;

font: bold 14px;
font-family: "Open Sans";
}
In the code above you can edit the font line to have the font size you need (instead of 14px).
4) Save the x.style file and reload the myCNC application. The changes should now take effect:
Editing the font (instead of the font size) can be done in a similar manner.

